Test Preparations
Bring-up and First Test Setup
Requirements
For testing the implementation you need one of the following hardware the APP can run:
| Android | iOS | MacOs | Windows | |
|---|---|---|---|---|
| Minimum SDK | Android 10.0 (Api-Level-29) | 12.1 | 10.0.17763.0 | |
| Target SDK | Android 12.0 (Api-Level-32) | – | 10.0.19041.0 | |
| Bluetooth MTU MIN: 230 BYTES | Bluetooth 4.2 REQUIRED | Bluetooth 4.2 REQUIRED | Bluetooth 4.2 REQUIRED | Bluetooth 4.2 REQUIRED |
| NFC | OPTIONAL | OPTIONAL | – | – |
For testing purposes, use our Vision Control app. You have the option of using iOS, Android, or Windows platforms, allowing you the flexibility to choose between a PC, laptop, tablet, or phone – use whichever device suits you best. Additionally, there’s no issue with testing specific features on one device and switching to another during the process.
- Install the following application from one of the possible ways:
- Windows:
- Windows Store: https://apps.microsoft.com/detail/9PN2FRZHH142
Go to Windows Store
- Windows Store: https://apps.microsoft.com/detail/9PN2FRZHH142
- Android:
- Google Play Store: https://play.google.com/store/apps/details?id=de.kkt.Vision
Go to Google Play Store - Huawei Galery: https://appgallery.huawei.com/#/app/C114471795
Go to Huawei Galery - Vision Server: https://server.kk-t.eu/api/v1/Tools/Install?tool=VisionAndroid
- Google Play Store: https://play.google.com/store/apps/details?id=de.kkt.Vision
- iOS / MacOs:
- Apple App Store: https://apps.apple.com/app/vision-control/id6467643102
Go to Apple App Store
- Apple App Store: https://apps.apple.com/app/vision-control/id6467643102
- Windows:
- Make sure the fixture is turned on.
- Make sure the Vision Controller is flashed with firmware. If not, you can download the newest bootloader here. Make sure you choose the correct bootloader for your application (If you have a preconfigured fixture from us or the bootloader is already flashed you can skip this step):
- Fanstel BT840 (nrf52840) :
https://server.kk-t.eu/api/v1/share/File?file=IQCONTROLLER_VISION_SPI_FBT840_BL1_2_1_SD_7_3_0.hex - Wuerth Orphelia III /Proteus III (nrf52840) :
https://server.kk-t.eu/api/v1/share/File?file=IQCONTROLLER_VISION_SPI_WOIII_BL1_2_1_SD_7_3_0.hex - Fanstel BC833 (nrf52833) :
https://server.kk-t.eu/api/v1/share/File?file=IQCONTROLLER_VISION_SPI_FBC833_BL1_2_1_SD_7_3_0.hex - Abluetech PTR9818 (nrf52840) :
https://server.kk-t.eu/api/v1/share/File?file=IQCONTROLLER_VISION_SPI_FBT840_BL1_2_1_SD_7_3_0.hex - Abluetech PTR9813/PTR9813+ (nrf52833) :
https://server.kk-t.eu/api/v1/share/File?file=IQCONTROLLER_VISION_SPI_FBC833_BL1_2_1_SD_7_3_0.hex
- Fanstel BT840 (nrf52840) :
- Scan for your fixture in the Vision Control App:
- Open the Vision Control App and make sure you have a working internet connection
- Login with an already existing account or register a new account
- A prepare wizard will open the first time you use the app. Enable your Bluetooth & Location services there. If you accept Bluetooth & Location services it should work out of the box. If an error occurs please inform yourself how to do this on your specific platform. A list of supported and tested devices can be found here: https://iqservice.glp.de/index/SupportedDevices
- Your app will open the Discover page:
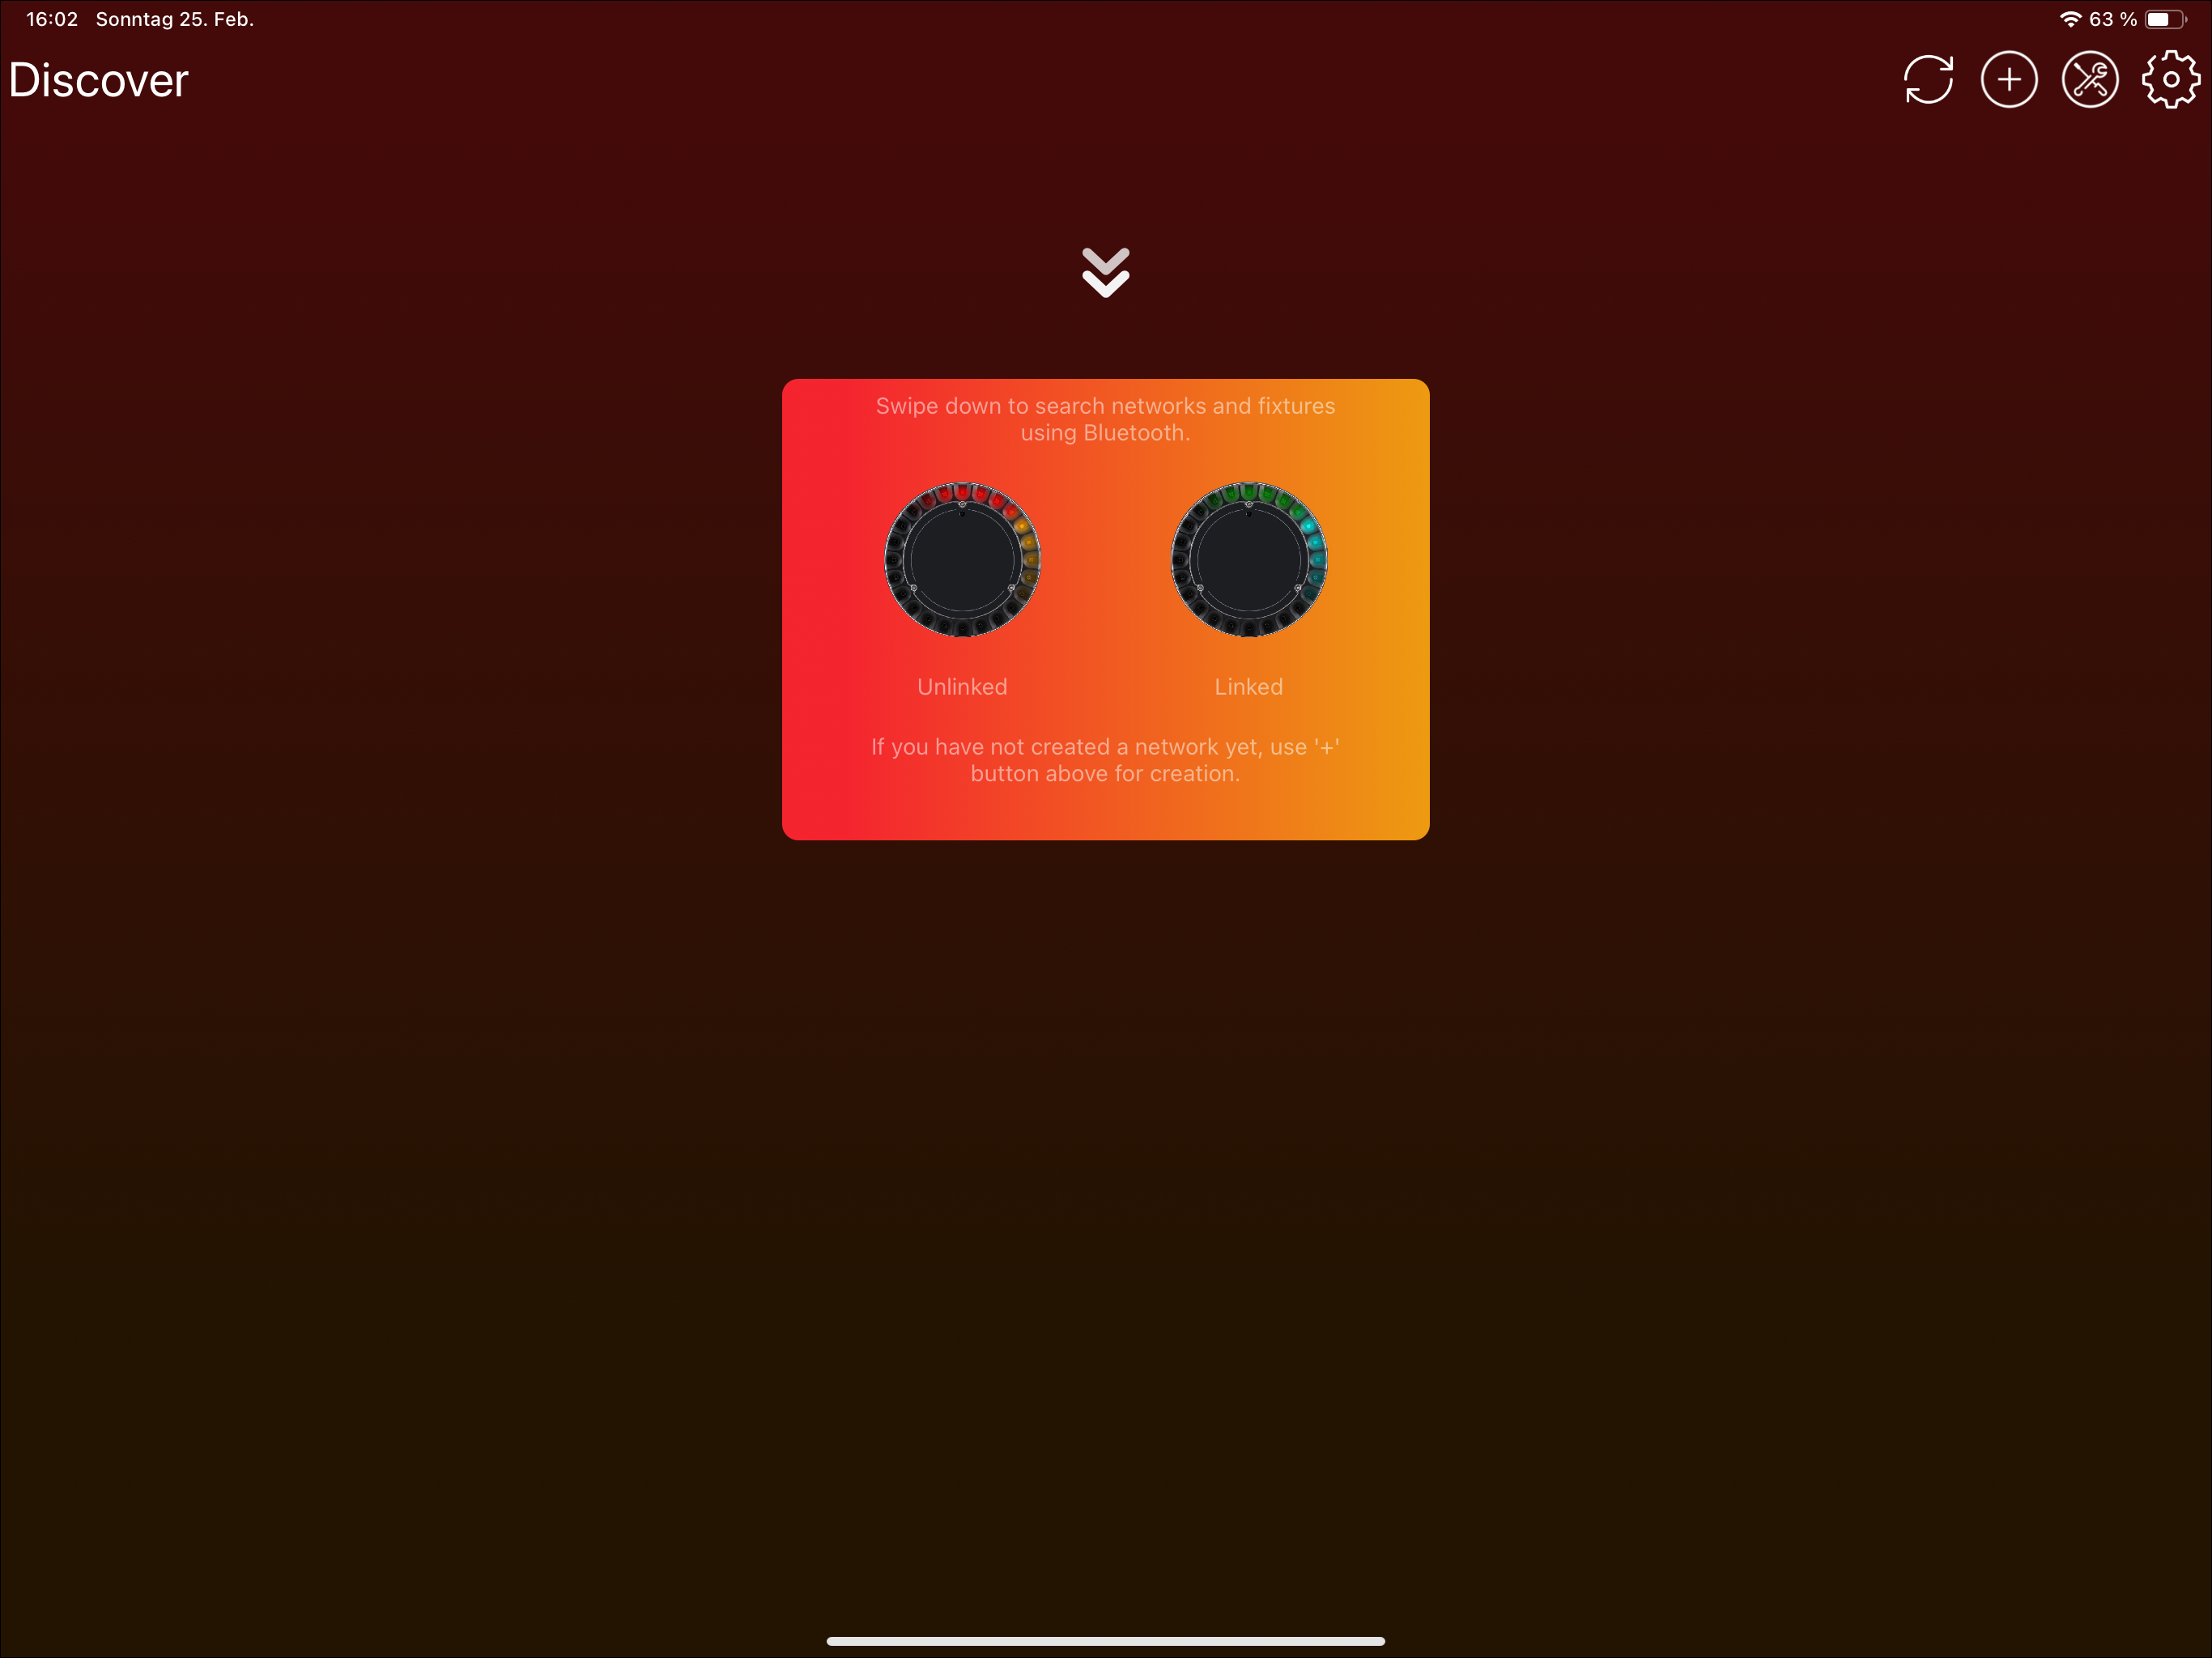
- Trigger a Bluetooth scan. A Bluetooth scan can be triggered in two ways depending on your device:

- Tablets: Use either the refresh icon or swipe down:


- Windows: Using the refresh Icon in the top:

- Phones: Swipe down as the icon indicates:

- Tablets: Use either the refresh icon or swipe down:
- Now your device searches for available fixtures using Bluetooth
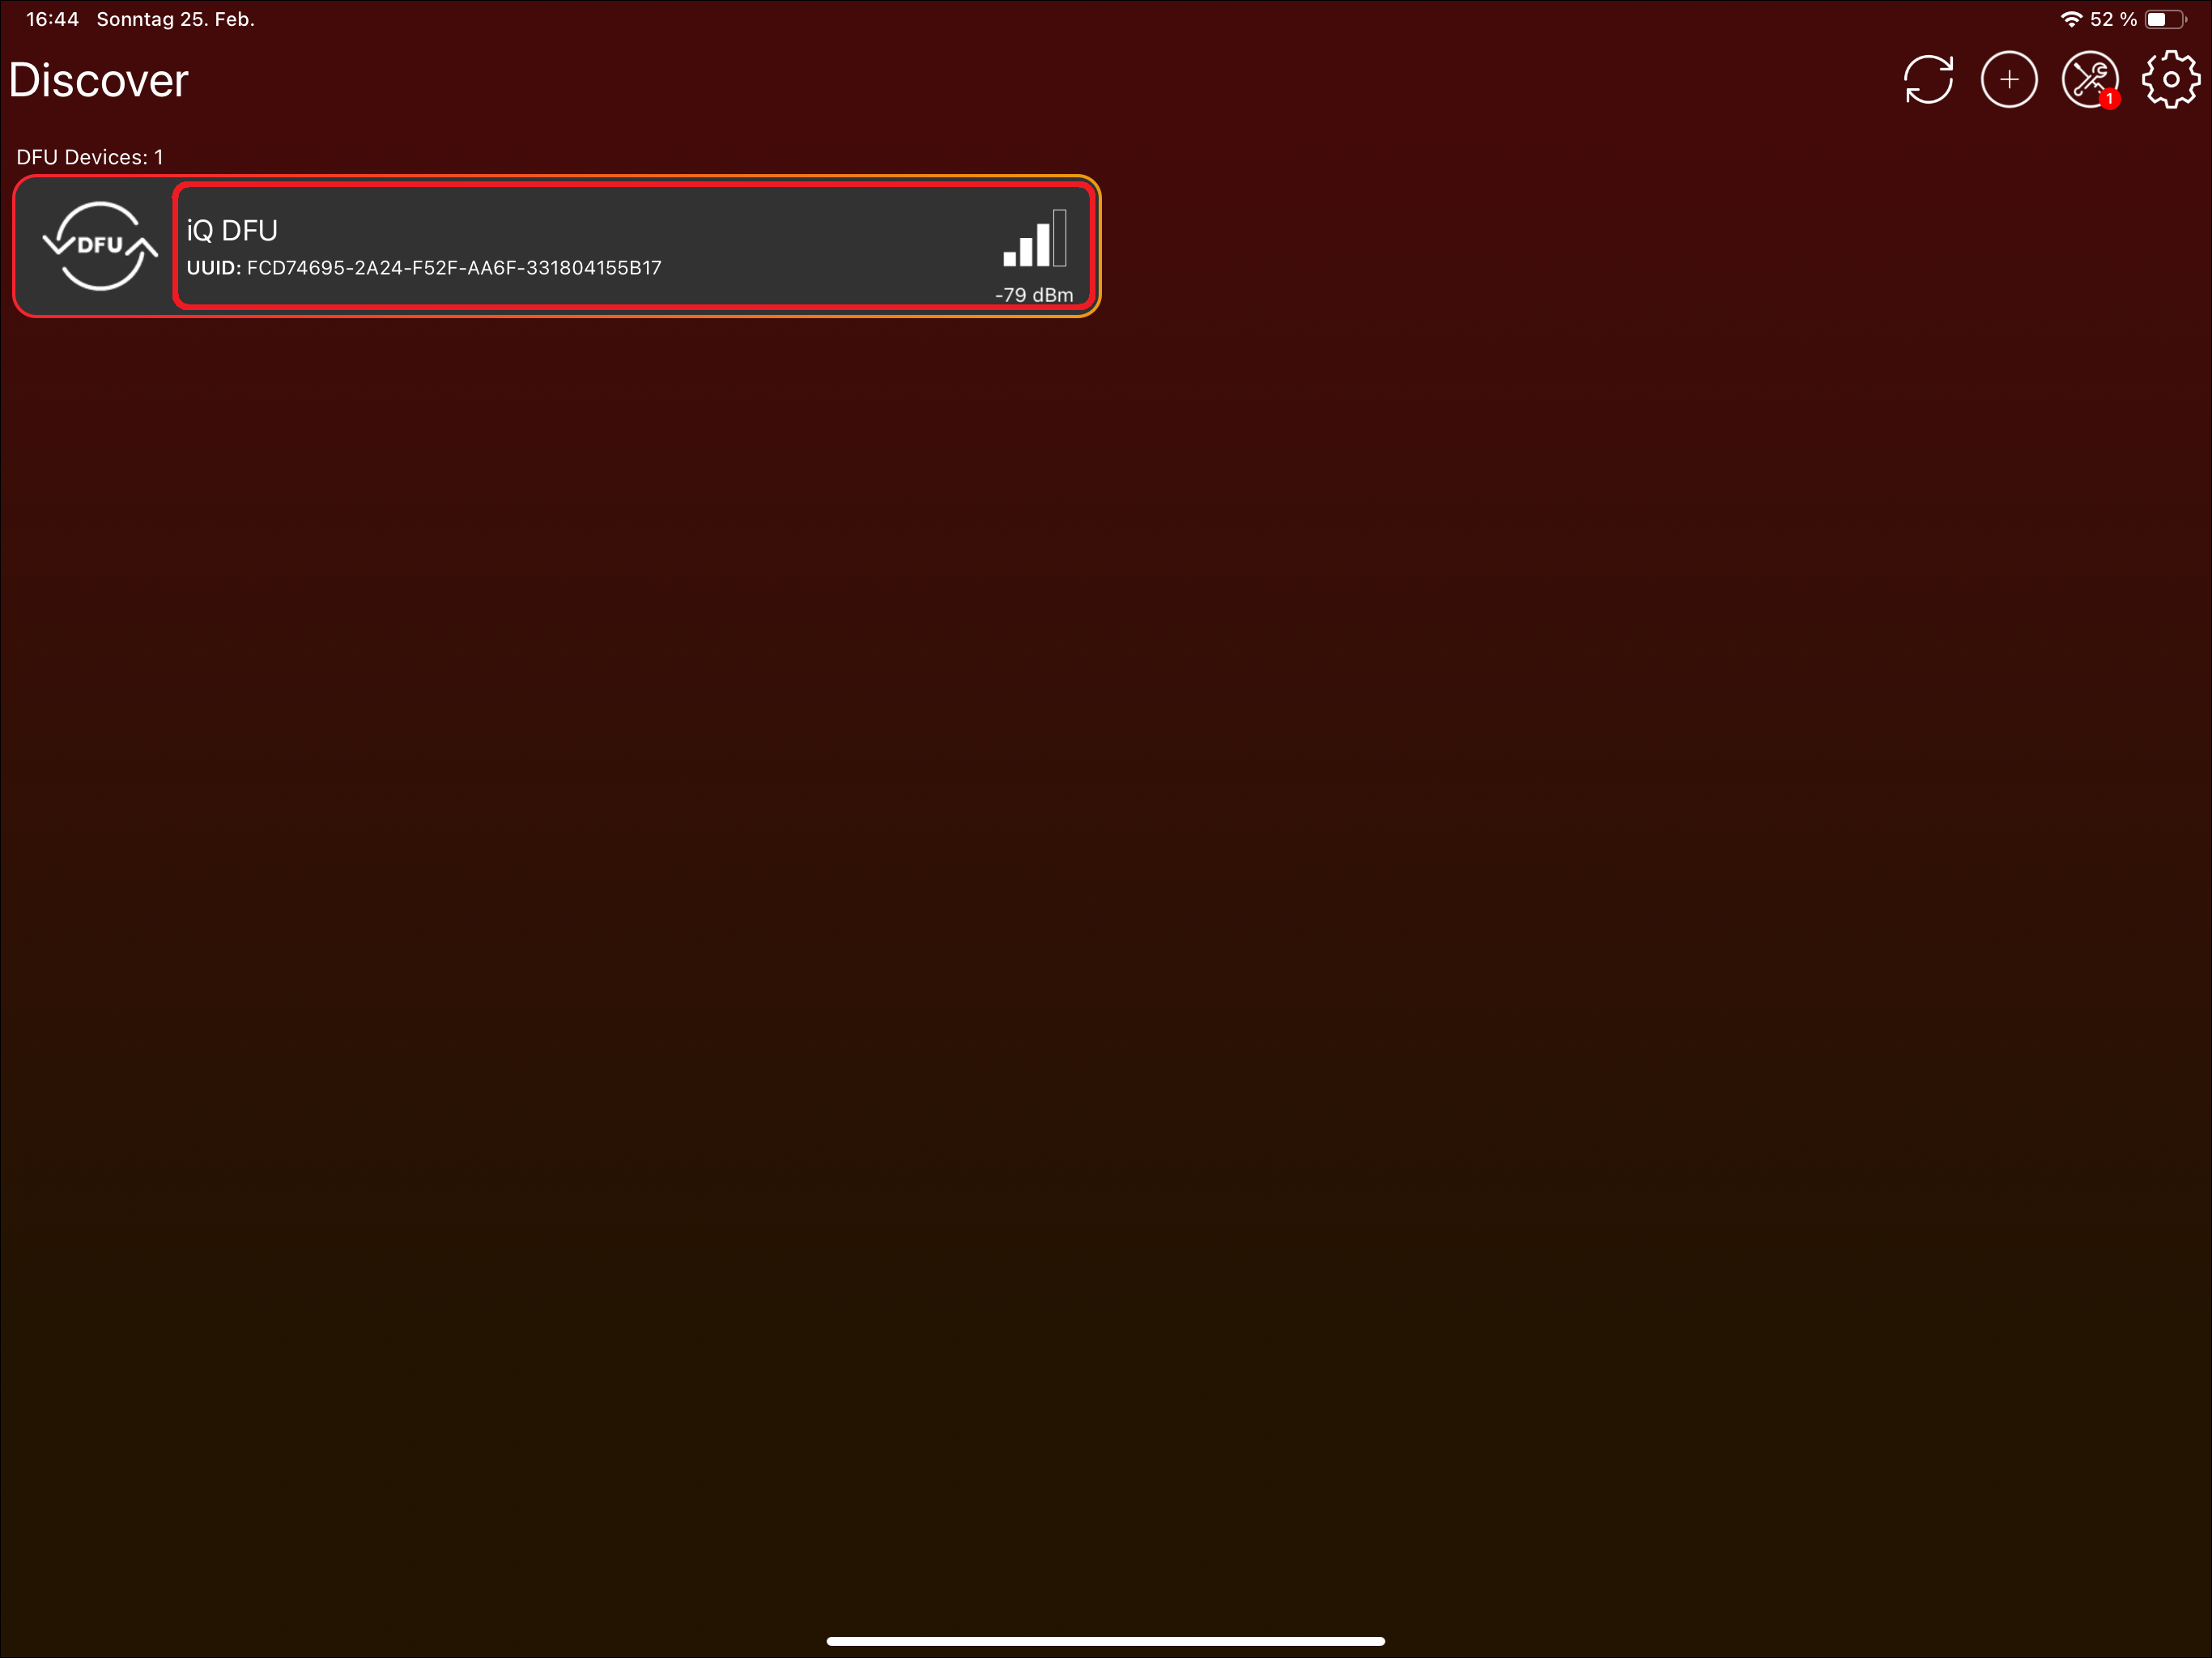
- If you have flashed the bootloader, or the bootloader was already flashed on the Vision module, install the newest Vision firmware using the Vision Control app. If you have a preconfigured fixture from us, skip this step:
- Press on the "Vision Bootloader" fixture. Do not click the DFU icon; it only selects or deselects the fixture and is not needed for this step.
- The application will ask you to update the Vision firmware. You can update to the newest available version by clicking „Update“:
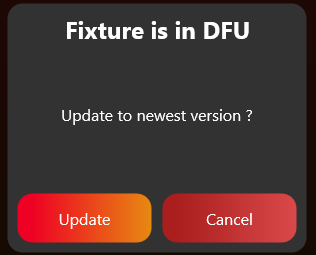
- If connection issues occur, reduce the MTU size in App Settings (the gear on top) -> Connection Settings. This is especially helpful for Windows.
- Press on the "Vision Bootloader" fixture. Do not click the DFU icon; it only selects or deselects the fixture and is not needed for this step.
- Check whether the fixture can already be discovered.
- During the first bring-up, the fixture may not be visible immediately if the communication is not working yet.
- If you are testing our example board, turn it on first. It should then be discoverable in the app.
- Set the application to "Test Mode" using the following procedure. This allows you to use and see development fixtures that are not registered yet. If Test Mode is not enabled, only released products can be found and used.
-
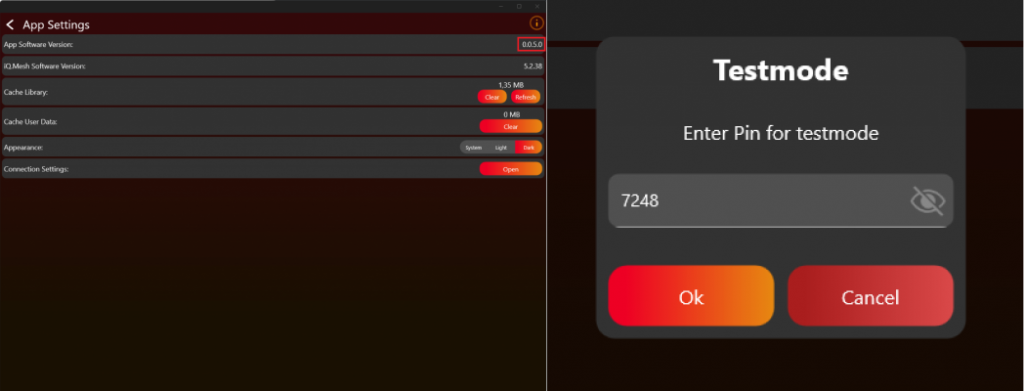
Go to „Settings“ by clicking on the gear in the top:
- Click on App Settings:
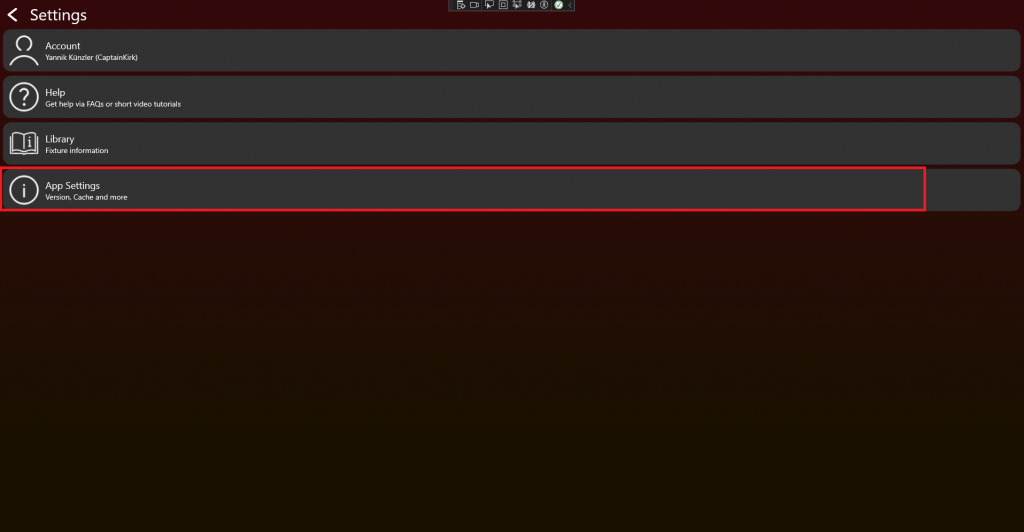
- Tab on the App Software Version label (0.0.5.0) two times. After that a prompt shows up. Type in the PIN "7248". Then the Test Mode will be activated.
-
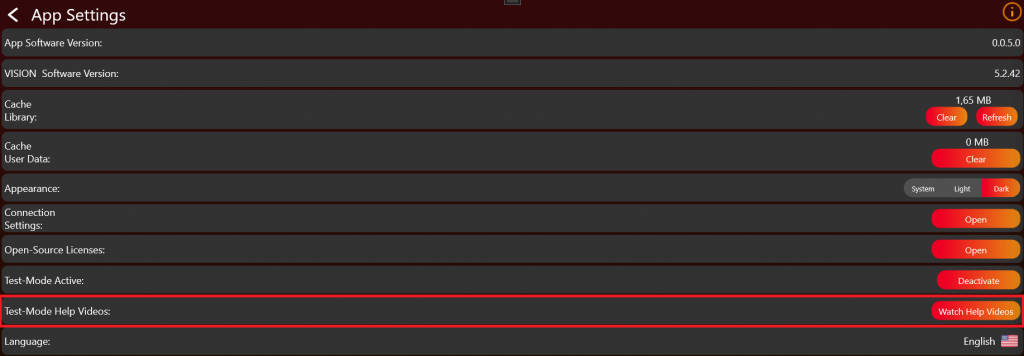
After successfully enabling the Test Mode, additional help videos will be available. These videos can assist you in better understanding the testing process. Click on „Watch Help Videos“ to see them:
- Go back to the "Discover" page and scan for your fixture.
-
Go to „Settings“ by clicking on the gear in the top:
- Check that the signal LED of the Vision Controller lights up during startup. This only happens after the controller has received the firmware through the app. Also make sure the correct bootloader is flashed on the main module.
- It lights up for 5 seconds every time the controller starts. It does not light up if the controller is either still in Sleep Mode or the wrong firmware is flashed.
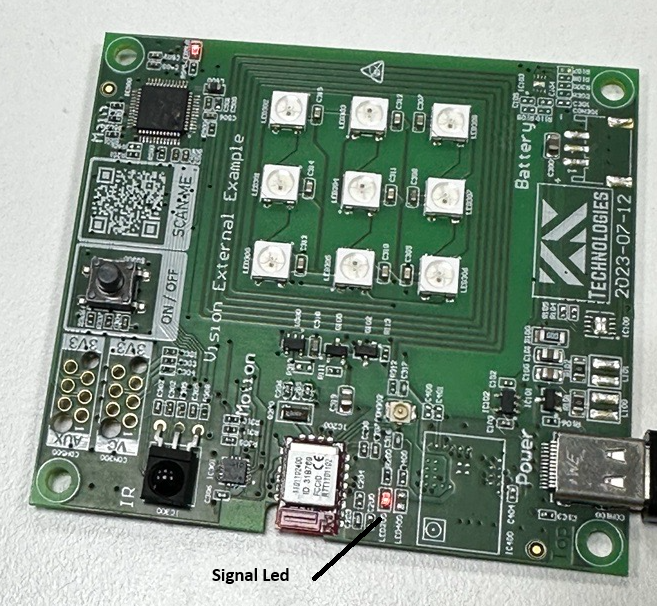
- Make sure the correct bootloader for main module is flashed and your schematic is right.
- Make sure the Vision Controller is in normal operation. Therefore make sure the „FIXTURE_IS_ON“ Pin is set to high. You can find more information in the documentation under System.
- Another issue can be the 32.768khz Crystal. Make sure it is connected and working. Bootloader works without but firmware needs the crystal.
- It lights up for 5 seconds every time the controller starts. It does not light up if the controller is either still in Sleep Mode or the wrong firmware is flashed.
- If your implementation already works make sure you set your input source to "Vision Protocol". Using the RDM Vision command the controller recognizes the input source and will advertise itself using Bluetooth. The Vision Controller only advertises itself when input source is Vision Protocol.
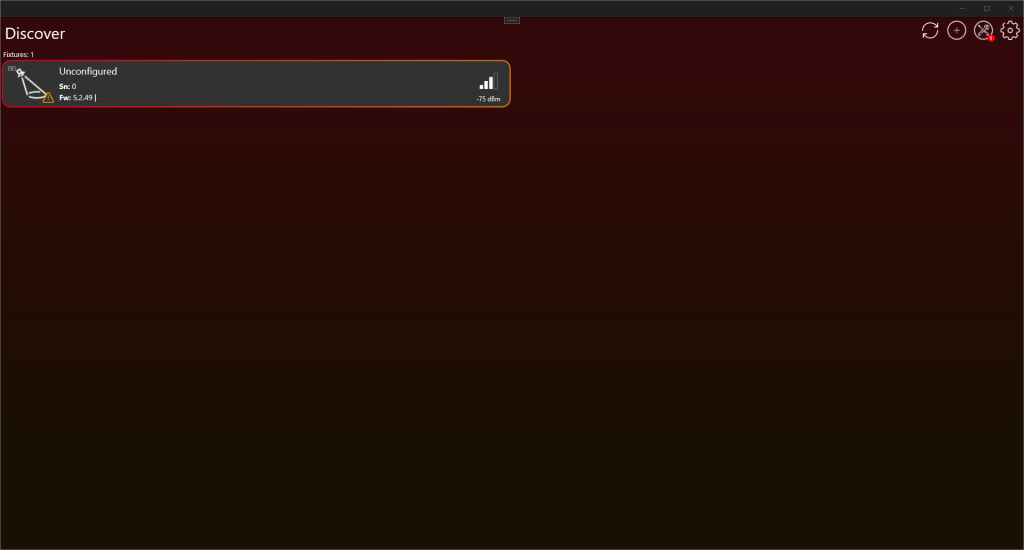
- After scanning, a fixture should be available like this:
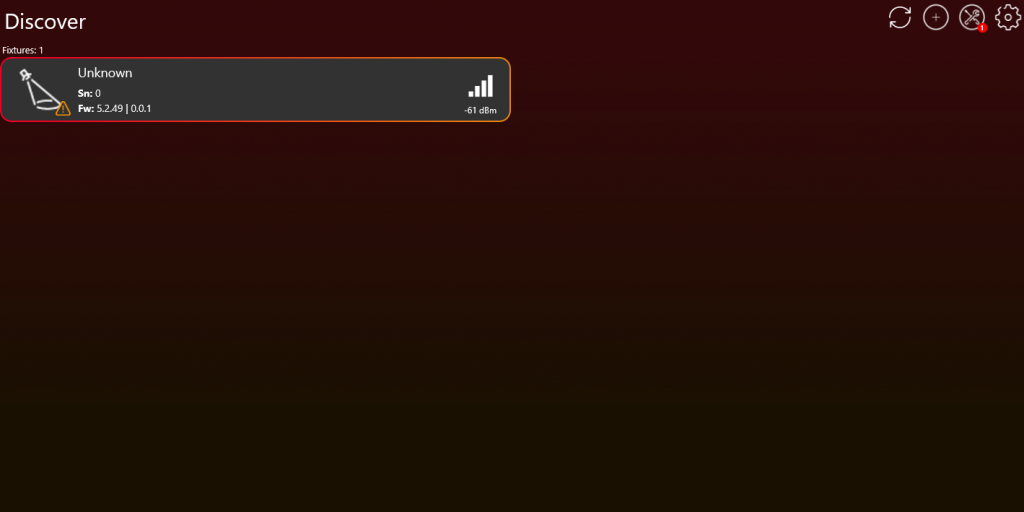
- If the fixture is not available make sure you answer the RDM Vision command correctly. You can find more information in the documentation under Vision RDM -> PIDs -> Command.
- If the fixture is shown as „Unconfigured“, either the communication interface is not working, or you do not answer the Vision RDM Command correctly. It is also important that Checksum of the Vision RDM command is correct. If you want you can still go on to the next point checking were exactly is the issue.
- After scanning, a fixture should be available like this:
- If this is still the first implementation test, verify the communication before continuing.
- Make sure the SPI communication is working. If you are using the SPI Library, check the last step in the SPI Library chapter to verify that it works as expected: https://server.kk-t.eu/ExternalVision/SPIInterfaceVision
- The main communication uses RDM through the Vision RDM Command. Check whether the Vision GET command is received periodically.
- Make sure all required information is answered correctly.
- After these checks, verify that the Bluetooth advertising signal of your fixture has good quality.
- If you did not discover any fixture make sure your Bluetooth module is available.
- If you have access to a Sample Board, compare the signal strength of your fixture’s Bluetooth advertising with that of the Sample Board. The signal quality of your fixture should not significantly degrade compared to the Sample Board.
- If you don’t have a Sample Board for comparison, ensure the Bluetooth advertising signal quality remains above -60dBm, at a distance of 20cm from your fixture. This threshold represents a very broad minimum standard for signal strength.
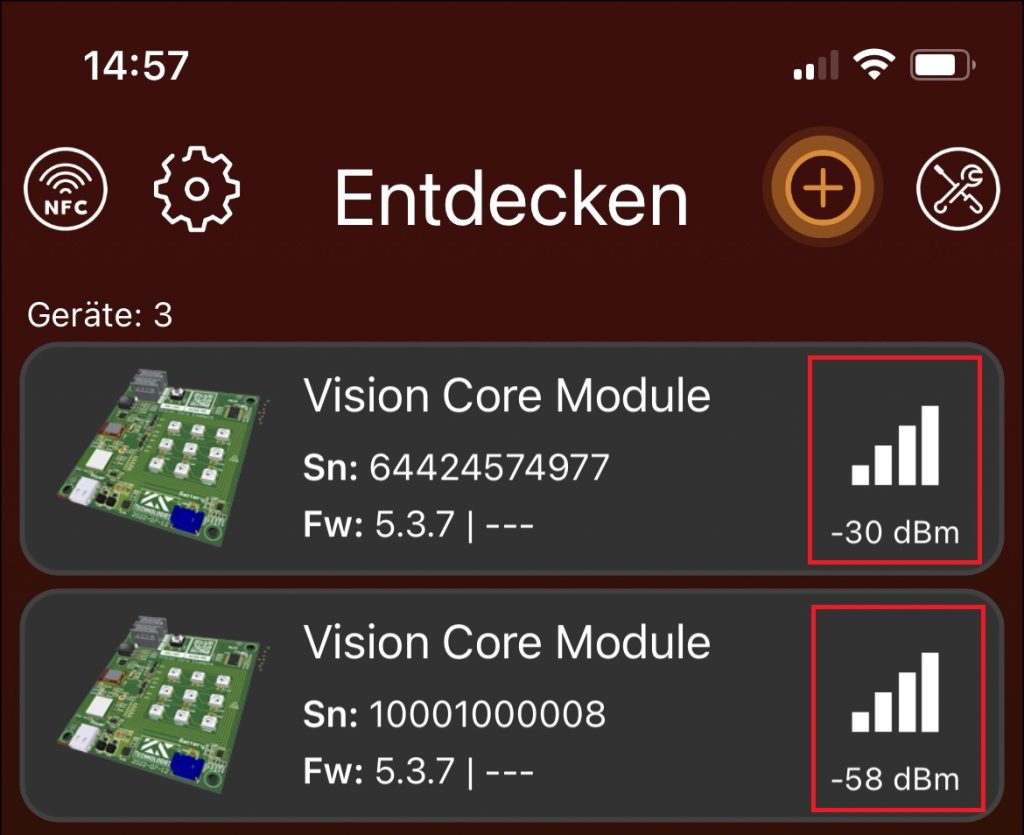
Bluetooth signal quality
- Now pressing on the fixture to connect your device with the fixture. Do not click on the Icon, there you can select and deselect the fixture but we do not need this function currently.
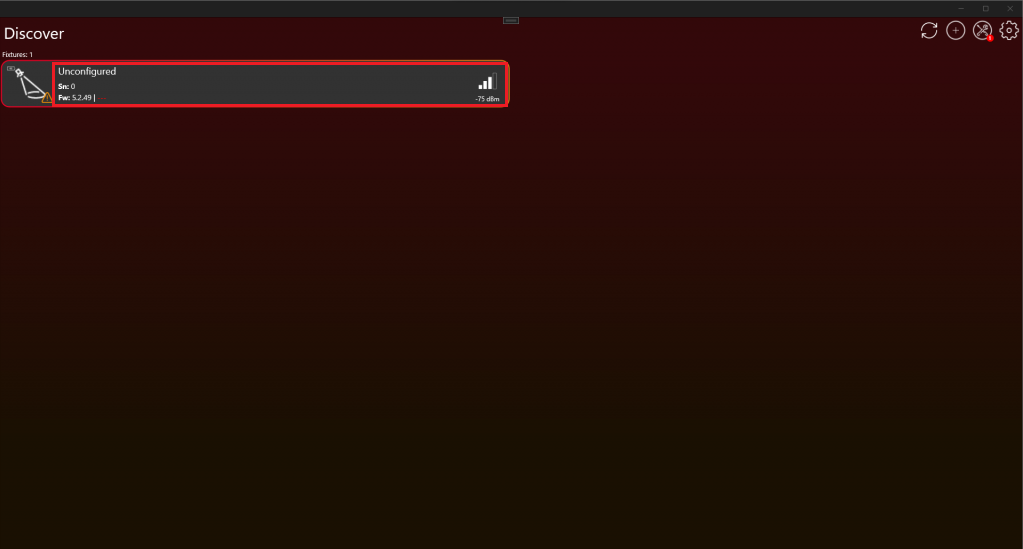
- After your device is connected to the fixture it should look like this. Now you are ready to test!
Now you can manually test all the functions needed for the product. When you think all the functions are working as expected, start creating the App Control Configuration for controlling the fixture through App Control:
https://server.kk-t.eu/ExternalVision/TestCreative
After that, test your product using the certification tool. Here all functions will be tested step by step:
https://server.kk-t.eu/ExternalVision/TestTestVerify