




Project Artery IC
Artery Custom Firmware Example
This chapter shows the complete path from an AT32 hardware project to a Vision-compatible fixture firmware. Start with VisionExternalExamples/Examples/VisionExternalExample. The supplied reference uses an AT32F415RCT7 and already contains working Keil Application and Bootloader project structures.
1. Understand what must be copied
The new example has three clearly separated layers:
- Fixture: product behavior. This is where personalities, product RDM, LED mapping, optional sensors, and menu pages are changed.
- Hardware: one folder for one exact PCB and MCU. It contains the peripheral adapters that call the generated AT32 driver code.
- Framework: generic system, input arbitration, RDM basics, storage, battery, display, and DFU behavior. Keep this unchanged for a normal product.
If the product uses the reference AT32F415RCT7 circuit, open the supplied projects and skip directly to section 8. If the MCU or pinout changes, perform the hardware-generation steps below and create a new Hardware variant.
For every Fixture or Hardware interface, first check whether a finished file in VisionExternalExamples/Examples already behaves like the new product. Copy and adapt that finished .c file when it is a close match. Otherwise copy the complete pseudo implementation with the same name from VisionExternalExamples/Template. Never compile a Template file in place and never copy the stable header from Framework/Interfaces.
2. Create the AT32 projects
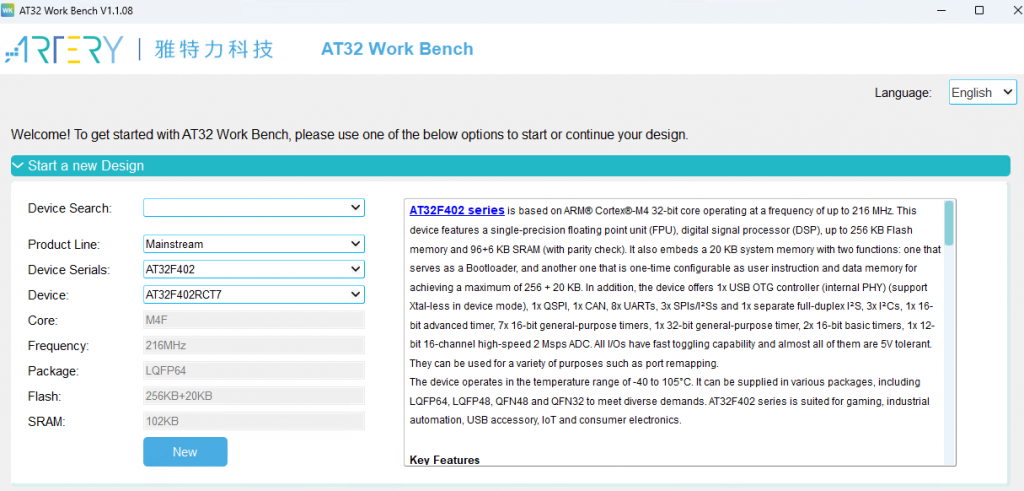
- Install AT32 Work Bench and the Keil Device Pack for the selected MCU.
- Create one generated project for the Application and one for the Bootloader. Use the exact MCU part number in both names.
- Keep generated startup, clock, interrupt, GPIO, DMA, and SPI files inside each IDE project. Do not place generated files in Fixture or Framework.
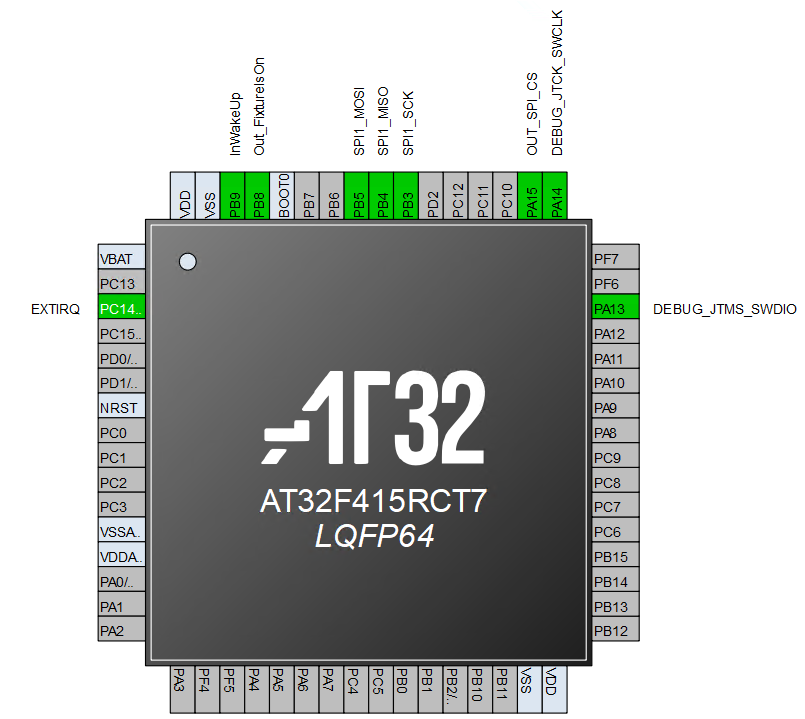
3. Configure the Vision pins
Use the names below in the generated configuration. The physical pins come from the product schematic:
- IRQ: GPIO external interrupt input, triggered on both edges.
- Fixture Is On: GPIO output. It reports that the fixture is on and reachable; it does not switch fixture power.
- Main Wake Up: GPIO input from Vision. It can wake the main MCU from its low-power state.
- SPI CS: GPIO output controlled by the main MCU.
- SPI SCK: SPI clock output from the main MCU.
- SPI MISO and MOSI: full-duplex SPI data pins.
4. Configure timebase and IRQ
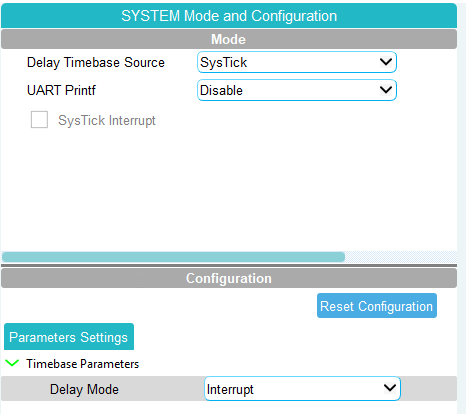
Enable SysTick in interrupt mode. The Framework receives a monotonically increasing millisecond value through SystemTask().
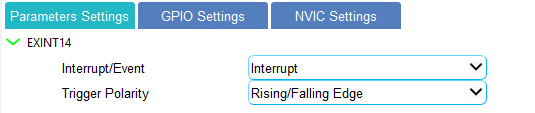
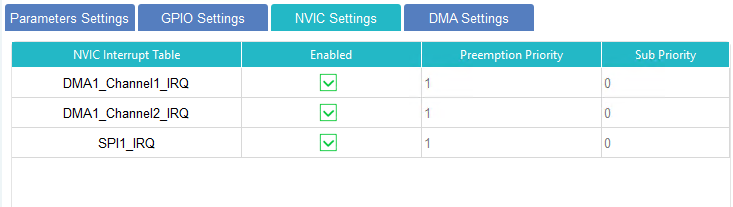
Configure the Vision IRQ as an external interrupt on both edges and enable its interrupt. Give it the highest practical priority. In the reference configuration it uses priority 0.

5. Configure SPI and DMA
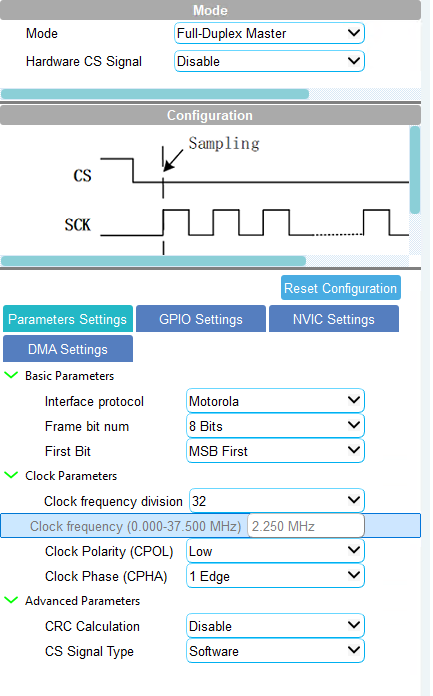
Configure the SPI peripheral as follows:
- Full-duplex master
- 8-bit data, MSB first
- Motorola frame format
- CPOL Low and first-edge sampling
- Software-controlled chip select
- A moderate clock frequency within the limits stated in the Vision SPI documentation
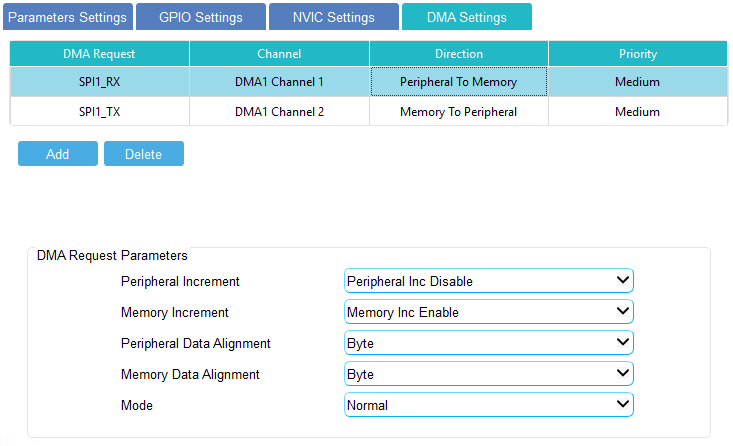
Use one DMA channel for SPI RX and one for SPI TX. Enable both DMA interrupts. Keep SPI and DMA at a lower priority than the Vision IRQ; the reference uses priority 1.
Reserve a static, DMA-compatible RX buffer for at least 520 bytes, matching HW_VISION_MAX_TRANSFER_LENGTH. If the selected DMA controller cannot transmit directly from the Vision library buffer, reserve a static TX buffer of the same size and copy the requested bytes before starting DMA. Never use a local stack buffer because the transfer finishes asynchronously. Store the requested length and pass exactly that many received bytes to the completion callback.
6. Generate the vendor code
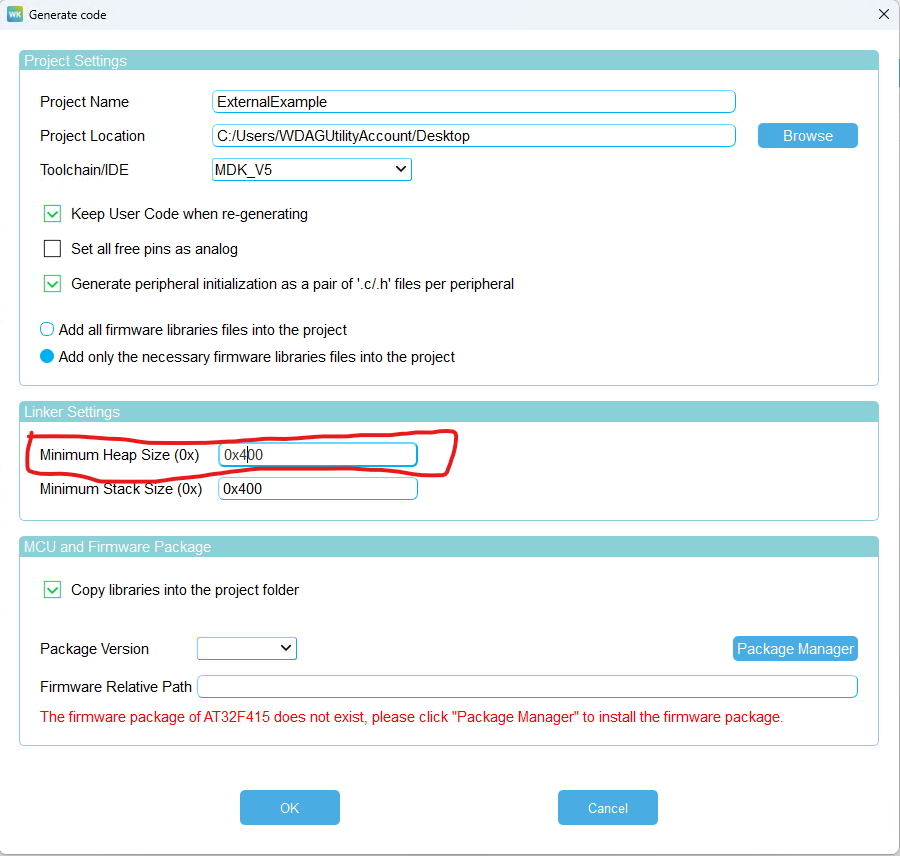
Select the required Keil toolchain and generate the code. The current Vision SPI library uses static allocation by default, so it does not require a larger heap. Set at least 0x400 heap only if VISION_USE_STATIC_ALLOCATION is deliberately removed to use dynamic allocation. Keep user code in the generated user sections so the project can be regenerated later.
7. Forward the generated interrupts
The generated interrupt handlers must call the Hardware variant callbacks. Use the supplied AT32 project as the exact reference instead of copying callback code from an older project:
- SPI RX DMA complete calls
SPI_DMA_RxTransferCompleteCallback(). - SPI TX DMA complete calls
SPI_DMA_TxTransferCompleteCallback(). - The Vision IRQ handler calls
EXINT_IrqLineCallback()on both edges. - DMA or SPI errors must end the active transfer and call the Hardware error callback.



8. Add the generated project to VisionExternalExample
Create these project directories. Replace the MCU part number when another controller is used:
Projects/Keil/
  VisionExternalExample_AT32F415RCT7_Application/
    Inc/              generated headers
    Src/              generated source and main.c
    Libraries/        AT32 driver and CMSIS files
    MDK-ARM/          Keil project
  VisionExternalExample_AT32F415RCT7_Bootloader/
    Inc/
    Src/
    Libraries/
    MDK-ARM/
Create Hardware/<BoardName>_<ExactMcuPartNumber>/Inc and Src. Copy Template/Hardware/Inc/hw_defines.h into the new Inc folder and replace every mandatory Flash and MCU placeholder. Do not copy Hardware interface headers.
Read the stable contracts in Framework/Interfaces/Hardware. Copy only the required hw_*.c templates from Template/Hardware into the new Src folder, then replace their marked pseudo operations with the AT32 peripheral code. Disabled features have no local Hardware source file.
9. Configure the Keil groups and paths
The Application project must compile the generated sources plus these groups:
Framework: every Framework source used by the ApplicationFixture: the selected example's Fixture sourcesHardware: exactly one Hardware variantLibSPI,LibRDM,LibButton, and optional Runtime sourcesLibColorConverter: onlylibColorConverter.hand the precompiled ARMCLANG library matching the MCU; never add the ColorConverter sourcesLibManagedFlashandLibManagedFlashSector: show both libraries as reference-only groups; the Framework adapter compiles the implementation selected infixture_defines.h
The Bootloader project needs generated sources, Framework/Src/dfu_update.c, the shared DFU configuration/file helpers, Vision SPI, RDM, and the Hardware sources required by the selected DFU transport. Add Framework/Inc, Framework/Interfaces, the Fixture configuration path, and the selected Hardware configuration path. Do not copy shared files into the IDE project directory; reference their shared paths.
Manually add every active local Fixture and Hardware .c file to every Keil Target that uses it. Configure the compiler to pre-include fixture_defines.h in each Target. Do not recreate product settings as Keil project constants. Keep only vendor/toolchain defines and the shared custom define BUILD_FOR_BOOTLOADER, which is used by the Application ReleaseBL and Bootloader targets.
New screenshot requested: current AT32 Keil group and include-path views. The old screenshots are intentionally not reused because they show the removed flat Application structure.
10. Connect main.c
After all generated peripheral initialization, the Application only starts and services the Framework:
#ifdef BUILD_FOR_BOOTLOADER
SCB->VTOR = HW_FLASH_APPLICATION_ADDRESS;
__DSB();
__ISB();
#endif

/* Generated clock, GPIO, DMA, SPI, EXINT and timebase initialization */
SystemInitialize();

while (1)
{
    SystemTask(wk_timebase_get());
}
The Bootloader calls DfuCheckBootReason() before peripheral initialization and DfuDownloadFlash() after initialization. Its main.c must implement every MCU callback declared by Framework/Inc/dfu_update.h:
HardwareSetMsp(): load the Application stack pointer immediately before jumping to the Application.HardwareEraseFlash(): erase the requested Application pages or sectors and returnfalseon every MCU Flash error.HardwareWriteFlash(): write the aligned update data, observe the MCU write width, and returnfalseon every MCU Flash error.HardwareVisionSetFixtureIsOn(): drive the Vision Fixture Is On output.HardwareGpioSetSignalLed(): drive the Bootloader status LED, or provide a safe no-operation implementation if the board has none.HardwareTimeMs(): return the monotonic millisecond timebase.HardwareCheckDFUPin(): returntruewhile the recovery input is held; returnfalseonly when the board genuinely has no recovery input.
A recovery button or test pad is strongly recommended. Holding it during reset must keep the device in the Bootloader even when the Application is invalid. When Vision DFU is enabled, the completed SPI transfer calls DfuVisionSpiTxRxComplete() with the received bytes and both Vision IRQ edges call DfuVisionIrqPinIrq() with the current pin level. These callbacks only access the MCU or forward events; do not copy DFU state handling out of Framework/Src/dfu_update.c.
11. Implement the Hardware variant
hw_vision.c: chip select, IRQ state, DMA transfer, completion/error callbacks, and Fixture Is On.hw_flash.c: aligned Flash erase and write.hw_system.c: millisecond time, reset, sleep, wake input, status LED, and MCU unique ID.hw_led.c,hw_power_button.c,hw_display.c,hw_battery.c, and input adapters: implement only when the corresponding feature is enabled.
The matching files in Template/Hardware are complete, buildable pseudo implementations. Keep a feature at 0 until its copied implementation controls the real hardware. Do not add unused template files to the Hardware variant or IDE project.
The mandatory Hardware files are hw_flash.c and hw_system.c. Add hw_vision.c, hw_led.c, hw_power_button.c, hw_display.c, hw_battery.c, hw_sensors.c, hw_wired_dmx.c, or hw_wireless_dmx.c only when their matching feature is enabled. Wired DMX Hardware is also required when DFU through the Vision DMX Adapter is enabled.
12. Set Flash and linker regions
Put all physical Flash values in Hardware/.../Inc/hw_defines.h. For the supplied AT32F415RCT7 example:
Bootloader:       0x08000000 - 0x08003FFF
DFU config:       0x08004000 - 0x080047FF
Application:      0x08004800 - 0x0803AFFF
Managed storage:  0x0803B000 - 0x0803FFFF
The Keil Bootloader ROM region is 0x08000000 / 0x4000. Application Debug uses the MCU Flash base. Application ReleaseBL uses 0x08004800 / 0x36800. Recalculate every value for another MCU and ensure regions do not overlap.
13. Configure the fixture
For a new fixture, copy Template/Fixture/Inc/fixture_defines.h into Fixture/Inc. First set every optional feature to 0. Replace the product identity, security key, versions, input defaults, DMX defaults, personality footprints, App footprint, LED count, color count, and power data. Add the always-required fixture_dmx_mapping.c and fixture_rdm.c. Then add optional files one at a time: fixture_led.c, fixture_color_converter_model.c, fixture_menu.c, fixture_sensors.c, fixture_variables.c plus fixture_variables_custom.h, or fixture_dfu_staging.c. Copy a close finished example implementation when available; use the Template pseudo file otherwise.
After copying an implementation, replace every pseudo operation, add the local file to every required Keil Target, build it, and only then set the matching FIXTURE_ENABLE_... value to 1. Stable declarations remain in Framework/Interfaces/Fixture and must not be copied. Do not add product settings to the Keil project. BUILD_FOR_BOOTLOADER is the only shared custom build define. The next chapter explains every important Fixture and Hardware definition in detail.
14. Build and test
- Build Bootloader, Application
Debug, and ApplicationReleaseBL. - Run
VisionExternalExamples/Tools/TestExamples.ps1to validate project references and AT32 C syntax. - Program the Bootloader and
ReleaseBLApplication on a test unit. - Verify Vision SPI communication, RDM identity, every personality and footprint, DMX reception state and timeout, Fixture Is On, Main Wake Up, reset, and a complete DFU update.
- For each additionally enabled feature, verify its real Hardware implementation before enabling the next feature. A successful syntax check does not verify pins, IRQ priorities, DMA timing, Flash erase boundaries, or RF-module behavior.
An AT32 BootloaderUpdate project is intentionally not included until an AT32-specific bootloader payload has been generated and verified.