概括
1. 理解 Vision
需要实现的内容
- 将 Vision Controller 理解为 Vision Control App 与灯具主控制器之间的无线和 App 接口。
- Vision Controller 与灯具主控制器之间使用 SPI 通信。
- 先理解 App 工作流程:搜索灯具、连接灯具、创建网络、link 灯具、控制 group 或单个 fixture。
重要规则
- Vision 以前叫 iQ 或 iQ.Mesh。旧文档、截图或旧 code package 中可能仍然保留旧名称。
- Vision 基于标准 DMX 和 RDM 概念。
- 如果灯具已经支持有线 DMX 和有线 RDM,应尽量复用同一套 DMX handling 和同一套 RDM implementation。
- 不要因为数据来自 Vision 就创建第二套独立 RDM library。
- App 使用 fixture RDM information 进行 discovery、status、warnings、errors、DMX settings、firmware versions 和客户可见控制。
- Vision Control Behavior 0 是 DMX Control,应像有线 DMX 一样工作。
- Vision Control Behavior 255 是 App Control,并对当前 frame 使用 App 专用固定默认值。
立即测试
- 写新 firmware 前,确认现有 wired DMX/RDM code 哪些可以复用。
- 确认团队理解两种正常控制行为:DMX Control 和 App Control。
- 确认没有计划添加重复 RDM stack,除非现有架构确实需要。
常见错误
- 误以为 Vision 使用另一种 RDM protocol。
- 介绍 (已内联)
- Vision Control App 概览 (已内联)
- 实现前需要准备的信息 (已内联)
- 软件概览 (已内联)
- 示例项目概览 (参考链接) - 用于理解完整示例项目。
- 逐步指南 (参考链接) - 仅作参考;本指南已经包含更新后的实现流程。
- FAQ (参考链接) - 用于补充问题,不作为主要实现路径。
亲爱的开发者:
欢迎阅读本指南。本指南用于帮助您理解我们的平台,并将其集成到您的软件中。我们准备了较为详细的文档,以便让实现过程尽可能顺利。文档内容比较多,但请不必担心;这些细节主要是为了避免误解。建议您按照文档顺序一步一步阅读和实现。如果您有任何问题,或需要进一步说明,请通过电子邮件联系我们,或联系您当地的 Vision Control Solutions GmbH 代表。
Mail: info@vision-cs.de
我们已经准备了逐步实现指南。请按照步骤仔细完成实现。
旧名称说明:本文件的早期版本以及部分旧源文件曾使用 iQ 或 iQ.Mesh 这个名称。现在该名称已更改为 Vision。面向客户的文档应使用 Vision 术语。当前 library 和面向客户的文档使用 Vision naming。较旧的 package 或截图中可能仍包含 iQMesh/iqMesh;请将它们理解为相同 Vision components 的旧名称。
如果您发现文档中有任何不清楚或不足的地方,请随时联系我们。我们很乐意提供帮助,确保您的实现过程尽可能顺利。
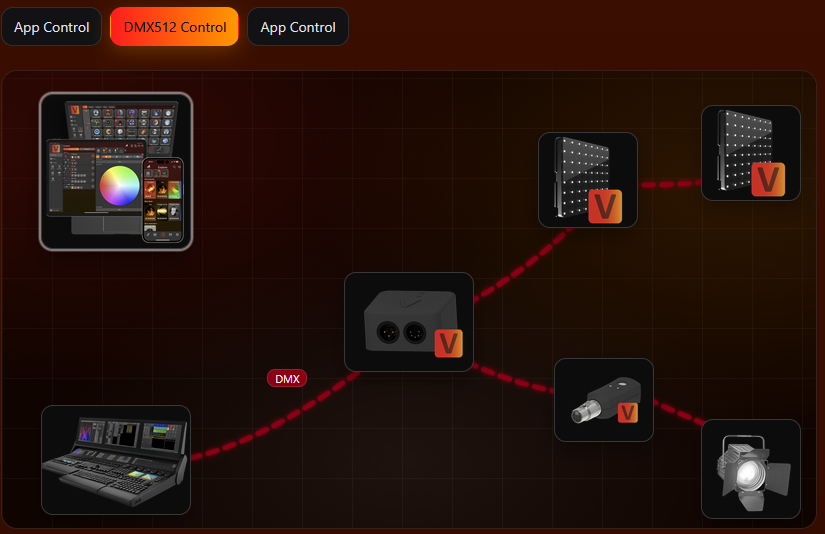
External Module
External Module 作为接口,用于实现与 Vision Control App 的通信。它通过 SPI 与灯具的主控制器连接。从功能上看,它类似于 WDMX/CRMX 模块,但与灯具内部接口的集成更紧密、更直接。
通信主要基于 RDM。基本概念是:您设计并生产自己的硬件,选择一个受支持的 Vision IC(见 Hardware -> Modules 页面,即硬件模块页面),烧录我们提供的固件,最后为该模块授权以便用于运行。
Vision 基于标准 DMX 和 RDM 概念。如果您的灯具已经支持有线 DMX 和有线 RDM,应尽可能复用相同的 DMX 处理逻辑和相同的 RDM 实现。Vision 不需要独立的第二套 RDM 协议栈。只有 App Control 会使用定义好的固定 DMX 行为,这样 App 才能以一致的方式控制同一类型的所有灯具。
Core Module
Core Module 是一个独立的灯具控制器,原生支持 Vision Control App。它可以根据灯具硬件需求进行定制,例如直接控制 LED 以及其他外设功能。
Core Module 的设计目标是仅基于一个 Vision IC 即可完成完整产品实现。流程与 External Module 相同:设计自己的硬件,选择受支持的 Vision IC,烧录我们提供的固件,并在量产使用前完成模块授权。
命名规则
Protocol Name: Vision Control
Vision Control App 概览
2_Vision_Control_App_Overview.html先理解 Vision Control App
开始固件实现之前,建议先理解客户实际如何使用 Vision Control App。即使在开发阶段启用 Test Mode 时,它看起来像一个测试工具,但它并不只是测试工具。它也是客户用于查找灯具、创建无线网络、连接灯具、读取状态信息以及控制灯具参数的用户界面。
Vision Control 官网提供 App 基本信息、下载链接、功能说明和教程视频:
https://visioncontrolapp.com/
我们也会通过微信渠道分享更多产品和工作流程信息:
VCS Vision Control Solutions GmbH
详细 App 手册包含许多截图和逐步说明:
https://visioncontrolapp.com/manual/
两种控制场景
Vision 支持两种主要控制场景。理解这两种场景很重要,因为它们解释了为什么 DMX Control 和 App Control 必须有不同的行为。
Vision DMX Control
在 DMX Control 中,灯具的行为应与有线 DMX 控制时相同。Vision 只是通过无线方式传输 DMX 数据,灯具应继续使用与有线实现相同的 DMX Personality、DMX Start Address 以及 DMX/RDM 逻辑。
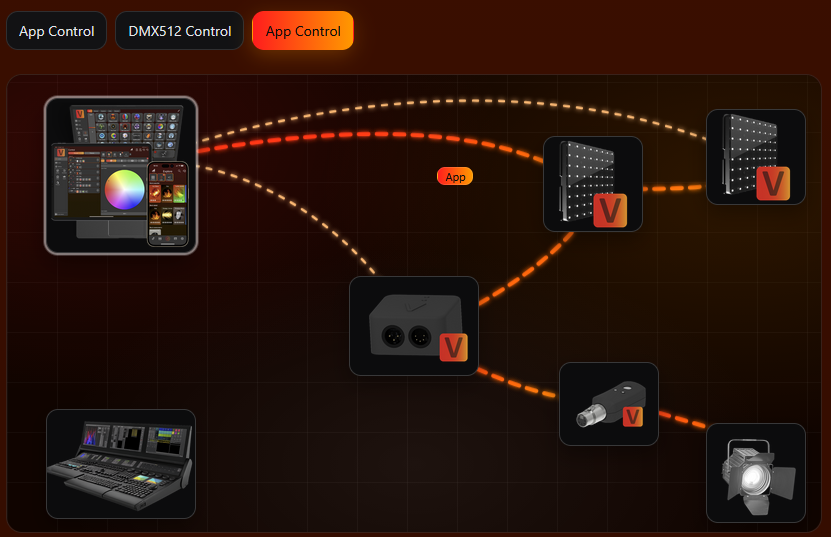
Vision App Control
在 App Control 中,App 通过 Vision 网络直接控制灯具。为了让同一类型的灯具在 App 中具有可预测的参数位置,当前 Vision frame 会使用 App Control Configuration。这不会替代灯具中通过 RDM 保存的设置。
基本 App 工作流程
- 安装并准备 App。 在 iOS、Android 或 Windows 上安装 Vision Control。首次启动时,请授予所需权限,特别是 Bluetooth 访问权限。
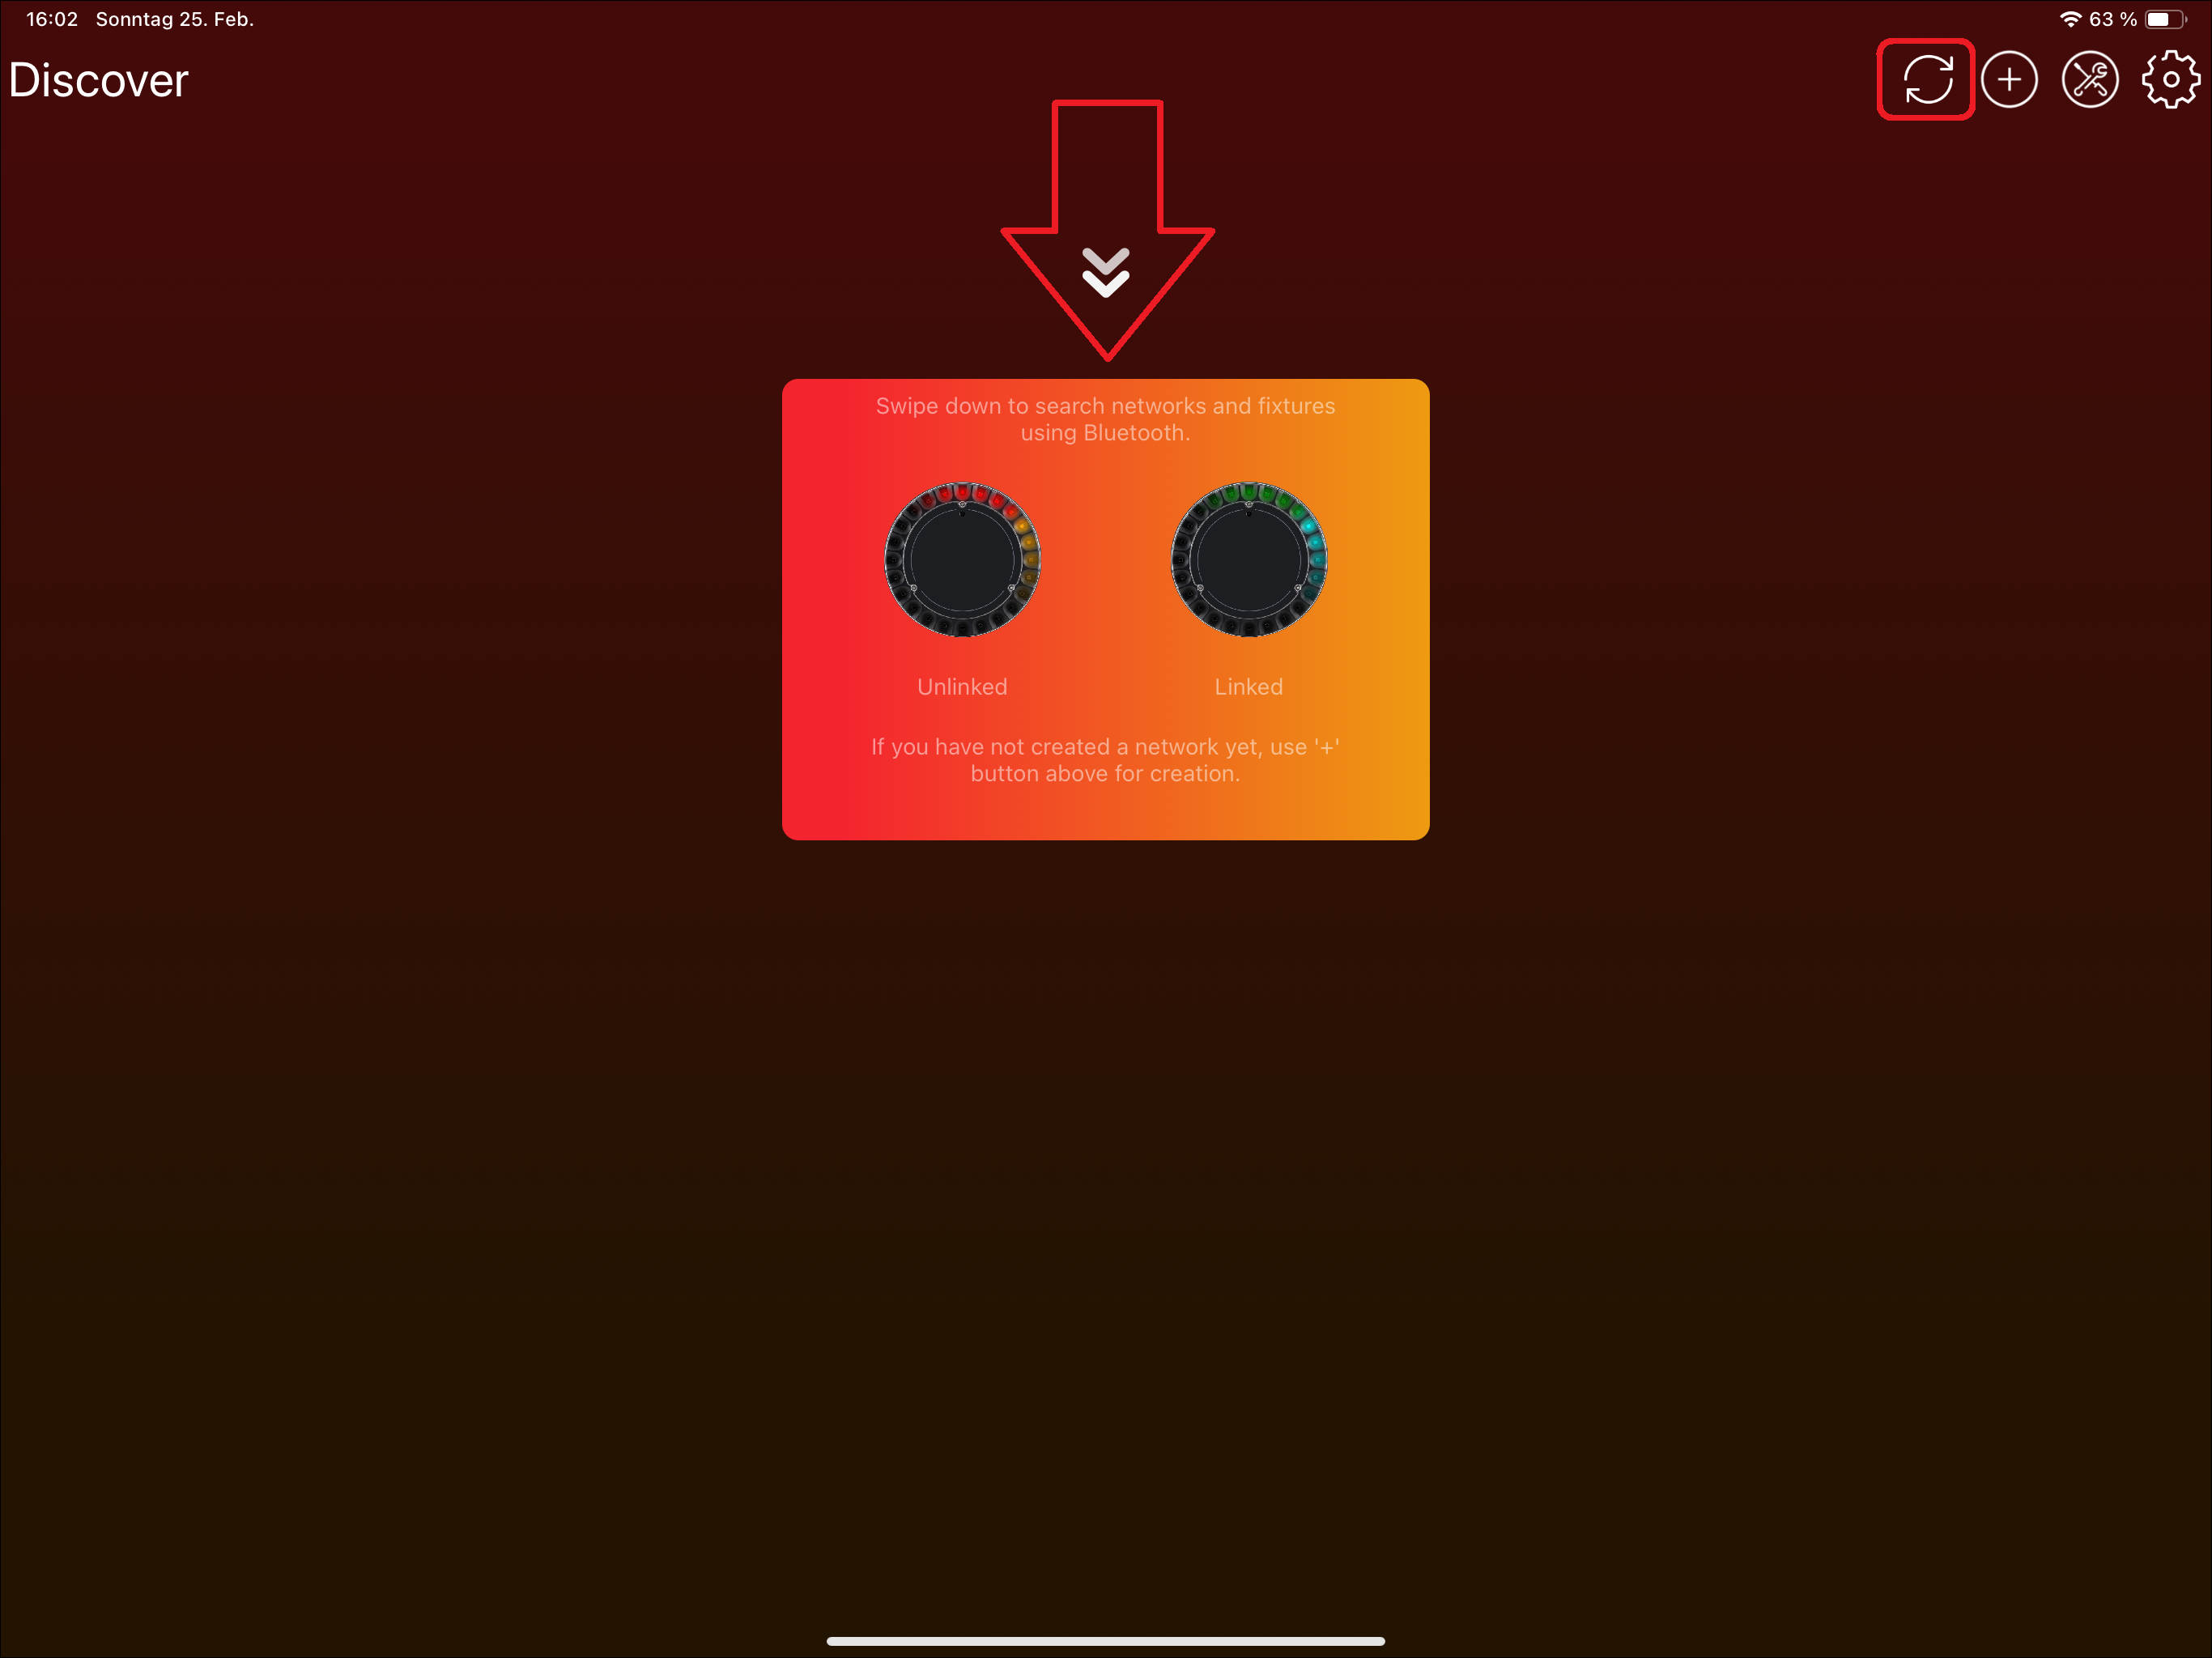
- 搜索灯具。 打开 Discover 页面。在手机上向下滑动开始扫描;在桌面端使用刷新按钮。灯具必须已上电、处于无线范围内,并且输入源配置为使用 Vision。
- 连接灯具。 点击灯具卡片进入灯具页面。灯具页面会显示重要状态信息,例如输入源、DMX 地址、DMX 模式、信号强度、固件版本、警告和错误。
- 控制灯具。 在 Lights 页面选择分组或灯具,然后在 Control 页面调整数值。App 只会显示灯具支持的组件,例如 dimmer、color、pan、tilt、zoom、projection 或 special functions。
- 使用状态和测试功能。 在开发过程中,可以使用 identify、reset、test modes、warning/error 信息、firmware update 以及 RDM 相关工具来验证灯具。
手册中的示例截图
以下截图展示了实现时最重要的几个 App 区域:搜索灯具、读取灯具信息以及控制灯具参数。完整的 App 页面和按钮说明请参考完整手册。
为什么这对实现很重要
- 客户连接或链接灯具之前,灯具必须能被发现。
- App 通过 RDM 读取灯具信息,因此 RDM 数据必须正确且易于理解。RDM 通信必须始终可用。
- 输入源必须清楚显示灯具当前由 Vision、DMX 还是其他来源控制。
- DMX Control 应复用与有线 DMX 相同的行为。
- App Control 必须使用 App Control Configuration,这样 App 才能显示并控制正确的灯具参数。
- 警告、错误、固件版本和测试功能应尽早实现,因为它们能明显简化开发和客户支持。
实现前需要准备的信息
5_Reseller_Notes.html本页总结了在以您自己公司品牌向制造商采购 Vision 兼容灯具时,需要提前考虑的关键事项。
RDM (Remote Device Management)
Vision 基于 RDM,因此需要灯具符合 RDM 要求。如果您还不是 RDM Manufacturer,第一步应注册您的公司。
RDM Manufacturer ID & RDM Device Model ID
请确认灯具的 RDM Manufacturer ID 和 RDM Device Model ID 在两种情况下都正确:在 Vision Control App 中,以及通过控制台上的 RDM 查看时。请记录所有已分配的 Device Model IDs,因为重复 ID 可能导致系统冲突和数据混乱。
Vision Specification
请与制造商明确您的 Vision featureset。这里提供一份 Fixture Specification 示例文件可供下载:
检查灯具与软件
对于每一个灯具固件版本,请确保基本 Vision Control 功能能够通过 verification process 正常工作。文档在这里: #source-77_Implementation_Verification_Tool
请务必在您这边测试灯具,或者将若干样机发送到我们的总部,以便我们进行验证。如果没有完成该验证,我们无法保证所有功能都能正确工作,也可能无法为后续问题提供可靠解决方案。
Server & Product Management
请向制造商申请您自有品牌灯具库在 Vision Webservice 中的控制权和访问权限。这样您才能自行管理产品。因此,制造商需要您的 Vision Company ID。
本章说明如何编写必要的软件,使您的 controller 能够与 Vision Controller 和 Vision Control App 通信。
为了让实现正常运行,需要完成 6 个主题。
- System
- SPI Interface
- Vision RDM
- Vision DMX
- Vision DFU
- Display
我们的示例项目覆盖了所有这些主题。对于每个主题,都可以查看示例项目,以便更好地理解实现方式。
定义
以下是几个重要定义:
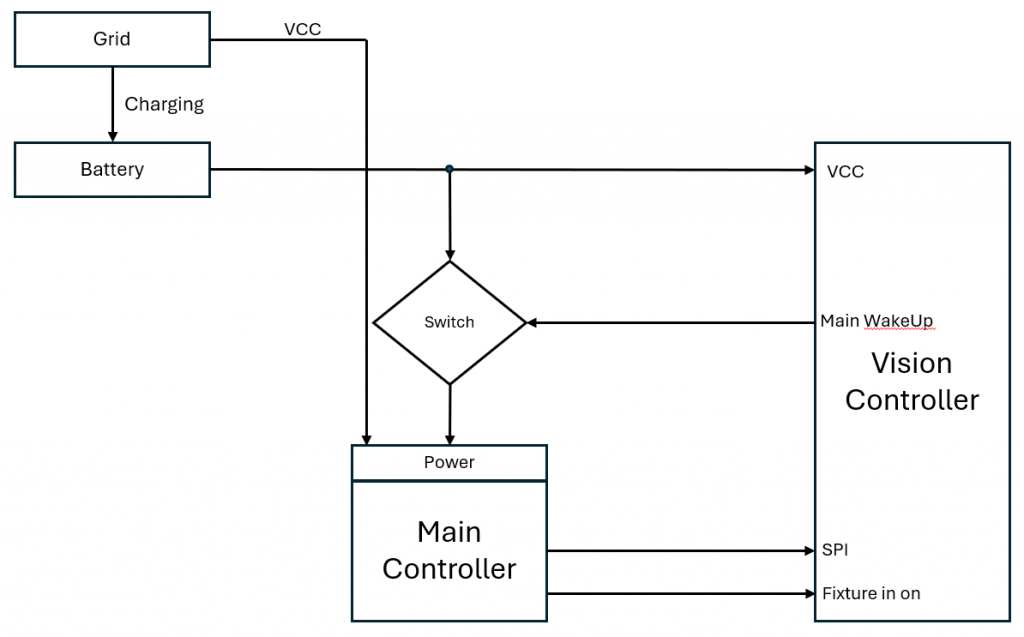
Main Controller: 灯具侧的 controller。
Vision Controller: 带有 Vision firmware 的 Bluetooth/mesh controller(例如 NRF52840 等)。
较旧的文档、截图、API 名称和文件名中可能仍使用 iQ 或 iQ.Mesh。在当前文档中,这称为 Vision 或 Vision Protocol。当前 library 使用 Vision header 和 API names。较旧的 code package 或 screenshot 可能仍显示 iQMesh/iqMesh;请将它们理解为同一个 Vision library 的 legacy names。
2. 硬件准备
目标: 集成 Vision Controller 硬件,确保 firmware 能可靠通信,并且 radio performance 可用。
需要实现的内容
- 选择支持的 Vision IC 或 module,并使用对应 pinout 页面。
- 根据所选 module 连接 SPI、chip select、IRQ、reset、programming pins 和必要 power pins。
- 根据灯具 power concept 实现 required FIXTURE_IS_ON 和 wakeup behavior。
- 设计 power supply,确保 Vision Controller 在 normal operation、sleep、wakeup 和 update 场景下都稳定。
- 按 antenna design rules 放置 antenna,并尽量远离金属和强噪声 electronics。
- 为所选 hardware module flash 提供的 Vision Controller firmware。
重要规则
- Vision Controller power supply 必须稳定在 3.3 V,并且噪声应尽量低。
- 32.768 kHz crystal accuracy 对可靠 Bluetooth connection 很重要。
- FIXTURE_IS_ON 必须真实反映灯具是否处于 normal operation。
- NFC、IR、motion、battery runtime、antitheft 等 optional features 可能需要额外 hardware。
- Battery fixture 必须先设计 wakeup 和 low-power behavior,再进入 firmware testing。
立即测试
- 在 startup、normal operation、radio activity 和 firmware update 时测量 3.3 V supply。
- 确认 Vision Controller 可以 flash,并以预期 firmware 启动。
- 确认 FIXTURE_IS_ON 和 MAIN_WAKEUP 在 normal operation 与 wakeup 时行为正确。
- 进行第一次 radio scan,并确认 fixture 可见且 signal strength 合理。
- 最终硬件验证时使用 radio signal measurement procedure。
常见错误
- power supply 或 wakeup pins 还不稳定时就开始测试 firmware。
- antenna 在实验台通过,但装入真实 housing 后失败。
- PCB 完成后才发现 optional feature hardware 缺失。
- 要求 (已内联)
- 功能 (已内联)
- 硬件模块概览 (已内联)
- 硬件模块 - Fanstel BT840 (参考链接) - 仅在选择该 module 时使用此 pinout。
- 硬件模块 - Wuerth Proteus Ophelia III (参考链接) - 仅在选择该 module 时使用此 pinout。
- 硬件模块 - Fanstel BC833 (参考链接) - 仅在选择该 module 时使用此 pinout。
- 硬件模块 - Abluetech PTR9818 (参考链接) - 仅在选择该 module 时使用此 pinout。
- 硬件模块 - Abluetech PTR9813 / PTR9813+ (参考链接) - 仅在选择该 module 时使用此 pinout。
- 硬件模块 - AT833 (参考链接) - 仅在选择该 module 时使用此 pinout。
- 硬件模块 - 其他模块 (参考链接) - 仅当硬件未被前面 module 页面覆盖时使用。
- 外设 (已内联)
- 电源 (已内联)
- 天线设计 (已内联)
- Vision firmware (已内联)
- 示例项目硬件 (参考链接) - 用于理解示例硬件。
- Custom hardware design (参考链接) - Custom helper。
- 限制 (参考链接) - 用于最终硬件 sanity check。
开始开发之前,必须理解项目要求。这些规格说明了软件或系统需要满足哪些条件才能正确运行。请查看下面关于 serial number、RDM (Remote Device Management)、DMX (Digital Multiplex) 和 DFU (Device Firmware Update) 的要求。
Serial number (S/N)
灯具必须具有唯一的 serial number,并且该 serial number 应在灯具上可见。App 使用该 serial number 来识别灯具。serial number 可以是任何小于 72057594040000000 的数字。理想情况下,serial number 由两部分组成。固定的前半部分用于表示灯具类型和硬件版本,递增的后半部分则让用户可以将其理解为数字编号。
Example serial number:
1000100100
Front Part: 用于推导灯具类型和硬件版本。
Back Part: 递增编号,因此用户可以识别这是第 100 台灯具。
Firmware Versioning
我们要求使用 semantic versioning 方案。
[Major,Minor,Patch,Release] (Semantic Versioning)。每个部分为 8 bit。我们额外加入 Release 部分,用于表示该固件是否为发布版本。Release 必须为 255,固件才可以通过服务器公开使用。否则服务器会拒绝该软件,因为它只被视为 developer version。
Major: 不兼容变更。该变更会改变灯具行为。
Minor: 固件中新增功能。
Patch: 固件中的 bug fix。
Release: 0-254: 用于测试的内部固件;255: 可公开发布的固件。
RDM (Remote Device Management)
完整实现需要一个可正常工作的 RDM 接口。以下链接说明了 RDM 的工作方式,请先阅读:
- RDM Manufacturer ID
由 ESTA 分配给每个制造商的 16-bit (2-byte) 值。
它确保每个制造商都可以创建全球唯一的标识符。
可以把它理解为 Ethernet MAC 地址中的 "Organizationally Unique Identifier" (OUI)。示例:
VCS Vision Control Solutions GmbH : 0x0969 - RDM UID 每个支持 RDM 的设备都有一个 48-bit (6-byte) 唯一标识符。
格式:[16-bit ManufacturerID] + [32-bit DeviceID]
DeviceID 由制造商分配,每个设备必须唯一。它可以是顺序编号、随机数,也可以基于 serial number。示例:
Manufacturer ID = 0x6574 (ETC)
DeviceID = 0x12345678
RDM UID = 0x6574:12345678。因此该 UID 在全球范围内唯一标识一个物理 RDM 设备。 - RDM DeviceModelID 是 16-bit 值,用于在制造商范围内标识设备型号。
该值由制造商分配,不由 ESTA 分配。
同一制造商可以有多个型号,每个型号都有自己的 DeviceModelID。示例:
Vision External Module: DeviceModelID = 0x0001
Vision Core Module: DeviceModelID = 0x0002。二者仍属于 ManufacturerID 0x0969,但通过 DeviceModelID 区分。
- 应支持 DeviceInfo 等标准 RDM Commands。Software 文档中提供了详细列表。
- Custom RDM Commands。我们需要您支持一些简单的 custom PIDs,用于 get/set 所有必需信息。
DMX (Digital Multiplex)
为了正确控制您的灯具,我们有一些具体要求。通过我们协议传输时,刷新周期固定为 20ms。可实现的组件也有一些要求:
- LED Color Control
- 最多支持 6 种颜色
- 最多支持 100 个像素独立控制
- 8 bit 或 16 bit linear
- 响应速度应为即时响应 (Snap)。如需 dimming 平滑处理,请使用我们的代码模板。
- LED White Control
- 最多支持 100 个像素独立控制
- 8 bit 或 16 bit linear
- 响应速度应为即时响应 (Snap)。如需 dimming 平滑处理,请使用我们的代码模板。
DFU (Device Firmware Update)
为了进行软件更新,您的控制器上必须有 bootloader。示例中提供了一个简单 bootloader。我们支持 dual bank 和 single bank bootloader。
实现内容由必需功能和可选功能组成。必需功能始终需要实现;可选功能则根据您的产品设计决定是否添加。开始硬件设计之前,必须先明确还需要额外集成哪些功能。下面是概览:
必需功能
- App Control - 允许通过 Vision App 配置和控制灯具。这是最终用户的主要操作界面。
- DMX Control over Vision Protocol – 提供标准 DMX512 控制,用于与灯光控制台集成。这确保与专业灯光系统兼容。
- Firmware Update – 确保设备可以通过 App 使用 DFU (Device Firmware Update) 包进行更新。这对于 bug fix、功能升级和长期产品支持非常关键。
- RDM Configuration – 当灯具与 Vision Control App 或 Vision Control Gateway 一起使用时,允许通过 RDM (Remote Device Management) 进行远程配置。
可选功能
- NFC Connect / NFC DMX Patching - 允许使用 NFC 快速配置和配对灯具。
Requirement: 硬件中集成 NFC antenna。 - IR Remote Control - 允许使用 IR remote 控制基本功能。
Requirement: 灯具中安装 IR sensor,并连接到 Vision Controller。 - IR Remote Wake-Up (Battery driven Fixtures) – 允许使用 IR remote 唤醒或开启灯具。
Requirement: 适用于电池供电灯具。Vision Controller 必须始终直接连接到电池。灯具中安装 IR sensor,并连接到 Vision Controller。 - NFC Wake-Up (Battery driven Fixtures) – 允许使用 NFC 唤醒或开启灯具。
Requirement: 适用于电池供电灯具。Vision Controller 必须始终直接连接到电池。硬件中集成 NFC antenna。 - NFC DMX Patching without A/C Grid Power – 在灯具没有交流电源供电时,允许使用 NFC 进行快速配置。
Requirement: 需要一块用于配置的小电池。Vision Controller 必须始终直接连接到这块电池。Vision Control 必须能够通过 WakeUp Pin 唤醒主控制器以便通信。 - App Control Scene Retention Across Power Cycles - 确保灯具断电再上电后自动恢复最后的活动场景。这样在掉电或主动关机后,无需用户操作即可继续运行。
Requirement: 需要一块小电池,并且 Vision Controller 必须由该电池永久供电。 - Universal Time Support - 提供稳定的内部时间源,用于 timestamp、logging 和 scheduled actions(例如 timed scenes 或 automated behaviors)。
Requirement: 需要一块小电池,以便在主电源关闭时保持计时。 - Sleep Mode - 当灯具未处于活动使用状态时降低功耗。适用于电池供电产品。
- Battery Runtime Selection - 允许用户调整亮度/输出等级,以延长电池供电运行时间。
- Emergency Mode - 在电源故障时确保灯具按照应急照明标准提供基本光输出。
- Anti-Theft Mode - 如果检测到未授权移动,则触发警报或信号。
Requirement: 硬件中集成 motion sensor。 - Shipping Mode - 运输期间禁用不必要功能,以节省电量并避免意外激活。
目前支持两种不同的 IC:
- nRF52833 (https://www.nordicsemi.com/products/nrf52833)
- nRF52840 (https://www.nordicsemi.com/products/nrf52840)
我们开箱支持以下硬件模块:
- Fanstel BC833: https://www.fanstel.com/bc833
- BC833M: 集成 PCB Antenna + 集成 32.768KHz crystal
- BC833E: 使用 u.FL 的 External Antenna + 集成 32.768KHz crystal
- Fanstel BT840: https://www.fanstel.com/bt840
- BT840F: 集成 PCB Long Range Antenna
- BT840E: 使用 u.FL 的 External Antenna
- BT840: 集成 PCB Antenna
- Wuerth Ophelia III (https://www.we-online.com/de/components/products/OPHELIA-III)
- 根据 PCB 版本不同,使用 Integrated PCB Antenna 或 External Antenna
- Wuerth Proteus III (https://www.we-online.com/en/components/products/PROTEUS-III)
- 根据 PCB 版本不同,使用 Integrated PCB Antenna 或 External Antenna
- Abluetech PTR9818 (https://www.abluetech.com/BLE%2052%20Series/484.html)
- 集成 PCB Antenna
- Abluetech PTR9813
- PTR9813: 集成 PCB Antenna
- PTR9813+: 使用 u.FL 的 External Antenna
我们也会尽快尝试加入以下模块。如果您选择其中之一,请告诉我们,这样我们可以更快提供所需说明:
- Ezurio BL654 PA
- Minew Semi nRF52840-MS88SF23
- Moko MK08
- Panasonic PAN1770
- RayTac MDBT50Q-U1MV2
- Ublox BMD-34
- Minew Semi nRF52840-MS88SF23
- Moko MK07
- Raytac MDBT50Q-512K
- NINA-B400-00B
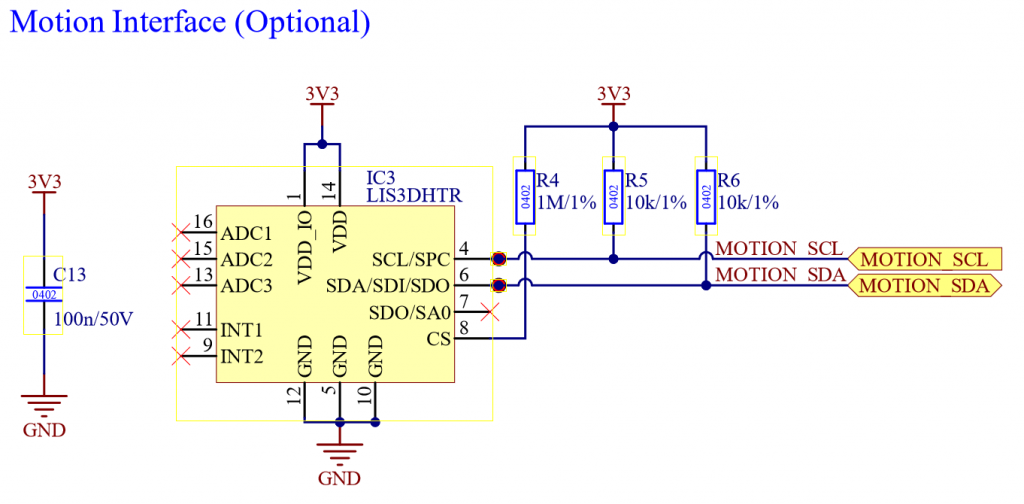
我们提供多种 peripherals,用于扩展功能。所有 peripherals 都是可选的,因此您可以根据产品需求灵活选择需要实现的功能。如果您希望集成这些 peripherals,下方提供了详细说明。目前我们支持 NFC Antenna、Motion Controller 和 IR Sensor。所有组件都连接到 Vision Controller。
NFC Antenna
NFC antenna 可用于与灯具快速建立连接,也可用于写入或读取一些信息。NFC Antenna 可以直接放在 PCB 上,也可以通过天线连接器连接。以下是对应原理图:
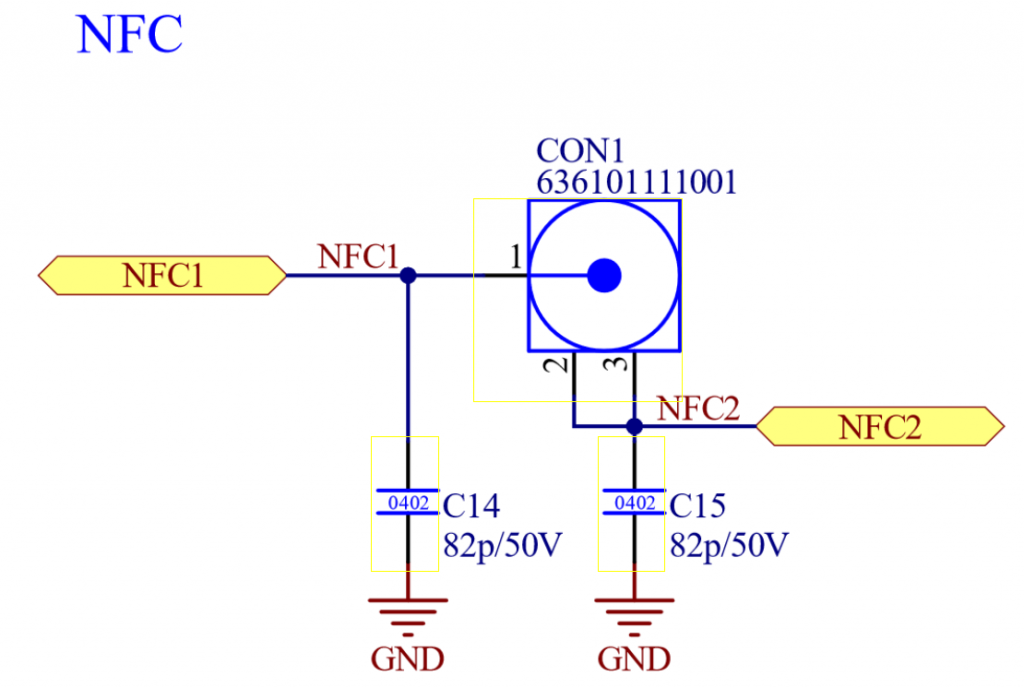
Used Part: “WR-UMRF PCB Receptacle SMT with 3 Pads, 50Ohm, DC~6GHz 636101111001”
关于 antenna tuning,请参考 Nordic 文档:
https://docs.nordicsemi.com/bundle/nwp_026/page/WP/nwp_026/nWP_026_intro.html
Motion Controller
Motion controller 可用于 anti theft mode 等安全功能。Vision controller 支持 STMicroelectronics 的 “ST LIS3DH” 以及 MEMSensing Microsystems 的 MSA311。更多信息可参考 https://www.st.com/en/mems-and-sensors/lis3dh.html 和 https://cdn-shop.adafruit.com/product-files/5309/MSA311-V1.1-ENG.pdf。请将 Motion controller 连接到 Vision IC 的 I^2C。以下是对应原理图:
IR Sensor
IR Sensor 可用于以简单方式开启、关闭和控制灯具。Vision controller 支持以下 IR Receiver:
- IRM-H6XXT/TR2
- Vishay TSOP2436
以下是对应原理图:
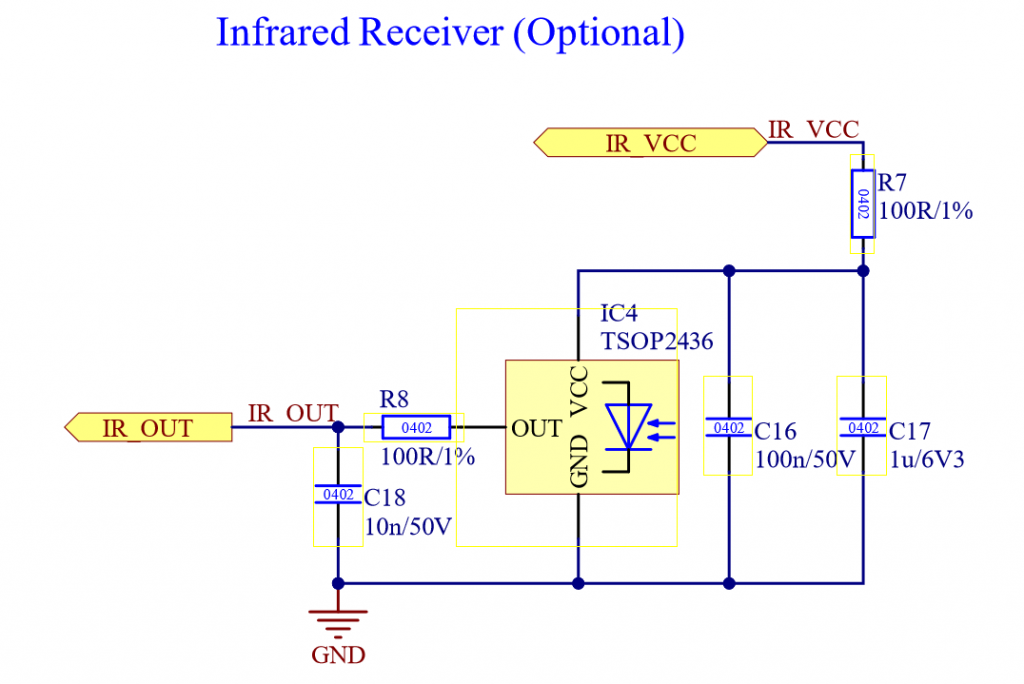
所有 peripherals 的原理图(NFC Antenna、Motion Controller 和 IR Sensor):
Vision Controller 的 Power Supply 需要满足以下要求:
- 典型电压 3.3V(最大 3.6V,最小 1.7V)
- 最大电流:20mA
- Vision Controller Sleep current: 14uA
- Vision Controller typical operating current: 10mA
如果是电池供电灯具,Vision Controller 电源和状态输入相关的原理图框图可以类似如下:
实现方式有多种。具体取决于灯具结构以及您希望支持这些功能的完整程度。下面的表格概述了可能的实现方式。原理图只包含简单模块,用于帮助理解概念。
| Fixture Type | 说明 | 支持 IR Wake Up | 支持 NFC Wake Up | 支持 Antitheft Stay On | Example Schematic |
| Grid powered (AC powered) fixture | 这种灯具内部没有电池,只由交流电网供电。 | NO | NO | NO | — |
| Grid powered fixture (AC powered) + Battery for configuration | 这种灯具内部有电池,但该电池只给逻辑部分供电,不用于给 LED 等负载供电。它允许灯具在没有交流电源时进行配置。 | NO | YES (for configuration) | NO | — |
| Single Cell Battery Fixture | 这种灯具内部有电池,并且该电池也为 LED 等执行器供电。典型电池电压为 3.7V。 | YES | YES | YES | https://kk-t.com/wp-content/uploads/2024/12/PowerSupplyExampleExt_Batterie_SingleCell.pdf |
| Multi Cell Battery Fixture | 这种灯具内部有电池,并且该电池也为 LED 等执行器供电。 电池电压高于 5V。 | YES | YES | YES | https://kk-t.com/wp-content/uploads/2024/12/PowerSupplyExampleExt_HighVoltage.pdf |
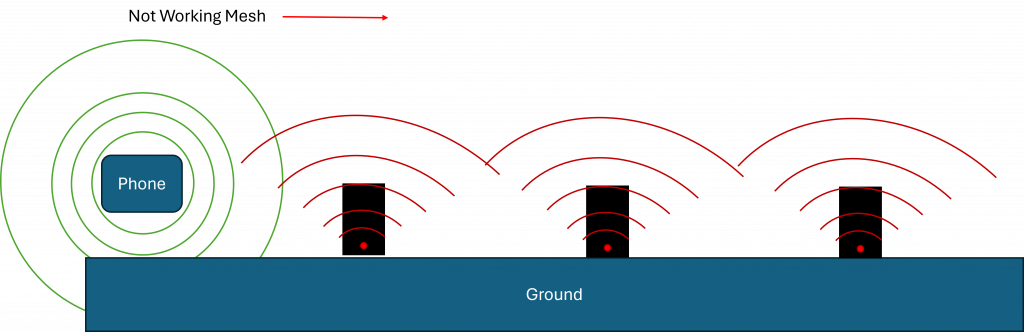
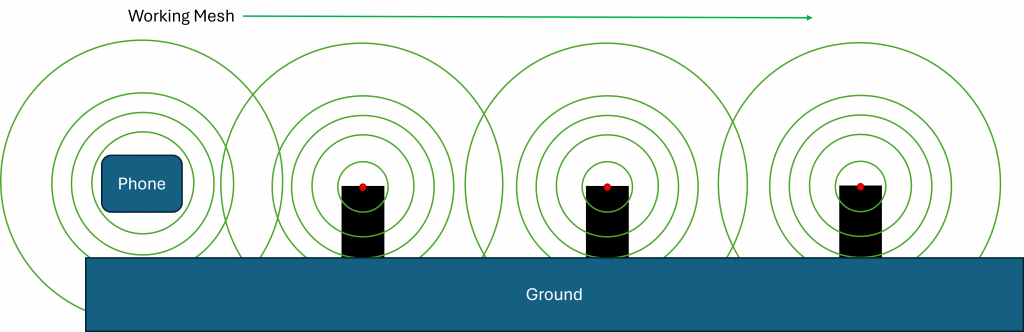
Mesh Systems 中的天线放置
为了获得最佳性能,天线应尽可能远离设备底部。
技术原因:
- 地面(earth 或大面积金属表面)会对 RF 能量起到有损吸收和反射作用。
- 当天线安装在靠近底部的位置时,其辐射方向图会被扭曲:能量会被地面吸收,并出现建设性/破坏性干涉(multipath)。
- ground plane effect 会降低有效增益,尤其是在低角度方向。而低角度方向对于 mesh 中可靠的 peer-to-peer 链路非常关键。
- 较低的天线位置会增加遮挡,因此障碍物后方或距离较远的节点可能无法建立稳定连接。
将天线保持在更高位置并远离地面,可以让辐射瓣更加对称,改善覆盖范围,并让网络中的链路质量(RSSI、SNR)保持一致。
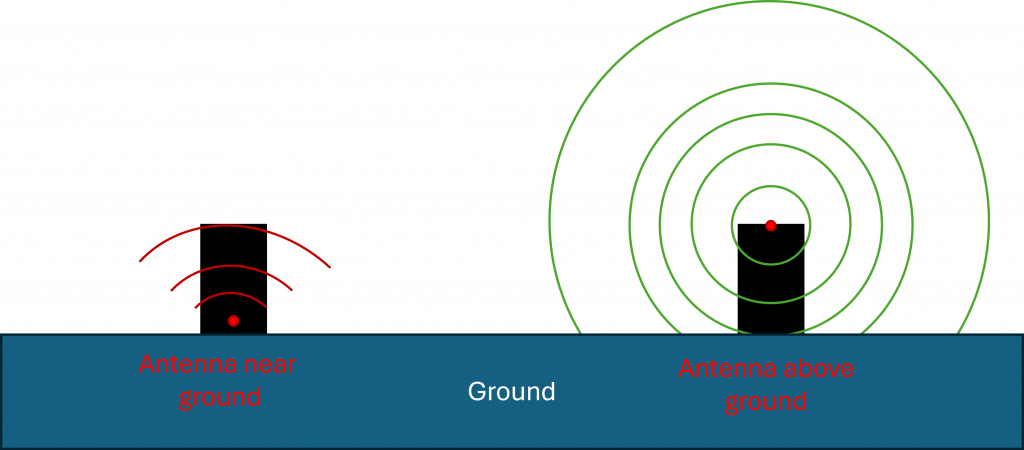
常见做法是将天线放在设备前部光学结构下方。因为 uplight 放在地面上时通常始终朝上。
天线设计
Keep-out & enclosure
- 在天线周围提供真实的 keep-out 空间,不要有金属、ground 或高介电常数塑料。
- 避免在天线前方使用金属化涂层、含碳塑料和水膜。
- 如果无法避免金属,请使用 on-metal 类型(PIFA/patch/slot),并将金属视为 ground plane 处理。
PCB & ground
- 严格按照 antenna datasheet 的 keep-out 要求执行;在 radiator 下方或周围不要放置 ground 或走线,除非 datasheet 明确允许。
- 其他区域应使用完整 ground,并通过 via stitching 加强;RF feed 下方不要分割 ground。
- 对于 monopole,请确保有足够 counterpoise(ground plane edge length >= lambda/10),或增加经过调谐的 ground extension/sleeve。
Feed & matching
- 使用 50 Ohm controlled-impedance feed。RF 路径应尽量短,避免 stub 和直角转弯。
- 在 feed 位置放置 pi-network(shunt-series-shunt),用于在最终外壳中调谐。初始可使用 0 Ohm/NP,并通过测量进行调谐。
- 不要在 RF 路径中随意加入 ESD/EMI 元件;只能使用 RF-rated components。
Cables & noise
Coax 应远离金属并避免急弯;连接器需要 strain relief。
DC/DC converters、crystal cans、快速数字边沿信号和显示屏应远离天线。噪声网络应走内部层,并用 ground vias 进行屏蔽。
Vision firmware
10_Vision_Firmware.htmlVision Controller 首先需要烧录 bootloader firmware。您可以在这里下载最新 bootloader。请确保为您的应用选择正确的 bootloader(如果您使用的是我们提供的预配置灯具,或 bootloader 已经烧录,可以跳过此步骤):
- Fanstel BT840 (nrf52840) :
https://server.kk-t.eu/api/v1/share/File?file=IQCONTROLLER_VISION_SPI_FBT840_BL1_2_1_SD_7_3_0.hex - Wuerth Orphelia III /Proteus III (nrf52840) :
https://server.kk-t.eu/api/v1/share/File?file=IQCONTROLLER_VISION_SPI_WOIII_BL1_2_1_SD_7_3_0.hex - Fanstel BC833 (nrf52833) :
https://server.kk-t.eu/api/v1/share/File?file=IQCONTROLLER_VISION_SPI_FBC833_BL1_2_1_SD_7_3_0.hex - Abluetech PTR9818 (nrf52840) :
https://server.kk-t.eu/api/v1/share/File?file=IQCONTROLLER_VISION_SPI_FBT840_BL1_2_1_SD_7_3_0.hex - Abluetech PTR9813/PTR9813+ (nrf52833) :
https://server.kk-t.eu/api/v1/share/File?file=IQCONTROLLER_VISION_SPI_FBC833_BL1_2_1_SD_7_3_0.hex
在 Vision Control App 中扫描您的灯具:
- 打开 Vision Control App,并确保网络连接可用。
- 使用已有账号登录,或注册一个新账号。
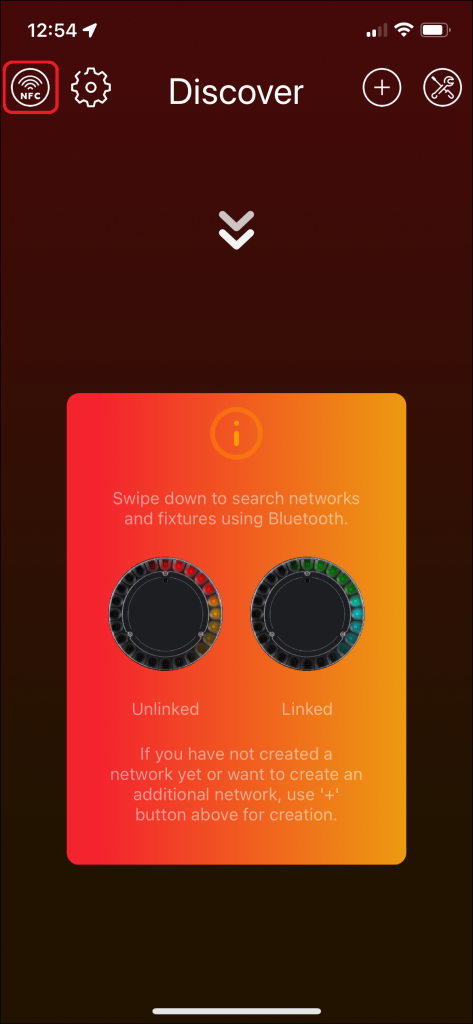
- 首次使用 App 时会打开准备向导。请在那里启用 Bluetooth 和 Location services。如果接受 Bluetooth 和 Location services,通常可以直接正常工作。如果发生错误,请根据您使用的平台查询如何正确开启这些权限。支持并测试过的设备列表可在这里找到:https://iqservice.glp.de/index/SupportedDevices
- App 会打开 Discover 页面:

- 触发 Bluetooth 扫描。根据设备不同,可以通过两种方式触发 Bluetooth scan:
- Tablets: 使用刷新图标或向下滑动:


- Windows: 使用顶部的刷新图标:

- Phones: 按图标提示向下滑动:
- Tablets: 使用刷新图标或向下滑动:
- 现在您的设备会通过 Bluetooth 搜索可用灯具。
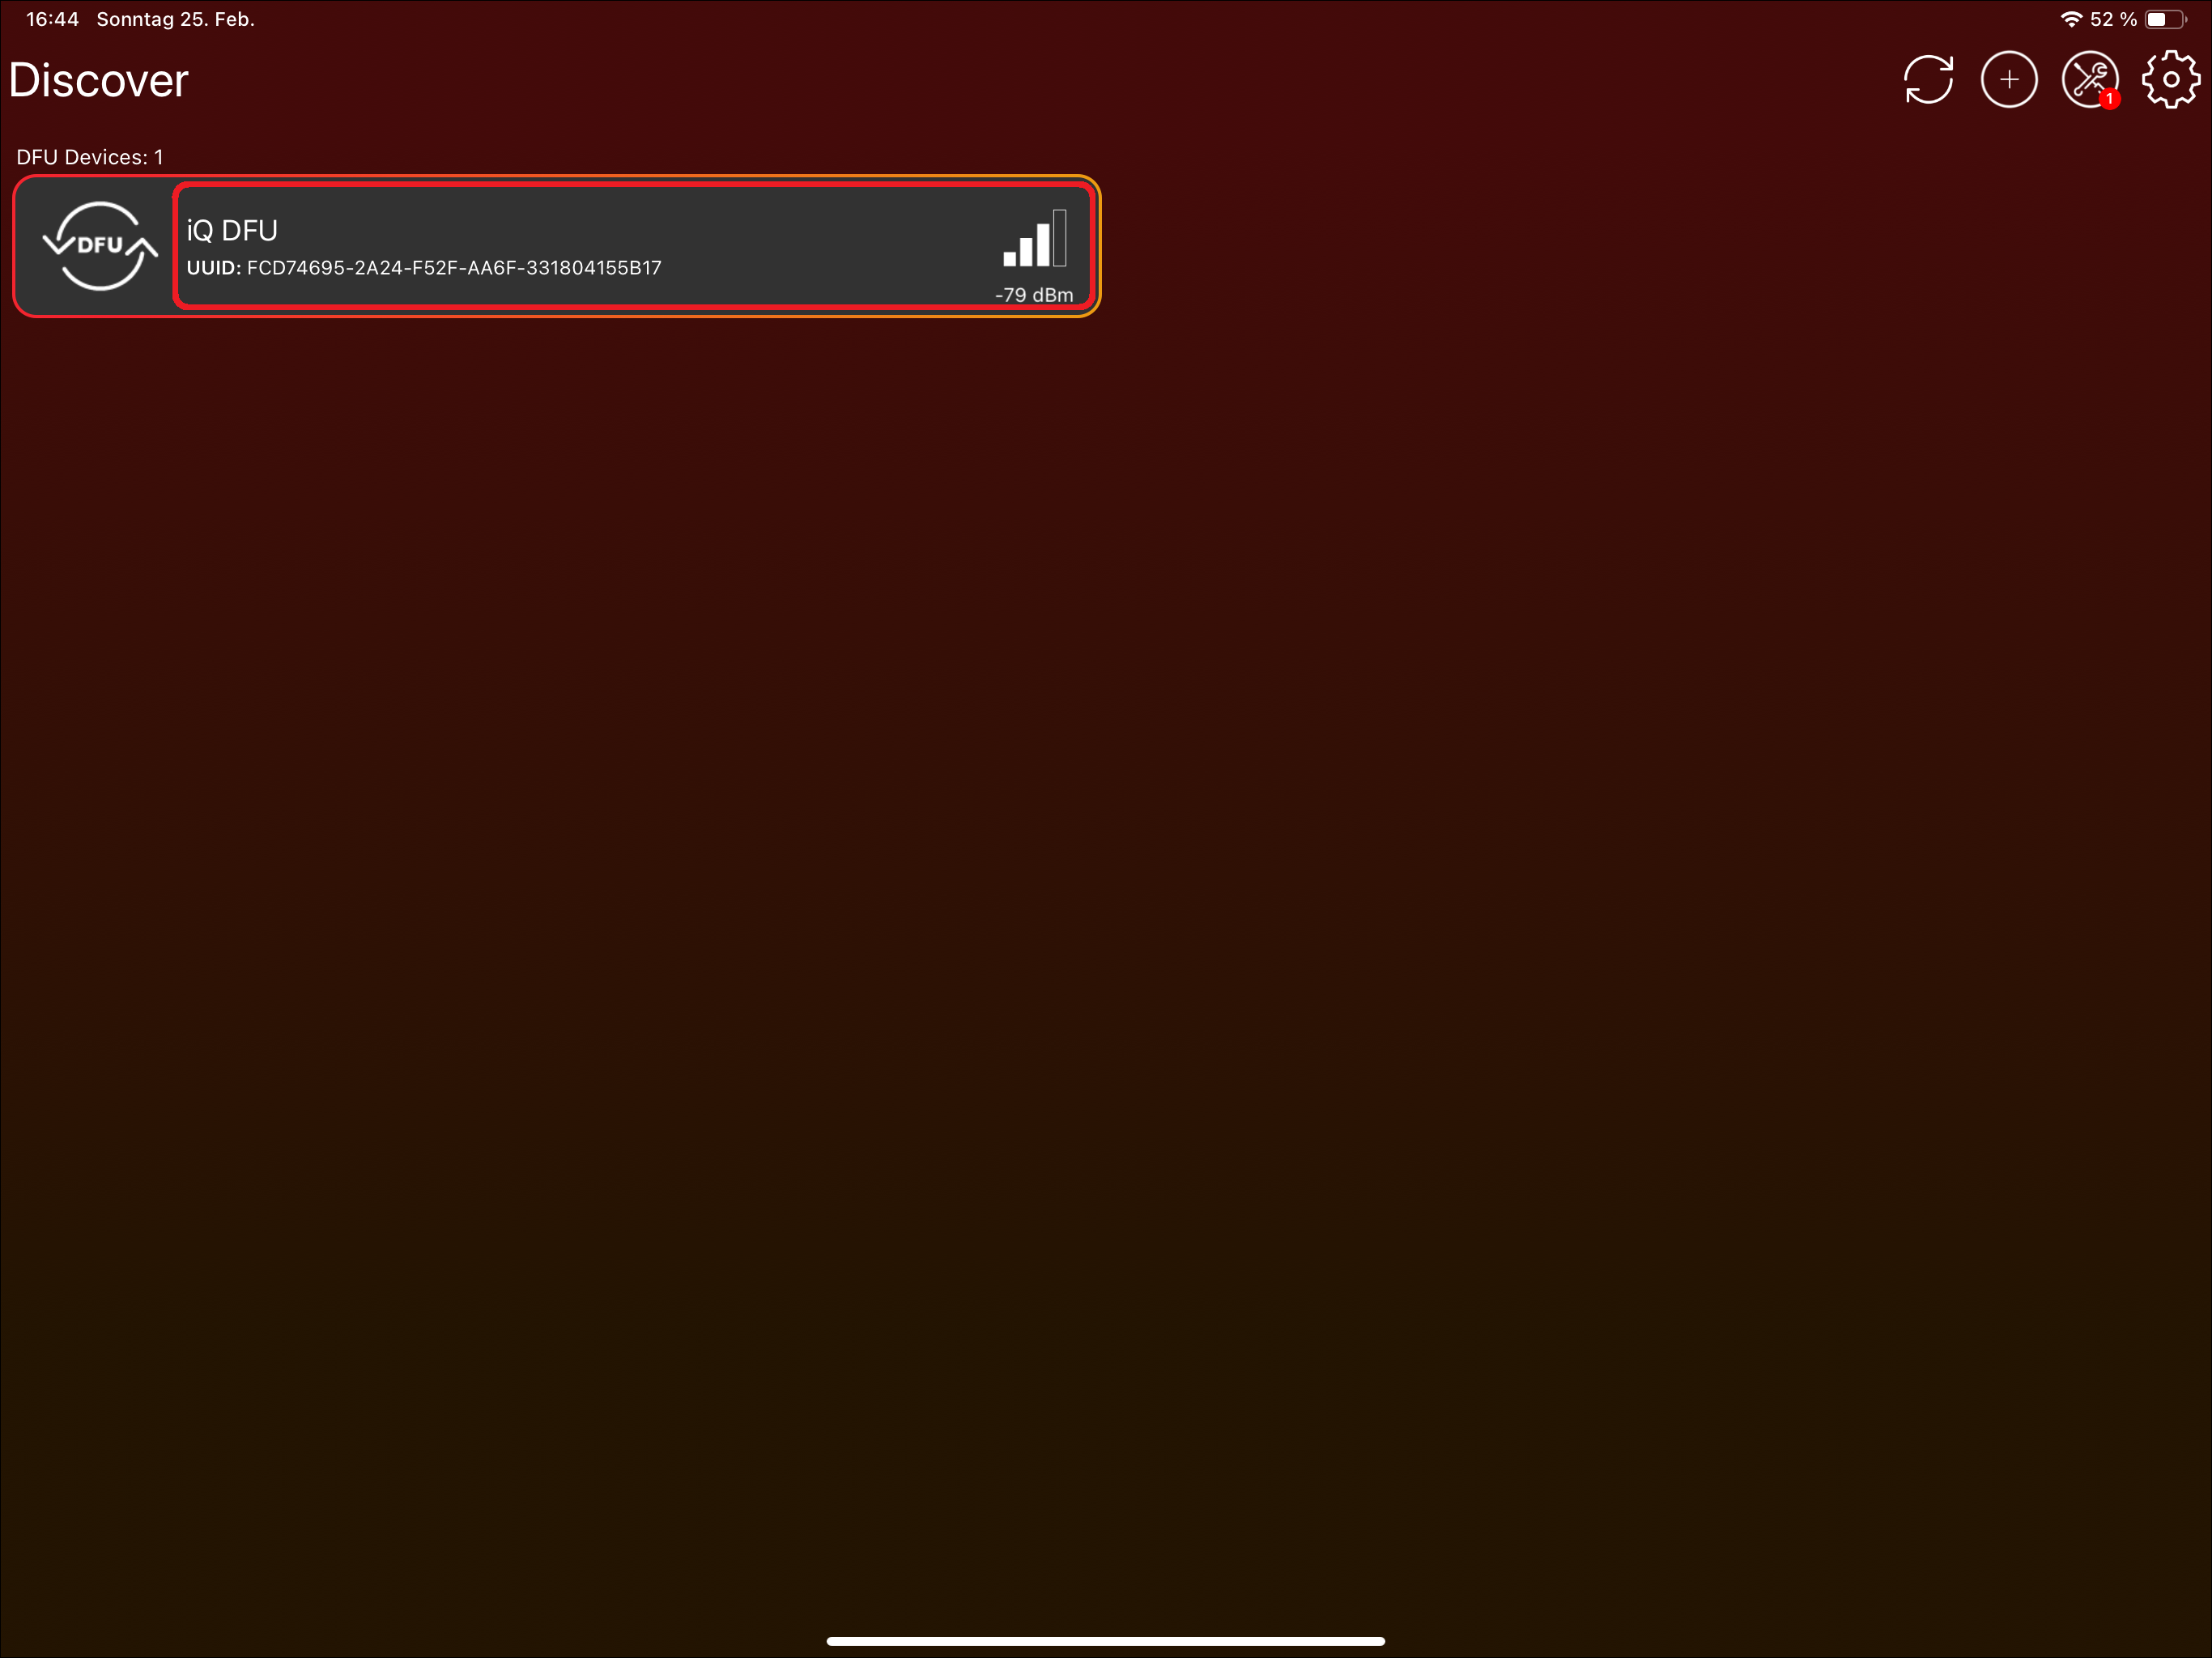
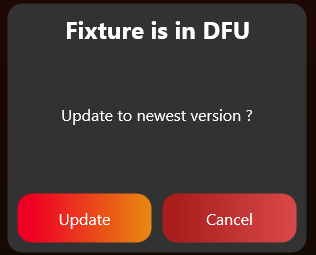
如果已经烧录 bootloader,或者 Vision module 上已经存在 bootloader,请使用 Vision Control App 安装最新的 Vision firmware。如果使用的是我们提供的预配置灯具,可以跳过此步骤:
- 点击 "Vision Bootloader" 灯具。不要点击 DFU icon;该 icon 只用于选择或取消选择灯具,此步骤不需要使用它。
- App 会提示更新 Vision firmware。点击 "Update" 即可安装最新可用版本:
3. SPI 集成
目标: 通过 prepared Vision SPI library 将 fixture firmware 连接到 Vision Controller。
需要实现的内容
- 将 Vision SPI library files 加入 fixture firmware project。
- Include libVisionSpiInterface.h,并使用当前 Vision API names。较旧的 package 对同一个 library 使用 iQMesh/iqMesh names。
- 提供 required hardware callbacks:SPI transfer、chip select 和 IRQ pin reading。
- 调用 vision_init,并提供 RDM UID、callbacks、App Control DMX footprint 和 DFU support flag。
- 在 main loop 或 scheduler 中定期调用 vision_task。
- 每次 SPI transfer 后调用 SPI completion/error event。
- 检测 IRQ pin 的 falling/rising edges,并转发给 library。
重要规则
- Fixture main controller 是 SPI master。
- SPI mode 为 CPOL 0、CPHA 0。
- 推荐 SPI baud rate 约 1.125 Mbit/s,不应明显低于该值。
- 大部分 low-level SPI transaction handling 由 prepared library 完成。
- Mandatory startup configuration 主要是正确 RDM_ID。大多数 behavior 通过 RDM 和 callbacks 处理。
- 如果使用 optional SPI configuration,应在 SYS_RESTARTED 后重新写入。
立即测试
- 先使用 bootloader firmware 验证 communication,再测试 application firmware。
- 确认 IRQ pin changes 能被正确且足够快地检测。
- 确认 vision_task 被定期调用,并且 SPI completion/error events 已转发。
- 如果 Vision Controller 与 main controller 无法通信,使用 communication/debug guide 或 test preparation workflow。
- 只有 basic SPI communication 稳定后,才继续 RDM 和 DMX。
常见错误
- SPI event flow 还不稳定时就 debug RDM 或 DMX。
- IRQ edge detection 优先级太低或实现不完整。
- 将旧 iQMesh function names 与当前 Vision library package 混用。
- SPI 接口介绍 (已内联)
- SPI Library (已内联)
- Bring-up 和首次测试准备 (已内联)
- SPI 配置 (参考链接) - 使用 prepared SPI library 时通常不需要。
- 示例项目软件 (参考链接) - 用于理解示例软件。
- 示例项目测试 (参考链接) - 用于理解示例测试流程。
- Custom Firmware Example - Artery (参考链接) - Custom helper。
- Custom Firmware Example - STM32 (参考链接) - Custom helper。
- Custom Firmware Adapt Defines (参考链接) - Custom helper。
- SPI protocol 说明 (参考链接) - Low-level protocol detail,通常由 prepared SPI library 处理。
- SPI operation (参考链接) - Low-level transaction detail,通常由 prepared SPI library 处理。
- SPI commands 和 registers (参考链接) - 用于 debugging 或 custom SPI implementation 的 register reference。
- SPI interrupts (参考链接) - 用于 debugging IRQ behavior。
- SPI timing (参考链接) - 用于 debugging communication timing。
SPI 接口介绍
25_SPI_Interface_Introduction.html灯具与 Vision Controller 之间通过 SPI interface 通信。因此,灯具的 Main Controller 作为 Master,Vision Controller 作为 Slave。
该接口由五个 3.3V 数字信号组成:
- IRQ - Interrupt signal。Active low,可通过 interrupt mask register 配置。
- CS - SPI Chip select,active low。
- SCK - SPI clock input。
- MOSI - SPI data input。
- MISO - SPI data output。
SPI interface 可以使用我们提供的 C library。您可以在 Vision SPI Library 章节中找到该库,该章节也说明了如何实现它。否则,请使用详细的 SPI Specification,并自行构建 SPI Interface。
SPI Library
26_SPI_Library.html实现方需要提供 prepared Vision SPI library 所使用的硬件接口:
- SPI master,基于 interrupt 或使用 DMA
- External GPIO IRQ interrupt
SPI 的推荐 Baudrate 约为 1.125MBits/s,不应低很多。SPI Mode 为 zero (CPOL = 0, CPHA = 0)。
您可以在 Vision External Example 中找到该 library 的 source code,也可以从这里下载:
https://kk-t.com/wp-content/uploads/2026/05/VisionSpiLibrary_2026_05_25.zip
Include 文件
只需将所有文件添加到您的项目中。Include libVisionSpiInterface.h,并调用必要函数。当前 library 使用 Vision naming。较旧的 package 和 example 曾使用 iQMesh/iqMesh;如果您对照旧资料,请将这些名称理解为同一个 Vision SPI library 的旧名称。
#include "libVisionSpiInterface.h"Memory mode
该 library 支持两种 memory modes:dynamic allocation 和 static allocation。
在 dynamic allocation mode 下,内存会在运行时按需分配,从而降低整体内存使用。
在 static allocation mode 下,所有必需内存都会在编译时以全局方式定义。
默认情况下,该 library 使用 dynamic allocation。
如需启用 static allocation,请在项目中定义 compile-time constant VISION_USE_STATIC_ALLOCATION,或在 libVisionSpiInterface.h 底部取消注释。
提供必要的 hardware functions
请确保提供以下 external hardware functions:
/* Start SPI transmit and receive interrupt or DMA based */
void HardwareVisionSpiSetTxRx(uint8_t* buf, uint16_t length);
/* Set SPI CS Pin regarding set value */
void HardwareVisionSpiSetCsPin(bool set);
/* Read state of IRQ Gpio Pin */
bool HardwareVisionGpioReadIrqPin(void);
初始化
初始化时必须调用 "vision_init" function。因此需要提供 RDM UID、必要 callbacks、DMX receive length,以及是否支持 device firmware updates。
uint8_t rdmId[6];
uint16_t visionSpecialDmxFootprint= 100; // The footprint used for Vision Control Behavior 255. (App Control)
bool supportDfu = false;
// Register necessary callbacks
vision_callbacks_t callbacks;
// Dfu callback implementation is not needed if dfu is not supported
callbacks.DfuDataReceived = &DfuDataReceived;
callbacks.DfuFlagReceived = &DfuFlagReceived;
// For receiving Dmx frames
callbacks.DmxReceived = &DmxReceived;
// For receiving Rdm frames
callbacks.RdmReceived = &RdmReceived;

// Init Vision SPI library
vision_init(rdmId, visionSpecialDmxFootprint,supportDfu, callbacks);
修改 RDM UID
如果 serial number 发生变化,因此 RDM UID 也需要变化,可以使用以下函数覆盖 RDM UID:
vision_setRdmId(rdm_id);提供 Task event
为了处理数据,需要在有时间时调用 "vision_task"。例如在 while loop 中调用:(优先级应低于 SPI 和 IRQ EXTI 的 interrupt routine)
while (1)
{
  uint32_t timems = HAL_GetTick();
  vision_task(timems);
}
提供 SPI completion event
SPI 完成后,或发生错误时,必须调用 "vision_extSpiEvent"。
例如使用 STM32 HAL callbacks:
void HAL_SPI_TxRxCpltCallback(SPI_HandleTypeDef *hspi)
{
	HAL_GPIO_WritePin(CS_GPIO_Port, CS_Pin,GPIO_PIN_SET);
	vision_extSpiEvent(SPI_EVENT_COMPLETION, dmaBufRx, dmaBufLength);
}
void HAL_SPI_ErrorCallback(SPI_HandleTypeDef *hspi)
{
	HAL_GPIO_WritePin(CS_GPIO_Port, CS_Pin,GPIO_PIN_SET);
	vision_extSpiEvent(SPI_EVENT_ERROR, dmaBufRx, dmaBufLength);
}
void HAL_SPI_AbortCpltCallback(SPI_HandleTypeDef *hspi)
{
	HAL_GPIO_WritePin(CS_GPIO_Port, CS_Pin,GPIO_PIN_SET);
	vision_extSpiEvent(SPI_EVENT_ERROR, dmaBufRx, dmaBufLength);
}
提供 GPIO edge detection event
为了检测 "IRQ" pin 的边沿,这里使用 HAL EXTI Callback。由于许多 controller 不支持完整的 edge detection,因此必须在 interrupt 中检查。请确保检测 falling edge 和 rising edge。
.
void HAL_GPIO_EXTI_Callback(uint16_t GPIO_Pin)
{
	if (GPIO_Pin == SPI_IRQ_Pin)
	{
		if (HAL_GPIO_ReadPin(SPI_IRQ_GPIO_Port, SPI_IRQ_Pin))
		{
			vision_extIrqInterupt(SPIEXT_IRQ_EDGE_RISING);
		}
		else
		{
			vision_extIrqInterupt(SPIEXT_IRQ_EDGE_FALLING);
		}
	}
}
使用 RdmReceived callback
RdmReceived callback 的优先级来自 Task event。在这里需要 decode RDM message。
在大多数项目中,应将接收到的数据传入与有线 RDM 相同的 RDM decoder。Vision 不需要单独的第二套 RDM stack。只需将必需的 Vision custom RDM commands 添加到您现有的 RDM 实现中。
static void RdmReceived(const uint8_t* buf, uint16_t length)
{
	// Handle RDM Data
	RdmDecodeMessage(buf, length);
}
如果需要应答该 message,可以直接使用以下函数写入 response:
uint8_t msg[length];
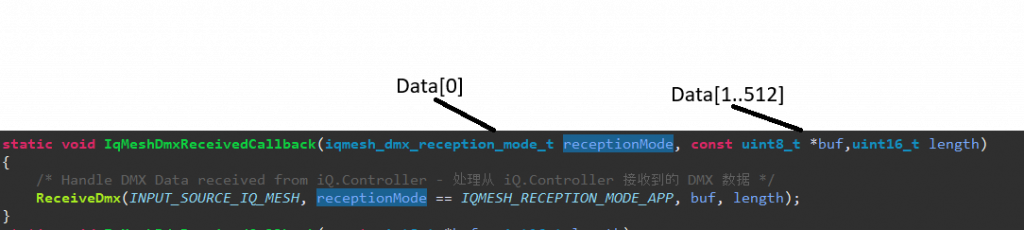
vision_WriteRdm(msg,length);使用 DmxReceived callback
DmxReceived callback 的优先级来自 Task event。从该 event 返回后 buffer 会被释放,因此请确保复制数据。
Vision DMX stream 中的第一个值是 Vision Control Behavior。它只用于解释当前 Vision DMX frame。不要因此改变灯具保存的 DMX personality、display settings、RDM settings 或其他协议设置。
对于 Vision Control Behavior 0,请将 DMX data 传入与有线 DMX 相同的 DMX handling。对于 Vision Control Behavior 255,只对当前 frame 应用定义好的 App Control defaults。
static void DmxReceived(uint8_t personality, const uint8_t* buf, uint16_t length)
{
	// Handle DMX Data
	if(personality == 255)
	{
		// Use App Control behavior with App Control default settings.
	}
	else if(personality > 0)
	{
		// Use DMX Control with this temporary DMX personality override.
	}
	else
	{
		// Use selected personality from the fixture
	}
}
使用 DFU callbacks
Dfu callback 的优先级来自 Task event。
static void DfuFlagReceived(vision_dfu_flag_t flag)
{
    // Handle DFU data
	if(flag == VISION_DFUFLAG_STOP)
	{
		// Check if dfu has started
		// Check received data for example using a CRC
		// if anything is good answer with success and initiate the update. There is a timeout about of 10 sec for answering
		vision_WriteDfu(DFU_SUCCESS);
	}
	if(flag == VISION_DFUFLAG_START)
	{
		// Check if dfu has not already started
		// Prepare flash, .. for receiving dfu
		// if anything is good answer with success to start the transmission. There is a timeout about of 10 sec for answering
		vision_WriteDfu(DFU_SUCCESS);
	}
}
static void DfuDataReceived(uint16_t packetNr, const uint8_t* buf, uint16_t length)
{
	// Check if packetNr is correct. Store packet.
	// if something is wrong answer with a error reason
	// vision_WriteDfu(DFU_ERROR_WRONG_PACKETNR);
}
不要遗漏:
请确保调用以下 library functions:
- vision_init
- vision_task
- vision_extSpiEvent
- vision_extIrqInterupt
并实现以下 callbacks:
- void HardwareVisionSpiSetTxRx(uint8_t* buf, uint16_t length);
- void HardwareVisionSpiSetCsPin(bool set);
- bool HardwareVisionGpioReadIrqPin(void);
并实现以下 callbacks 来处理数据:
- DfuDataReceived
- DfuFlagReceived
- DmxReceived
- RdmReceived
Debug library - 查找问题
为了查找硬件或固件实现相关问题,我们提供了一个 step by step guide,用于调试该 library:
分析 Vision Wireless Controller logs
如需获取用于日志收集的特殊 Vision Wireless Controller 固件版本,请进入 CUSTOM IMPLEMENTATION Project Artery IC,并参考页面末尾的 Analyse logs of Vision Wireless Controller 章节。这些 logs 在实现过程中非常有帮助。
Bring-up 和首次测试准备
66_Test_Preparations.htmlBring-up 和首次测试 setup
要求
为了测试 implementation,需要可运行 Vision Control App 的 device:
| Android | iOS | MacOs | Windows | |
|---|---|---|---|---|
| Minimum SDK | Android 10.0 (Api-Level-29) | 12.1 | 10.0.17763.0 | |
| Target SDK | Android 12.0 (Api-Level-32) | - | 10.0.19041.0 | |
| Bluetooth MTU MIN: 230 BYTES | Bluetooth 4.2 REQUIRED | Bluetooth 4.2 REQUIRED | Bluetooth 4.2 REQUIRED | Bluetooth 4.2 REQUIRED |
| NFC | OPTIONAL | OPTIONAL | - | - |
测试时请使用 Vision Control app。可以使用 iOS、Android 或 Windows,因此可以选择 PC、laptop、tablet 或 phone。也可以在一个 device 上测试某些 features,然后在过程中切换到另一个 device。
Install Vision Control App
- Windows Store: https://apps.microsoft.com/detail/9PN2FRZHH142
- Google Play Store: https://play.google.com/store/apps/details?id=de.kkt.Vision
- Huawei Gallery: https://appgallery.huawei.com/#/app/C114471795
- Vision Server Android Installer: https://server.kk-t.eu/api/v1/Tools/Install?tool=VisionAndroid
- Apple App Store: https://apps.apple.com/app/vision-control/id6467643102
Prepare Fixture and Vision Controller
- 确保 fixture turned on。
- 确保 Vision Controller 已 flash firmware。如果还没有,请下载并 flash 正确 bootloader。如果 fixture 是我们预配置的,或 bootloader 已经 flashed,可以跳过此 step。
- Fanstel BT840 (nrf52840):
https://server.kk-t.eu/api/v1/share/File?file=IQCONTROLLER_VISION_SPI_FBT840_BL1_2_1_SD_7_3_0.hex - Wuerth Orphelia III / Proteus III (nrf52840):
https://server.kk-t.eu/api/v1/share/File?file=IQCONTROLLER_VISION_SPI_WOIII_BL1_2_1_SD_7_3_0.hex - Fanstel BC833 (nrf52833):
https://server.kk-t.eu/api/v1/share/File?file=IQCONTROLLER_VISION_SPI_FBC833_BL1_2_1_SD_7_3_0.hex - Abluetech PTR9818 (nrf52840):
https://server.kk-t.eu/api/v1/share/File?file=IQCONTROLLER_VISION_SPI_FBT840_BL1_2_1_SD_7_3_0.hex - Abluetech PTR9813/PTR9813+ (nrf52833):
https://server.kk-t.eu/api/v1/share/File?file=IQCONTROLLER_VISION_SPI_FBC833_BL1_2_1_SD_7_3_0.hex
Scan and Connect
- Open Vision Control App,并确保 internet connection 可用。
- Login with existing account,或 register new account。
- 第一次使用 app 时会打开 prepare wizard。请 enable Bluetooth & Location services。支持和测试过的 devices list: https://iqservice.glp.de/index/SupportedDevices
- App 会打开 Discover page。

- Trigger Bluetooth scan。Tablet 可使用 refresh icon 或 swipe down;Windows 使用顶部 refresh icon;phones 通常 swipe down。

- Device 会通过 Bluetooth 搜索 available fixtures。
安装 Vision Firmware
如果已经 flash bootloader,或者 Vision module 上已经有 bootloader,请使用 Vision Control app 安装最新的 Vision firmware。如果 fixture 是我们预配置的,可以跳过此步骤。
- 点击 "Vision Bootloader" fixture。不要点击 DFU icon;该 icon 只用于 select / deselect fixture,此步骤不需要使用它。

- Application 会提示更新 Vision firmware。点击 "Update" 可安装最新 available version。

- 如果遇到 connection issues,请在 App Settings -> Connection Settings 中降低 MTU size。此方法对 Windows 尤其有帮助。
检查 Fixture 是否可被发现
- 第一次 bring-up 时,如果通信还没有正常工作,fixture 可能不会马上显示在 app 中。
- 如果正在测试我们的 example board,请先打开电源。打开后应该可以在 app 中被发现。
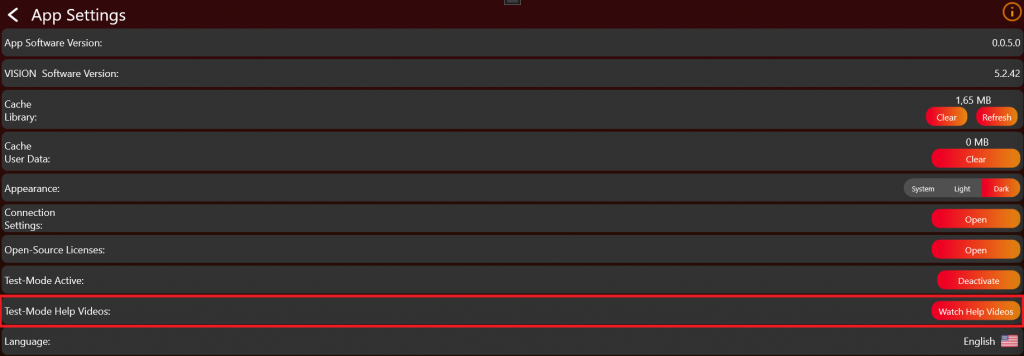
启用 Test Mode
- 点击顶部 gear 进入 Settings。

- Click App Settings。
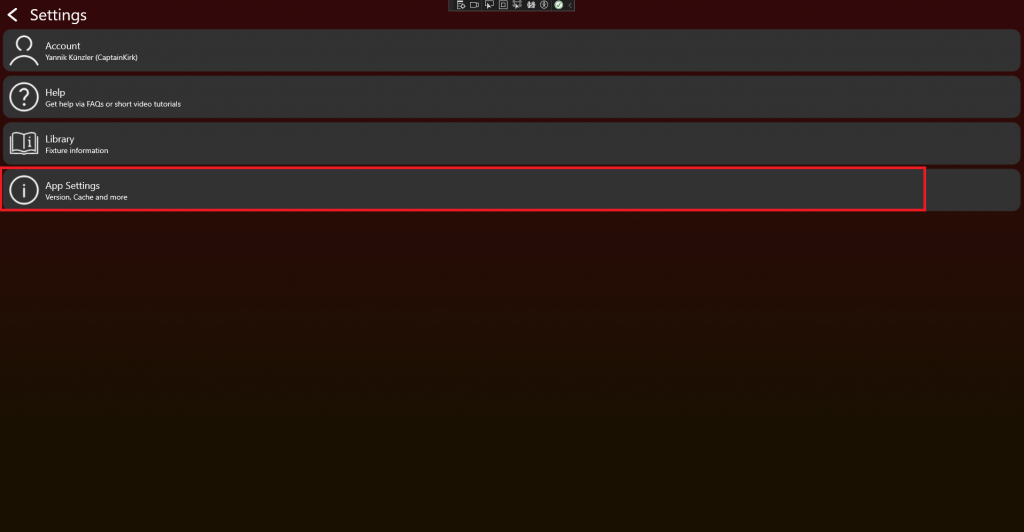
- 点击 App Software Version label(例如 0.0.5.0)两次。出现 prompt 后输入 PIN 7248,Test Mode 即会 activated。

- Test Mode 成功 enabled 后,会出现 additional help videos。点击 "Watch Help Videos" 可查看。
- 返回 Discover page,并重新 scan fixture。
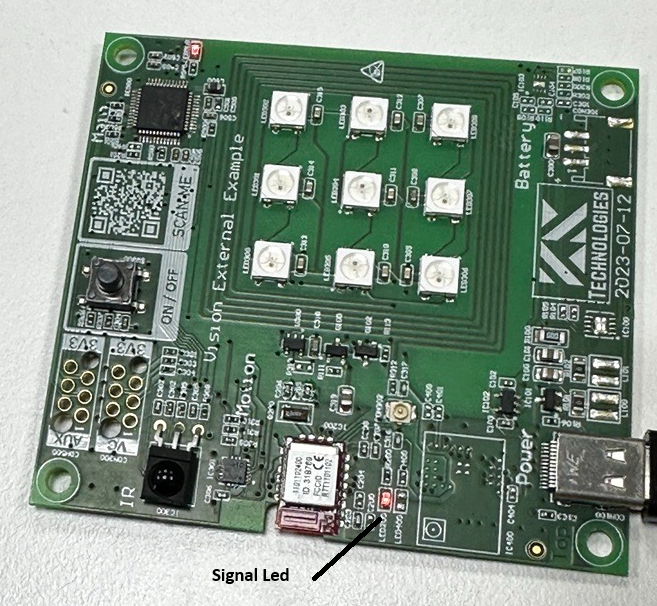
检查启动和广播状态
- 检查 Vision Controller 的 signal LED 在 startup 时是否亮起。只有 controller 已经通过 app 收到 firmware 后,LED 才会在启动时亮起。还要确认 main module 已 flash correct bootloader。Controller 每次 start 时 LED 会亮 5 seconds。如果 controller 仍在 Sleep Mode,或 flash 了 wrong firmware,LED 不会亮。
- 确保 main module 使用 correct bootloader,并确认 schematic 正确。
- 确保 Vision Controller 处于 normal operation。请确认
FIXTURE_IS_ONpin set high。更多信息见 System documentation。 - 另一个可能 issue 是 32.768 kHz crystal。请确认它 connected and working。Bootloader 可以 without crystal 工作,但 firmware 需要 crystal。
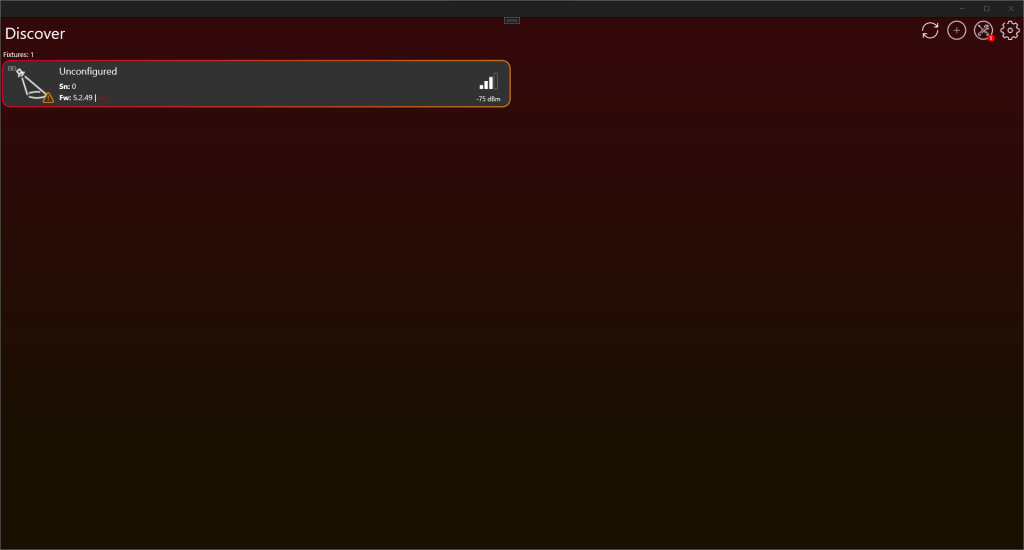
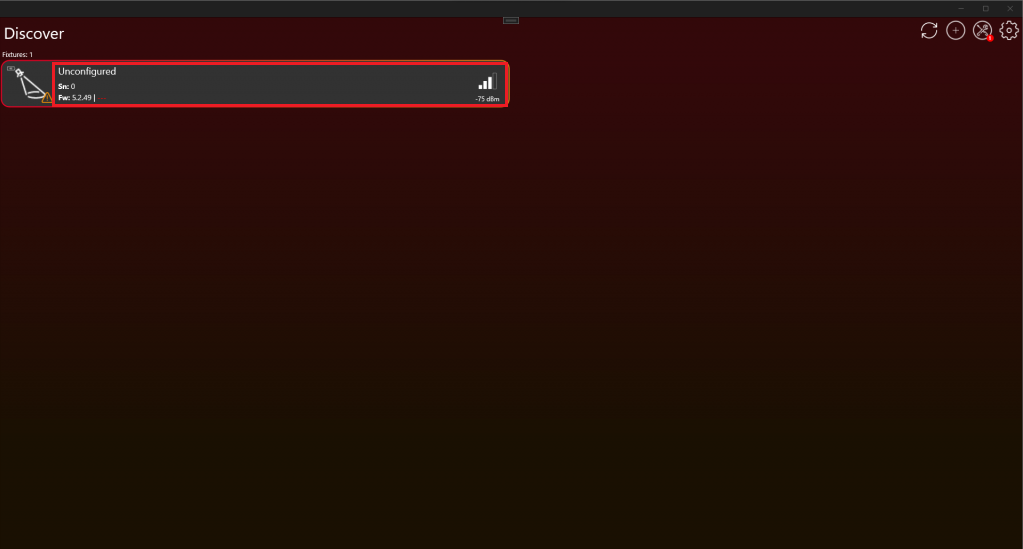
如果 implementation 已经工作,请确保 input source 设置为 Vision。通过 RDM Vision command,controller 会识别 input source,并通过 Bluetooth advertise itself。Vision Controller 只在 input source 为 Vision 时 advertise itself。
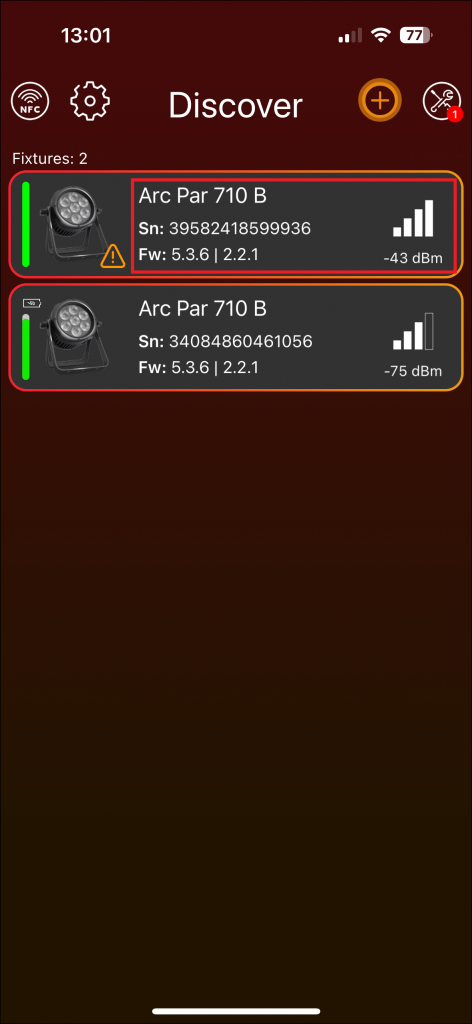
- Scan 后,fixture 应像这样 available:

- 如果 fixture 不 available,请确认正确应答 RDM Vision command。更多信息见 Vision RDM -> PIDs -> Command。
- 如果 fixture 显示为 "Unconfigured",说明 communication interface 可能未工作,或 Vision RDM Command 未正确应答。Vision RDM command checksum 也必须 correct。
首次通信检查
- 如果这还是第一次 implementation test,请先确认通信是否正常,再继续后面的测试。
- 确认 SPI communication 正常工作。如果使用 SPI Library,请查看 SPI Library 章节最后的测试步骤,确认它按预期工作:#source-25_SPI_Interface_Introduction
- 主要通信通过 RDM 和 Vision RDM Command 完成。请检查是否周期性收到 Vision GET command。
- 确认所有 required information 都被正确应答。
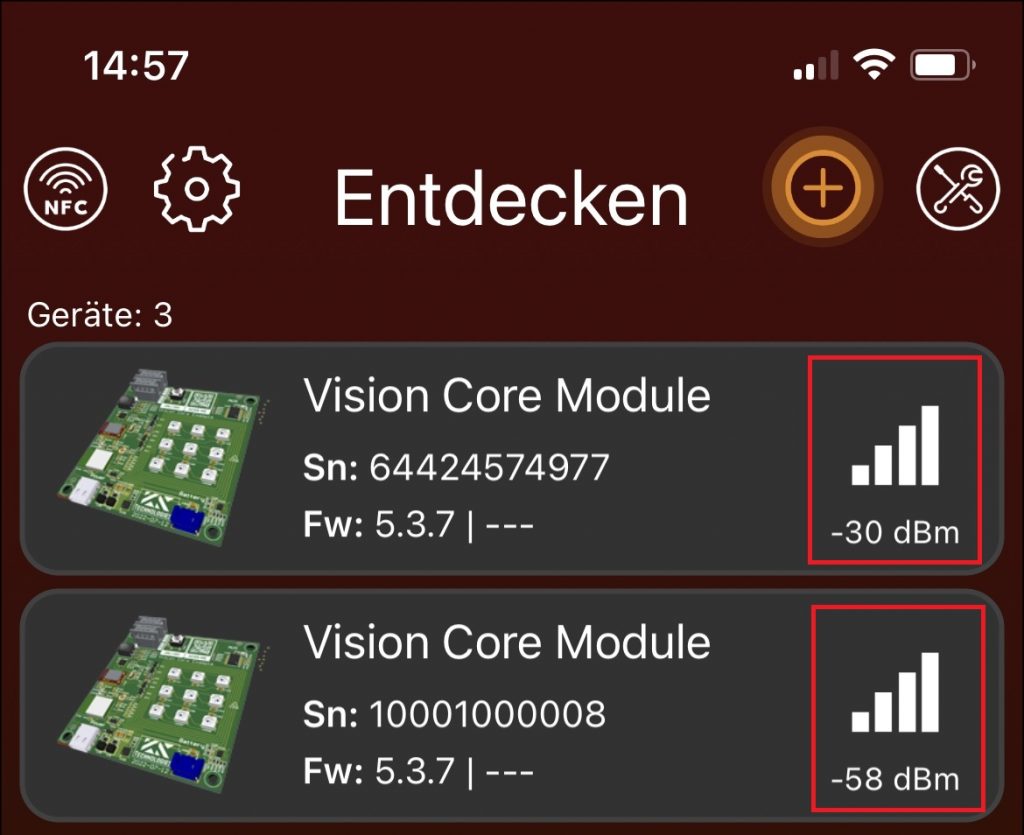
检查 Bluetooth 广播信号质量
- 完成上述检查后,再确认 fixture 的 Bluetooth advertising signal quality 是否良好。
- 如果没有发现任何 fixture,请先确认 Bluetooth module available。
- 如果有 Sample Board,请将 fixture 的 Bluetooth advertising signal strength 与 Sample Board 对比。Fixture signal quality 不应明显 worse。
- 如果没有 Sample Board,fixture 距离 20 cm 时,Bluetooth advertising signal quality 应保持 above -60 dBm。这是一个 very broad minimum standard。
连接 Fixture
点击 fixture 连接 device 与 fixture。不要点击 icon;该 icon 只用于 select / deselect fixture,目前不需要。
连接后应如下图所示。现在可以开始测试。
现在可以手动测试 product 所需 functions。当所有 functions 按预期工作后,开始创建用于 App Control 的 App Control Configuration:
#source-74_App_Control_Configuration
之后使用 certification tool 测试 product。该 tool 会 step by step 测试所有 functions:
#source-77_Implementation_Verification_Tool
4. RDM 实现
目标: 让 fixture 通过 Vision 对 required RDM commands 的响应与 wired RDM 保持一致。
需要实现的内容
- 尽可能将 RdmReceived data 传入 wired RDM 已使用的同一个 RDM decoder。
- 通过 vision_WriteRdm 返回 RDM answers。
- 实现 required standard RDM commands,例如 device info、device label、factory defaults、DMX personality、DMX start address、identify、reset、power state 和 self-test commands。
- 实现 required Vision custom RDM commands:CPID_VISION、CPID_ERROR_CODES 和 CPID_WARNING_CODES。
- 根据 PID requirement page 正确暴露 supported parameters。
- 即使 App Control 对当前 Vision DMX frame 使用临时默认值,RDM 仍应报告 saved user settings。
重要规则
- Vision 不使用另一种 RDM protocol,只是 transport layer 不同。
- Fixture 必须始终响应 RDM commands,即使 Vision 不是当前 selected input source。
- Factory default 应在需要时触发 unlink behavior。
- RDM UID 和 device model information 必须正确,尤其是 OEM products。
- 不要把 temporary App Control defaults 报告为 saved RDM settings。
立即测试
- 实现 required RDM commands 后立即运行 RDM test。
- 测试 device label、factory defaults、DMX personality、DMX start address、identify 和 power state 的 get/set behavior。
- 测试 CPID_VISION behavior,包括 input source、input state、unlink 和支持的 optional features。
- 测试 error 和 warning CPIDs。
- 通过 display 或 wired RDM 修改 DMX address/personality,并确认 Vision RDM 报告同样的 saved values。
常见错误
- 复制第二套 RDM stack,而不是复用现有 wired RDM implementation。
- 只关注 custom Vision CPIDs,忘记 mandatory standard PIDs。
- 让 App Control 改变 saved RDM settings。
- RDM 介绍 (已内联)
- RDM UID Specification (已内联)
- RDM PID 要求 (已内联)
- RDM Power State (已内联)
- RDM Vision Command (已内联)
- Display menu 要求 (已内联)
- Input Sources (已内联)
- Test RDM (已内联)
- RDM Library (参考链接) - 如果使用 prepared RDM library 而不是现有 wired RDM stack,请参考。
- RDM Error Codes (参考链接) - 详细 error reporting reference。
- RDM Warning Codes (参考链接) - 详细 warning reporting reference。
RDM 介绍
34_RDM_Introduction.htmlRDM 介绍
Vision RDM Protocol 完全基于 RDM Protocol(ANSI E1.20 - 2010)。唯一的区别是 transport layer:Vision RDM 通过 SPI communication 接收和发送。
RDM Protocol(ANSI E1.20 - 2010,Entertainment Technology - RDM Remote Device Management Over DMX512 Networks)在 DMX lighting fixtures 中被广泛认可和使用。Vision 采用该标准作为 fixture communication 的基础,因此已有的 RDM libraries 可以继续使用,不需要为 Vision 重新开发第二套 RDM stack。
因此,Vision 基于标准 DMX 和 RDM concepts。如果您的灯具已经支持 wired DMX 和 RDM,请尽量复用相同的 DMX handling 和相同的 RDM implementation。Vision 不需要单独的第二套 RDM stack。只有 App Control 会使用定义好的固定 DMX behavior,这样 app 才能一致地控制同一类型的所有灯具。
如果您还不支持 RDM,可以使用我们提供的 library。该 library 在下一节 RDM Vision Library 中说明。如果您已经有自己的 RDM implementation,可以跳过 library 章节。
如果需要更多 RDM 信息,可以访问 ESTA 网站 https://tsp.esta.org,或在这里下载相关 documents:https://tsp.esta.org/tsp/documents/published_docs.php
RDM UID Specification
36_RDM_UID_Specification.htmlRDM UID 格式说明
RDM UID 必须符合 RDM format,必须唯一,并且由以下信息组成:
- ESTA_Manufacturer_ID
- Unique Id
Format:
- [8 bit - ESTA_Manufacturer_ID]
- [8 bit - ESTA_Manufacturer_ID]
- [8 bit - Unique Id]
- [8 bit - Unique Id]
- [8 bit - Unique Id]
- [8 bit - Unique Id]
为了识别 device,需要使用 RDM Command DeviceInfo 中的 DeviceInfo.DeviceModelId attribute。
Replacement RDM UID
如果 fixture 没有 native RDM support,并且没有 manufacturer RDM value,我们可以提供 replacement RDM UID。
- [8 bit - REPLACEMENT_ID]
- [8 bit - REPLACEMENT_ID]
- [8 bit - Unique Id]
- [8 bit - Unique Id]
- [8 bit - Unique Id]
- [8 bit - Unique Id]
REPLACEMENT_ID: 0xFXXX
RDM PID 要求
37_RDM_PID_Requirements.html标准 RDM commands
以下 ANSI E1.20 定义的 standard RDM commands 是必需的,必须实现。
| RDM Command |
|---|
| PID_DEVICE_INFO |
| PID_DEVICE_LABEL |
| PID_FACTORY_DEFAULTS(执行 factory default 时,应同时触发 Vision unlink。) |
| PID_DMX_PERSONALITY |
| PID_DMXSTARTADDRESS |
| PID_SENSOR_DEFINITION(No Sensors -> DeviceInfo Sensor Count = 0,PID optional) |
| PID_SENSOR_VALUE(No Sensors -> DeviceInfo Sensor Count = 0,PID optional) |
| PID_DEVICE_HOURS |
| PID_LAMP_HOURS(No Lamp, but LED -> implement as source hours) |
| PID_LAMP_STRIKES(No Lamp? Not necessary) |
| PID_LAMP_STATE(No Lamp? Not necessary) |
| PID_DEVICE_POWER_CYCLES |
| PID_IDENTIFY_DEVICE |
| PID_RESET_DEVICE |
| PID_POWER_STATE |
| PID_PERFORM_SELFTEST |
| PID_SELF_TEST_DESCRIPTION |
RDM CPID 要求
以下 custom RDM commands 必须实现。
| RDM Command | Exposed as supported parameter |
|---|---|
| CPID_VISION | No |
| CPID_ERROR_CODES | Yes |
| CPID_WARNING_CODES | Yes |
可选 RDM CPID
以下 custom RDM commands 可以实现,用于在 server 上获取 extended data。
| RDM Command | Exposed as supported parameter |
|---|---|
| CPID_VISION_DATA | No |
| CPID_TOTAL_DEVICE_HOURS | Yes |
| CPID_TOTAL_SOURCE_HOURS | Yes |
| CPID_TOTAL_DEVICE_POWER_CYCLES | Yes |
RDM Power State
38_RDM_Power_State.htmlPID Power State
Get:
- POWER_STATE_FULL_OFF: Fixture is off。(无法应答)
- POWER_STATE_SHUTDOWN: Fixture is off。只能通过 RESET 回到
POWER_STATE_NORMAL。Fixture 仍会响应 messages。 - POWER_STATE_STANDBY: Fixture 处于 sleep mode,并尽可能降低 current consumption。
- POWER_STATE_NORMAL: Fixture 处于 normal operation mode。
Set:
- POWER_STATE_FULL_OFF: Fixture turns off。
- POWER_STATE_SHUTDOWN: Fixture turns off。
- POWER_STATE_STANDBY: Fixture 进入 sleep mode,并尽可能降低 current consumption。
- POWER_STATE_NORMAL: Fixture 进入 normal operation mode。
RDM Vision Command
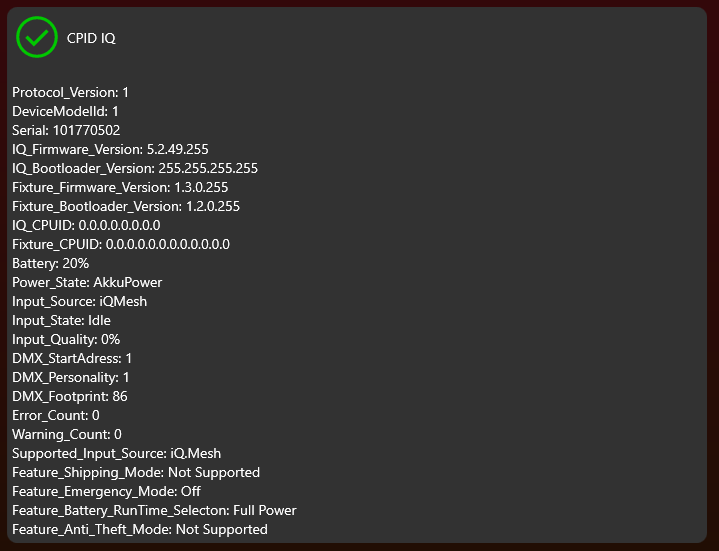
39_RDM_Vision_Command.html该 parameter 用于读取 Vision Controller 正常工作所需的全部必要信息。
| Data Type | DS_UNSIGNED_BYTE | PDL Size | Variable(See Protocolversion) |
| Cmd Class | CC_GET | Unit | UNITS_NONE |
| Prefix | PREFIX_NONE | Default | 0x00 |
| Min | 0x00 | Max | 0xFF |
| Description | "VISION" | ||
GET Command 0xA000
Controller Incoming Command:
| (Port ID) | (Msg. Count) | (Sub-Device) | |
| 0x01-0xFF | 0x00 | 0x0000 (Root) or 0x0001-0x0200 | |
| (CC) | (PID) | (PDL) | |
| GET_COMMAND | VISION (0xA000) | 0x00 | |
| (PD) | |||
Controller Response:
| (Response Type) | (Msg. Count) | (Sub-Device) | |
| ACK | 0x00-0xFF | Copy of Controller SD | |
| (CC) | (PID) | (PDL) | |
| GET_COMMAND_RESPONSE | VISION (0xA000) | Variable(See Protocolversion) | |
| (PD) | |||
| Info Stream | |||
Info Streams:
| Info Stream Protocol Version 1 | ||||
|---|---|---|---|---|
| Index | DataType | Name | Description | Value Definitions |
| 0 | uint8_t | Protocol Version | 描述 protocol version | 1: Version 1 |
| 1 | uint16_t | DeviceModelId | 来自 RDM DeviceInfo 的 DeviceModelId | |
| 3 | uint64_t | Serial | Fixture serial number,使用定义 format。注意 RDM 是 Big Endian。 | 必须是唯一 Serialnumber |
| 11 | uint8_t[4] | Vision Controller Firmware Version | 描述 Vision Controller Version。可从 SPI register 读取。 | [Major,Minor,Patch,Release]从 SPI Register 读取。如果不可用,设置为 zero。该 parameter 仅用于通过 DMX interface 读取 information。 |
| 15 | uint8_t[4] | Vision Controller Bootloader Version | 描述 Vision Controller Bootloader Version。可从 SPI register 读取。 | [Major,Minor,Patch,Release]从 SPI Register 读取。如果不可用,设置为 zero。该 parameter 仅用于通过 DMX interface 读取 information。 |
| 19 | uint8_t[4] | Fixture Firmware Version | 描述 Fixture Version | [Major,Minor,Patch,Release](Semantic Versioning)。每个 part 为 8 bit,并额外添加 Release part,用于表示是否为 release version。Release 必须为 255,firmware 才能通过 server 公开可用。否则 server 会拒绝该 software,因为它只被视为 developer version。因此,在正式 release version 255 之前,可以创建最多 244 个 developer versions。 |
| 23 | uint8_t[4] | Fixture Bootloader Version | 描述 Fixture Bootloader Version | [Major,Minor,Patch,Release]如果没有 bootloader,设置为 zero。 |
| 27 | uint8_t[8] | Vision Controller CPU ID | 描述 Vision Controller CPU ID。可从 SPI register 读取。 | 如果不可用,设置为 zero。该 parameter 仅用于通过 DMX interface 读取 information。 |
| 35 | uint8_t[12] | Fixture Main CPU ID | 描述 Fixture Main Controller CPU ID | 如果不可用,设置为 zero。该 parameter 仅用于通过 DMX interface 读取 information。 |
| 47 | uint8_t | Battery | Battery state / Level Indicator Info | 1-100: Battery available(用于 fixture operation 的 chargeable battery),1 到 100 表示 state of charge in % 0: No battery available 255: 仅用于 wakeup 和 fixture configuration 的小 battery 如果 Power Supply State 为 4 或 5:0-100 用作 Level Indicator |
| 48 | uint8_t | Power Supply State | Power Supply State / Level Indicator State | 0: No Power(Battery wakeup) 1: Battery Powered 2: Grid Power Supply / AC Power Supply 3: Charging Battery(使用小 battery 仅做 configuration 时不适用) 如果没有 battery,但需要 level indicator,例如 haze fluid level,请使用: 4: Level indicator 如果需要表示 preparation,例如 heat up,请使用: 5: Level indicator + Inpreparation |
| 49 | uint8_t | reserved | ||
| 50 | uint8_t | Selected Input Source | 描述 selected input source | 0: Vision 1: DMX 2: CRMX / WDMX 3: Artnet 4: SACN 5: GLP DOP 6: IR Remote (Fixture) 7: Manual Mode 8: Auto Mode(Automatic Source Selection with Priority。请参考 InputSource 章节) 9 - 252: Reserved 253: Wireless (2.4 GHz) 254: Wireless (Other) 255: Ethernet |
| 51 | uint8_t | Selected Input State | 描述 selected input source 的 state。如果 selected input source 为 Vision,请使用 Vision 的 Status register information 推导该 value。 | 0: Idle(DMX not available 等) 1: Unlinked(CRMX/Vision unlinked 等) 2: Linked(CRMX/Vision linked 等) 3: Active(DMX available、CRMX 等) 4: Active Vision(Vision Active or Master) |
| 52 | uint8_t | Selected Input Quality | 描述 input source 的 signal quality | 0: No quality available 1-100: Quality in % |
| 53 | uint16_t | DMX StartAdress | Fixture 的 DMX Startaddress | 1 - 512(来自 fixture menu 的 DMX start address) |
| 55 | uint8_t | DMX Personality | Fixture 的 DMX Personality | 0: DMX Personality not available 1-255: DMX Personalities(来自 fixture menu 的 DMX Personality) |
| 56 | uint16_t | DMX Footprint | Selected DMX Mode 的 DMX Channel count | 来自 fixture menu 中所选 DMX Personality 的 DMX Footprint |
| 58 | uint8_t | Error Count / Warning Count | Fixture 的 Error Count | Bit 0-3: Error Count Bit 4-7: Warning Count。Wake Up mode 中,fixture 应显示 last session 的 Error Count。 |
| 59 | uint16_t | Supported Input Sources | Supported input sources 的 flags | Bit 0: Vision Bit 1: DMX Bit 2: CRMX / WDMX Bit 3: Artnet Bit 4: SACN Bit 5: GLP DOP Bit 6: IR Remote (Fixture) Bit 7: Manual Mode Bit 8: Auto Mode Bit 9 - 15: Reserved 需要其他 source?请联系我们。 请记住 RDM 是 Big Endian。 所以数据顺序如下: [Bit 8-15],[Bit 0-7] |
| 61 | uint8_t | Feature: Sleep Mode | 0: NOT SUPPORTED 1: Supported | |
| 62 | uint8_t | Feature: Battery Shipping Mode | 0: NOT SUPPORTED 1: Supported | |
| 63 | uint8_t | Feature: Emergency Mode | 0: NOT SUPPORTED 1: Off 2: On | |
| 64 | uint8_t | Feature: Battery RunTime Selection | 0: NOT SUPPORTED 1: Full Power 2 - 25: Runtime in (Hours +1) | |
| 65 | uint8_t | Feature: Anti-Theft-Mode | 0: NOT SUPPORTED 1: Inactive 2: Ready 3: Active(Alarm triggered) | |
Code example
typedef enum
{
  RDMVISIONSETTINGSCOMMAND_INPUTSOURCE = 1,
  RDMVISIONSETTINGSCOMMAND_INPUTSTATE = 2,
  RDMVISIONSETTINGSCOMMAND_DISPLAYPOPUP = 3,
  RDMVISIONSETTINGSCOMMAND_EMERGENCYMODE = 4,
  RDMVISIONSETTINGSCOMMAND_BATTERYRUNTIME = 5,
  RDMVISIONSETTINGSCOMMAND_ANTITHEFTMODE = 6,
}rdm_vision_settings_command_t;

typedef enum
{
  RDMVISIONINPUTSOURCE_VISION = 0,
  RDMVISIONINPUTSOURCE_DMX = 1,
  RDMVISIONINPUTSOURCE_CRMXWDMX = 2,
  RDMVISIONINPUTSOURCE_ARTNET = 3,
  RDMVISIONINPUTSOURCE_SACN = 4,
  RDMVISIONINPUTSOURCE_GLPDOP = 5,
  RDMVISIONINPUTSOURCE_IRREMOTE = 6,
  RDMVISIONINPUTSOURCE_WIRELESS2_4GHZ = 253,
  RDMVISIONINPUTSOURCE_WIRELESS2_OTHER = 254,
  RDMVISIONINPUTSOURCE_ETHERNET = 255,
}rdm_vision_inputsource_t;

typedef enum
{
	IQ_POWERSUPPLY_STATE_NOPOWER = 0, // No Power (Battery wakeup)
	IQ_POWERSUPPLY_STATE_BATTERY_POWERED = 1,
	IQ_POWERSUPPLY_STATE_GRID_POWERED = 2,
	IQ_POWERSUPPLY_STATE_CHARGING = 3,
}rdm_vision_power_supply_state_t;

typedef enum
{
	IQ_INPUTSTATE_IDLE = 0, // No Power (Battery wakeup)
	IQ_INPUTSTATE_UNLINKED = 1,
	IQ_INPUTSTATE_LINKED = 2,
	IQ_INPUTSTATE_ACTIVE = 3,
}rdm_vision_input_state_t;

typedef struct  __attribute__((__packed__))
{
  uint8_t protocollVersion;
  uint16_t deviceModelId;
  uint64_t serial;
  uint8_t iqControllerFirmware[4];
  uint8_t iqControllerBootloaderFirmware[4];
  uint8_t fixtureFirmware[4];
  uint8_t fixtureBootloaderFirmware[4];
  uint8_t iqControllerCpuId[8];
  uint8_t fixtureMainCpuId[12];
  uint8_t battery;
  rdm_vision_power_supply_state_t powerSupplyState;
  uint8_t reserved;
  rdm_vision_inputsource_t inputSource;
  rdm_vision_input_state_t inputState;
  uint8_t inputQuality;
  uint16_t dmxStartaddress;
  uint8_t dmxPersonality;
  uint16_t dmxFootprint;
  uint8_t errorCount;
  uint16_t supportedInputSource;
  uint8_t reserved2;
  uint8_t featureShippingMode;
  uint8_t featureEmergency;
  uint8_t featureRuntimeSelection;
  uint8_t featureAntitheftMode;
}rdm_vision_get_response_t;

static void DecodeGetVision(rdm_message_header_t header, uint8_t * msg, uint16_t length)
{
  rdm_answer_t implemented;
  implemented.response = RDM_ACK;
  implemented.reason = NR_UNKNOWN_PID;
  rdm_vision_get_response_t response;
  memset(&response,0,sizeof(response));
  RdmExtGetVision(&implemented,&response);
  if(implemented.response == RDM_ACK)
  {
    response.deviceModelId= __builtin_bswap16(response.deviceModelId);
    response.serial = __builtin_bswap64(response.serial);
    response.dmxStartaddress= __builtin_bswap16(response.dmxStartaddress);
    response.dmxFootprint= __builtin_bswap16(response.dmxFootprint);
    response.supportedInputSource= __builtin_bswap16(response.supportedInputSource);
    SendResponse(header,(uint8_t*)&response,sizeof(response));
  }
  else
  {
    SendNackResponse(header, implemented.reason);
  }
}

typedef enum
{
	IQ_INPUTSTATE_UNLINK = 0,
	IQ_INPUTSTATE_LINK = 1,
}rdm_vision_set_input_state_t;

typedef enum
{
  RDMVISIONBATTERYRUNTIME_FULLOUTPUT = 0,
  RDMVISIONBATTERYRUNTIME_1HOURS = 1,
  RDMVISIONBATTERYRUNTIME_2HOURS = 2,
  RDMVISIONBATTERYRUNTIME_3HOURS = 3,
  RDMVISIONBATTERYRUNTIME_4HOURS = 4,
  RDMVISIONBATTERYRUNTIME_5HOURS = 5,
  RDMVISIONBATTERYRUNTIME_6HOURS = 6,
  RDMVISIONBATTERYRUNTIME_7HOURS = 7,
  RDMVISIONBATTERYRUNTIME_8HOURS = 8,
  RDMVISIONBATTERYRUNTIME_9HOURS = 9,
  RDMVISIONBATTERYRUNTIME_10HOURS = 10,
  RDMVISIONBATTERYRUNTIME_11HOURS = 11,
  RDMVISIONBATTERYRUNTIME_12HOURS = 12,
  RDMVISIONBATTERYRUNTIME_13HOURS = 13,
  RDMVISIONBATTERYRUNTIME_14HOURS = 14,
  RDMVISIONBATTERYRUNTIME_15HOURS = 15,
  RDMVISIONBATTERYRUNTIME_16HOURS = 16,
  RDMVISIONBATTERYRUNTIME_17HOURS = 17,
  RDMVISIONBATTERYRUNTIME_18HOURS = 18,
  RDMVISIONBATTERYRUNTIME_19HOURS = 19,
  RDMVISIONBATTERYRUNTIME_20HOURS = 20,
  RDMVISIONBATTERYRUNTIME_21HOURS = 21,
  RDMVISIONBATTERYRUNTIME_22HOURS = 22,
  RDMVISIONBATTERYRUNTIME_23HOURS = 23,
  RDMVISIONBATTERYRUNTIME_24HOURS = 24,
}rdm_vision_battery_runtime_t;

typedef enum
{
  RDMVISIONANTITHEFT_ON,
  RDMVISIONANTITHEFT_OFF,
  RDMVISIONANTITHEFT_ALARM
}rdm_vision_antitheft_t;


typedef struct
{
   uint8_t protocollVersion;
   rdm_vision_settings_command_t command;
} rdm_vision_settings_stream_t;

static void DecodeSetVision(rdm_message_header_t header, uint8_t * msg, uint16_t length)
{
  rdm_answer_t implemented;
  implemented.response = RDM_ACK;
  implemented.reason = NR_UNKNOWN_PID;
  if(length >= sizeof(rdm_vision_settings_stream_t) + 1)
  {
    rdm_vision_settings_stream_t* stream = (rdm_vision_settings_stream_t*) msg;
    switch(stream->command)
    {
      case RDMVISIONSETTINGSCOMMAND_INPUTSOURCE:
      RdmExtSetVisionInputSource(&implemented,*((rdm_vision_inputsource_t*) &msg[sizeof(rdm_vision_settings_stream_t)]));
      break;
      case RDMVISIONSETTINGSCOMMAND_INPUTSTATE:
      RdmExtSetVisionInputState(&implemented, *((rdm_vision_input_state_t*) &msg[sizeof(rdm_vision_settings_stream_t)]));
      break;
      case RDMVISIONSETTINGSCOMMAND_DISPLAYPOPUP:
      RdmExtSetVisionPopup(&implemented,*((rdm_vision_popup_t*) &msg[sizeof(rdm_vision_settings_stream_t)]) );
      break;
      case RDMVISIONSETTINGSCOMMAND_EMERGENCYMODE:
      RdmExtSetVisionEmergencyMode(&implemented,msg[sizeof(rdm_vision_settings_stream_t)] > 0);
      break;
      case RDMVISIONSETTINGSCOMMAND_BATTERYRUNTIME:
      RdmExtSetVisionBatteryRuntime(&implemented,*((rdm_vision_battery_runtime_t*)&msg[sizeof(rdm_vision_settings_stream_t)]));
      break;
      case RDMVISIONSETTINGSCOMMAND_ANTITHEFTMODE:
		if(*((uint32_t*)&msg[sizeof(rdm_vision_settings_stream_t)]) == 583619)
		{
			 RdmExtSetVisionAntitheftMode(&implemented,RDMVISIONANTITHEFT_OFF);
		}
		else if(*((uint32_t*)&msg[sizeof(rdm_vision_settings_stream_t)]) == 204688)
		{
			 RdmExtSetVisionAntitheftMode(&implemented,RDMVISIONANTITHEFT_ON);
		}
		else if(*((uint32_t*)&msg[sizeof(rdm_vision_settings_stream_t)]) == 388165)
		{
			 RdmExtSetVisionAntitheftMode(&implemented,RDMVISIONANTITHEFT_ALARM);
		}
		else
		{
			implemented.response = RDM_NACK_REASON;
		}
      break;
	   default:
        implemented.response = RDM_NACK_REASON;
      break;
    }
    if(implemented.response == RDM_ACK)
    {
      uint8_t response = 0;
      SendResponse(header,&response,1);
    }
    else
    {
      uint8_t response = 3; // 0 -Ok , 1 - Unknown Command , 2 Err Execution Command, 3 Unsupported command
      SendResponse(header,&response,1);
    }
  }
  else
  {
    SendNackResponse(header, NR_FORMAT_ERROR);
  }
}
SET Command 0xA000
Controller Incoming Command:
| (Port ID) | (Msg. Count) | (Sub-Device) | |
| 0x01-0xFF | 0x00 | 0x0000 (Root) or 0x0001-0x0200 | |
| (CC) | (PID) | (PDL) | |
| SET_COMMAND | Vision (0xA000) | Variable(0-100) | |
| (PD) | |||
| Settings Stream | |||
Controller Response:
| (Response Type) | (Msg. Count) | (Sub-Device) | |
| ACK | 0x00-0xFF | Copy of Controller SD | |
| (CC) | (PID) | (PDL) | |
| SET_COMMAND_RESPONSE | Vision (0xA000) | 1 | |
| (PD) | |||
| uint8_t Status | 0 = OK, 1= Unknown Command, 2 = Error executing Command, 3 = Unsupported Command | |||
Settings Streams:
| Settings Stream Protocol Version 1 | ||||
|---|---|---|---|---|
| Index | DataType | Name | Description | Value Definitions |
| 0 | uint8_t | Protocol Version | 描述 Protocol Version | 1: Version 1 |
| 1 | uint8_t | Command Identifier | Command | - |
| 2 | uint8_t[variable] | Data | Data 取决于 command | - |
| Command | Identifier | DataType | Description | Value Definitions |
|---|---|---|---|---|
| Set Input Source | 0x01 | uint8_t | 0: Vision, 1: DMX, 2: CRMX / WDMX, 3: Artnet, 4: SACN, 5: GLP DOP, 6: IR Remote (Fixture), 7: Manual Mode, 8: Auto Mode, 9 - 252: Reserved, 253: Wireless (2.4 GHz), 254: Wireless (Other), 255: Ethernet 需要其他 Source?请联系我们。 | |
| Set Input Source State | 0x02 | uint8_t | 0: Unlink 1: Link (trigger) | |
| Show Display Popup | 0x03 | uint8_t [var] | See Command Details | |
| Set Emergency Mode | 0x04 | uint8_t | 在 supported fixtures 上设置 emergency mode | 0: Off 255: On |
| Set Battery RunTime Selection | 0x05 | uint8_t | 在 supported fixtures 上设置 battery runtime | 0: Full Power 1 - 24: Runtime in Hours |
| Set Anti-Theft-Mode | 0x06 | uint32_t | 在 supported fixtures 上设置 anti-theft-mode | 583619: Off 204688: On 388165: Alarm 出于 security reasons,该 Command 应仅通过 Vision active,不应通过 DMX RDM active。 |
| Set Shipping Mode | 0x07 | - | Set Shipping mode | 255: On |
| Set Serial number | 0x08 | uint8_t[8] uint64_t | Fixture Security Key Serialnumber | Fixture Security Key 由 Vision Web Service 生成,可在 Fixture Settings Page 中找到。 |
| Set Device Model ID / Fixture ID | 0x09 | uint8_t[8] uint16_t | Fixture Key DeviceModel/Fixture ID | Individual fixture key,可在 Fixture 的 RDM Libraries 下添加。 可使用 RDM Device Model ID 或 specific fixture id。 |
Feature: Emergency mode
Emergency Mode 可以 enabled 和 disabled。该 setting 应保存,因此 fixture 断电后仍能记住状态。
如果 emergency mode enabled,当没有 grid power available 时,fixture 应以 full output 点亮。如果 gridpower(AC)available,则应按 normal operation 行为工作。
Feature: Battery runtime selection
Battery RunTime Selection 可以 enabled 和 disabled。该 setting 应保存,因此 fixture 断电后仍能记住状态。
如果 enabled,fixture 必须确保 battery runtime 符合选择值,从 minimum 1 hour 到 24 hours。该 runtime 基于 100% charging state 定义。
良好的实现方式是限制 fixture 的 maximum power output。根据 battery capacity 和 energy consumption 计算需要的输出,并 dim down light,以保证所需 runtime。
Feature: Anti-theft mode
Anti-Theft-Mode 可以 enabled、disabled 和 triggered。启用 Anti-Theft-Mode 时,不应允许关闭 fixture,也不应允许使用 display 等 user interface。当 Anti-Theft-Mode 被 triggered 时,fixture 应通过 visual effects 和/或 sound effects 发出 alarm。
该 feature 只有在 fixture 为 battery powered 时才能完整实现。如果 feature active,所有 user interfaces 都应 locked(例如 menu locked、button locked 等)。Vision Controller 拥有 fixture 当前 acceleration information。如果 fixture 在 anti-theft-mode 下被移动,会触发 alarm。
- 使用 red 和 blue 之间的 dynamic color pattern
- 使用 internal speaker 作为 siren(optional)
Feature: Shipping mode
Shipping Mode 只能 enabled。
如果 shipping mode enabled,fixture 应关闭并 cut off battery power。Fixture 只能通过 gridpower(AC)再次启动,以确保 transport experience 更可靠。
设置 Serial number / Device Model ID
该 function 可用于向 fixture 写入 serial number 或 device model id。该 function 仅对 fixture owners 开放。
Fixture Security Key 由 Vision Web Service 生成,可在 Fixture Settings Page 中找到。
Display menu 要求
54_Display_Menu_Requirements.html为了给 user 提供 standardized implementation,需要定义一些 menu behavior。Vision App Control 应设计为一个 input source,类似 DMX、CRMX 或 ArtNet。
Input Source 名称:VISION APP。如果字符空间不足,可以使用 VC APP。
VISION APP menu 分为一个 action、一个 optional setting,以及一组 read-only information items。下表列出应向 user 显示的 entries:
| Level 1 | Level 2 | Level 3 | Type | Description |
| VISION APP | Unlink | Action | 将 fixture 从 network unlink。需要 user confirm。 | |
| App Visibility | Vision Active* | Setting (optional) | Vision 被选择为 Input Source。 | |
| Input Inactive | 当没有其他 active Input Source available 时,Vision 变为 active。 | |||
| Always | Vision 始终 active。 | |||
| Information | State | Information (read-only) | Current link state: Unlinked / Linked / Active / Master / Inactive。 | |
| Network Name | Fixture linked 到的 network name。 | |||
| Signal Quality | Signal quality in % (0 - 100)。 | |||
| UUID | Fixture 的 unique identifier。 |
Note: App Visibility setting 是 optional。如果未实现,fixture 应按选择了 "Vision Active" 的方式 behavior。
Vision 相关 fixture settings(Battery)
以下 fixture settings 是 optional,但 recommended,因为它们会由 Vision Control app 显示和使用。如果实现,应可从 regular fixture menu 访问,通常位于 General Settings 和 Fixture Brightness 下。
| Setting | Options | Type | Description |
| AC Emergency | OFF* / ON | Setting (optional) | 定义 AC emergency 时的 fixture behaviour。Vision app 只会将该 setting On / Off。 |
| Battery Runtime | OFF* Remaining Time: xx | Setting (optional) | Battery runtime limit disabled。 |
| Full battery: 2 h Remaining Time: xx | Target runtime 2 h。 | ||
| Full battery: 4 h Remaining Time: xx ... Full battery: 22 h Remaining Time: xx | Target runtime 可按 2 h steps 选择。 | ||
| Full battery: 24 h Remaining Time: xx | Maximum target runtime。 |
完整 menu 示例
以下 example 展示如何将 VISION APP entries 嵌入完整 fixture menu,并与 common fixture settings 放在一起。Default values 使用 "*" 标记。
| Level 1 | Level 2 | Level 3 | Level 4 | Description / Default |
| DMX Settings | DMX Address | 1 - 512 | Default: 1。 | |
| DMX Mode | RGB / RGBL / ... | Default: RGB | ||
| Input Source | Wired DMX | Wired DMX input。 | ||
| CRMX | Wireless CRMX input。 | |||
| Vision App | 在该 mode 中请确保 CRMX off。 | |||
| Master / Slave | Set as Master / Set as Slave | Default: Slave。 | ||
| Input Settings | Vision App | Unlink | Yes / No | Action - 将 fixture 从 network unlink。 |
| Visibility (optional) | Vision Active* / Input Inactive / Always | Default: Vision Only。 | ||
| Information | State / Network Name | Read-only。 | ||
| Signal Quality / UUID | Read-only。 | |||
| CRMX | Unlink | Yes / No* | Unlinks CRMX network。 | |
| Dimmer Settings | Dimmer Curve | Linear / Square / Square Inv / S-Curve* | Default: S-Curve。 | |
| Dimmer Response | Off* / Slow / Middle / Fast / Very Fast | Default: Off。 | ||
| Fixture Settings | AC Emergency | OFF* / Hold / Blackout / White / Color Macro | AC emergency 时的 behaviour。Vision app 只会将该 setting On / Off。 | |
| Battery Runtime | OFF* Remaining Time: xx | Battery runtime limit disabled。 | ||
| Full battery: 2 h Remaining Time: xx | Target runtime 2 h。 | |||
| Full battery: 4 h Remaining Time: xx ... Full battery: 22 h Remaining Time: xx | Target runtime 可按 2 h steps 选择。 | |||
| Full battery: 24 h Remaining Time: xx | Maximum target runtime。 | |||
| DMX Fail | Hold* / Blackout | DMX signal loss 时的 behaviour。 | ||
| Factory Defaults | Yes / No | 将所有 settings reset to factory defaults。 | ||
| Information | Device Hours | Standard RDM counter (PID 0x0400)。Fixture total runtime。 | ||
| Lamp Hours | Standard RDM counter (PID 0x0401)。Total LED runtime;Vision app 将其用作 LED hours。 | |||
| Device Power Cycles | Standard RDM counter (PID 0x0405)。Total power cycles。 | |||
| RDM ID | Unique RDM device identifier。 | |||
| Software Version | Fixture firmware / software version。 | |||
| Sensors | Sensors like temperature。 |
Anti-theft lockscreen
当 fixture 通过 Anti-Theft feature locked 时,display 应清楚显示该 state,并告诉 user 如何 unlock。推荐 message:
Anti-Theft is active: Use Vision Control app to unlock
对于字符空间有限的 displays,可以使用以下 short variant:
Anti-Theft: Unlock via Vision Control
如何获取这些信息?
Unlink (Action):
使用 Vision SPI Library 时,该 function 位于 libVisionSpiInterface.h,名称为 vision_unlinkVisionData。它会将 fixture 从 Vision App 创建的 network unlink。
State (Information)
使用 Vision SPI Library 时,该 function 位于 libVisionSpiInterface.h,名称为 vision_getStatusFlags。Return type 为 vision_status_flags_t。在该 type 中可以找到所需 information:vision_status_t。
Network Name (Information)
使用 Vision SPI Library 时,该 function 位于 libVisionSpiInterface.h,名称为 vision_getInformation。Return type 为 vision_information_t,其中包含 12 Bytes long network name。
Signal Quality (Information)
使用 Vision SPI Library 时,该 function 位于 libVisionSpiInterface.h,名称为 vision_getInformation。Return type 为 vision_information_t,其中包含 signalQuality。0 - 100 表示 Quality in %。
UUID (Information)
使用 Vision SPI Library 时,该 function 位于 libVisionSpiInterface.h,名称为 vision_getInformation。Return type 为 vision_information_t,其中包含 uuid。
Input Sources
55_Input_Sources.htmlVision 需要一些 source switching logic 才能按预期工作。
因此,如果 fixture 有不同 signal inputs,就必须使用不同 input sources。这些 input sources 定义当前哪个 signal active。
Vision supports:
0: Vision
1: DMX
2: CRMX / WDMX
3: Artnet
4: SACN
5: GLP DOP
6: IR Remote (Fixture)
7: Manual Mode
8: Auto Mode (Automatic Source Selection with Priority)
9 - 252: Reserved
253: Wireless (2.4 GHz)
254: Wireless (Other)
255: Ethernet
Auto Mode(自动 source selection)
该 mode 用于在不改变 input source setting 的情况下,自动在 protocols 之间切换。该 mode 应按以下方式 behavior:
Priority: 1. DMX, 2. WDMX, 3. Vision App Control
当某个 higher priority source 变为 active 时,应使用该 source 的 DMX,并且只要该 source 保持 active,wireless radio protocols 可以 turned off。
Idle: WDMX 和 Vision App Control 应 active。
DMX Active: WDMX 和 Vision 应 off。关闭 WDMX chip;Vision 会自动处理该 use case,您只需要在 RDM CPID Vision 中返回正确 response(50: Selected Input Source,51: Selected Input State)。CPID Vision
WDMX Active: Vision 应 off。Vision 会自动处理该 use case,您只需要在 RDM CPID Vision 中返回正确 response(50: Selected Input Source,51: Selected Input State)。CPID Vision
Vision Active: WDMX 必须 turned off。
Test RDM
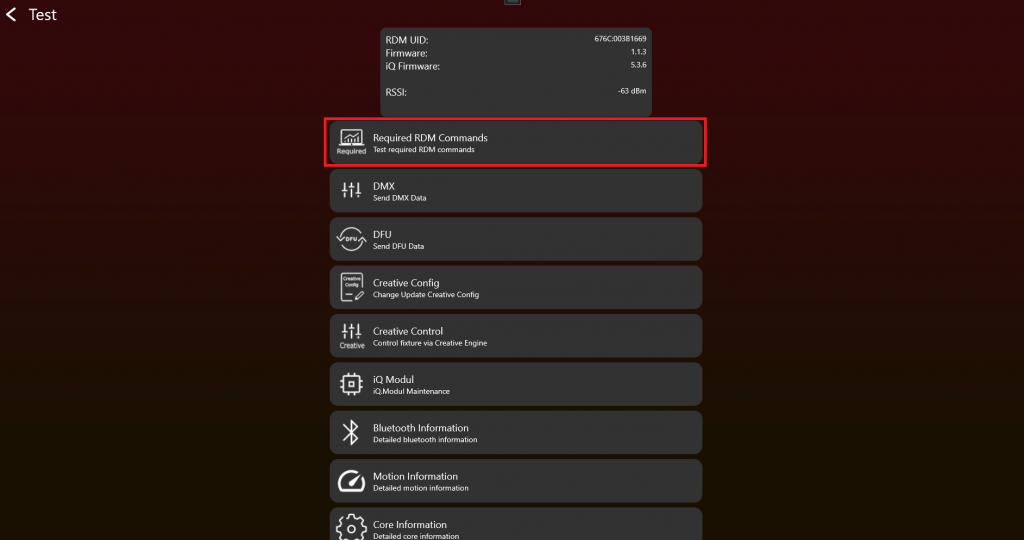
68_Test_RDM.html- Enable Test Mode 并连接 fixture 后,应显示如下。测试 RDM Commands 时,点击 "Required RDM Commands":
2. 点击 Get / Set button 后,RDM commands 会发送到 fixture,并显示 result。请逐项检查每个 RDM command 的 result。
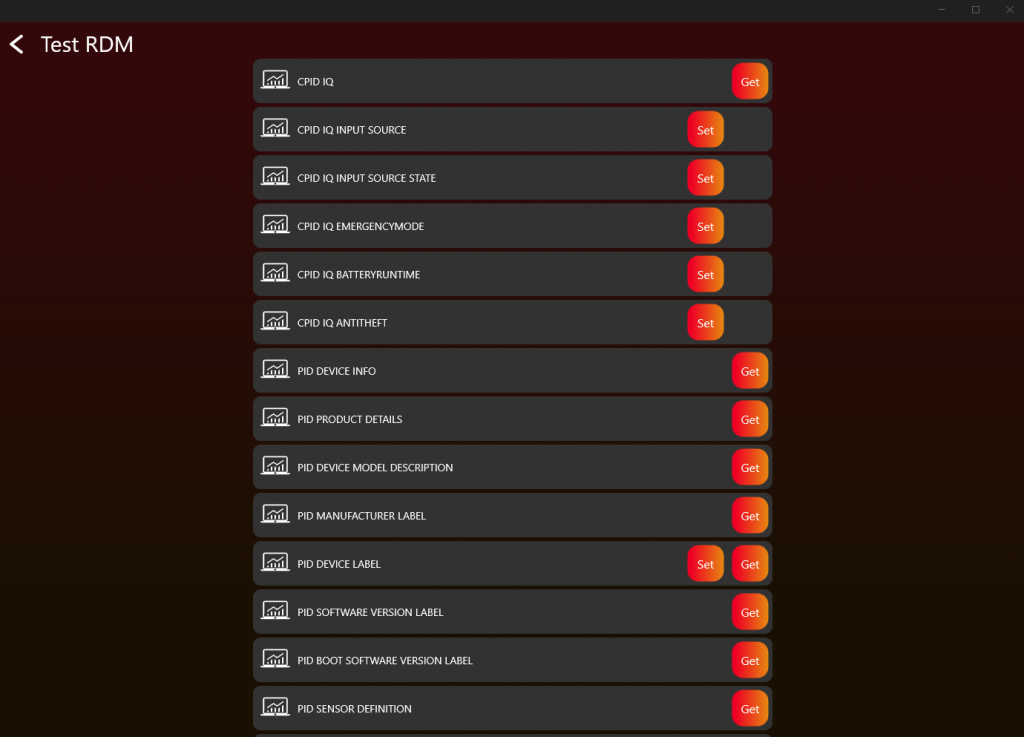
3. 如果 response 正确,应如下所示:
4. 对每个 RDM command 重复该 step。
5. DMX Control 和 App Control
目标: 正确实现 normal DMX Control 和 App Control,并避免把它们与 saved fixture settings 混淆。
需要实现的内容
- 通过 DmxReceived 接收 Vision DMX stream。
- 读取第一个值作为 Vision Control Behavior。
- Vision Control Behavior 0 时,将 DMX data 交给与 wired DMX 相同的 DMX handling。
- Vision Control Behavior 255 时,仅对当前 frame 应用 App Control defaults。
- Values 1-254 仅在需要支持 legacy Vision DMX Adapter behavior 时实现。
- 当 Vision 不是 selected input source 时,通过 WRITE_DMX 将 fixture physical DMX input 写回 Vision。
重要规则
- Vision Control Behavior 0 表示 DMX Control,使用 fixture saved DMX start address、DMX personality 和 user settings。
- Vision Control Behavior 255 表示 App Control,使用固定默认值,例如 DMX start address 1 和 required App Control personality。
- App Control 不得修改 saved display settings、saved DMX settings、RDM settings 或其他 protocol settings。
- 同一类型 fixtures 在 App Control 下必须行为一致。
- RDM 应继续报告 saved user settings,而不是 temporary App Control defaults。
- Values 1-254 是 Vision DMX Adapter only 的 legacy behavior。
立即测试
- 使用 DMX start address 1 和另一个地址(例如 10)测试 Vision Control Behavior 0。
- 测试不同 saved DMX personalities,并确认行为与 wired DMX 一致。
- 测试 Vision Control Behavior 255,并确认 fixture 在当前 frame 中忽略 saved DMX start address。
- 确认 App Control 使用 required fixed personality,并且 color behavior 可预测。
- 如果支持 Vision DMX Adapter legacy behavior,测试 Vision Control Behavior 1 和 2 作为 temporary personality overrides。
常见错误
- 把 App Control 称为 DMX mode,导致客户以为它是 saved fixture DMX personality。
- 当 Vision frame 请求 temporary behavior 时改变 fixture saved DMX personality。
- App Control 中使用 saved RGB/RGBW/RGBL fixture settings,而不是 App 要求的一致 behavior。
- DMX 介绍 (已内联)
- DMX frame (已内联)
- DMX personality 要求 (已内联)
- Test DMX (已内联)
DMX 介绍
47_DMX_Introduction.htmlDMX 介绍
Vision DMX Protocol 完全基于 DMX 512。与 Vision RDM Protocol 类似,区别只在 transport layer,以及 data stream 中的第一个 data byte。Vision DMX 通过 SPI communication 接收。
DMX512(E1.11 - 2008, USITT DMX512-A)是用于 digital communication networks 的标准,常用于控制 lighting 和 effects。
DMX512 protocol
DMX512 是一种 digital communication standard,通过一根 cable 向多个 devices 发送 control data,例如 dimmers、spotlights 和 moving heads,通常用于 theater、concert 和 event lighting。Data 以 packets 形式发送,最多包含 512 个独立 channels,每个 channel 控制 lighting fixture 的某个具体功能。
DMX personalities
"DMX Personalities" 指一个 DMX-controllable device 可具有的不同 configurations。每个 personality 表示一种 operation mode,会影响 device 使用多少 channels,以及每个 channel 控制什么。例如,一个 lighting fixture 可能有一种 personality 使用三个 channels 控制 red、green 和 blue,也可能有另一种 personality 使用四个 channels,例如 Master Dimmer、red、green、blue。
DMX start address
Start address 是 device 在 DMX network 上监听的第一个 channel number。它定义 device control 在 512 channels sequence 中从哪里开始。例如,如果 device 的 start address 设置为 101,并且它使用 5 channels 的 personality,则会使用 channels 101 到 105。正确设置 start address 对 lighting system 正常工作非常重要,因为它确保 correct data 被发送到 intended devices。
DMX footprint
"Footprint" 指 device 根据当前 personality 使用的连续 DMX channels 数量。Footprint 越大,device 使用的 channels 越多,从而可以更细致地控制 device 的各种 functions。Footprint size 会根据 device complexity 和 selected personality 变化。例如,简单 dimmer 的 footprint 可能为 1,而复杂 moving head 可能使用 20 个或更多 channels。
这意味着 Vision DMX 在 DMX Personalities、Start Address 和 Footprint 方面遵循与 standard DMX512 相同的 principles。关键区别在 data transmission 方法:Vision DMX 不通过 typical DMX512 physical protocol 接收 packets,而是使用 SPI(Serial Peripheral Interface)接收 data packets。SPI 是 embedded systems 中常用的 short-distance hardware interface。
DMX frame
48_DMX_Frame.htmlVision DMX data stream 定义如下:
| data[0] | data[1] | data[2] | data[3] | ... | data[512] |
|---|---|---|---|---|---|
| Vision Control Behavior | dmx[1] | dmx[2] | dmx[3] | ... | dmx[512] |
Vision Control Behavior = 0 -> DMX Control。
当 Vision Control Behavior 设置为 0 时,fixture 应像被普通 DMX stream 控制一样工作。
Fixture 应使用当前 selected DMX settings,例如:
- DMX mode
- DMX start address
- fixture configuration
- color mixing settings
- 其他 user-selected fixture settings
在该 mode 中,behavior 应与 normal DMX operation 完全一致。
Vision Control Behavior == 255 -> App Control。
Fixture 应根据 Vision DMX Personality Requirement 使用定义好的 App Control behavior。
在该 mode 中,fixture 对当前 Vision DMX data stream 应忽略 user-selected DMX settings,转而使用固定的、为 app 优化的 default values。
这包括:
- 同一类型的所有 fixtures 在 app control 时应表现一致
- DMX start address 应为
1 - DMX mode 应匹配 required Vision DMX personality
- color mixing behavior 应固定且可预测
- fixture 不应根据 fixture settings 在 RGB、RGBW、RGBL 或类似 modes 之间切换
这很重要,因为通过 Vision app 控制时,fixtures 不应表现出不一致行为。
Fixture 不得 修改任何 internal user settings、display settings、saved DMX settings,或其他 protocols 使用的 settings。
App Control defaults 只在内部应用于当前 Vision DMX data stream。
RDM 仍应报告 user-selected fixture settings,而不是临时 App Control defaults。
该 function 的目的,是让 app 可以在定义明确的状态下控制 fixture,而不修改 fixture 自身保存的 settings。
使用 Vision SPI library 的示例
- Data[0]: Vision Control Behavior
- Data[1-512]: DMX (DMX Data[0..511])
在 example 中,这已经被 separated:
Fixture implementation 示例:
Fixture 的 personalities:
- 1: Simple (Length 5)
- 2: Advanced (Length 10)
- 3: Single Pixel Control (Length 50)
- App Control Personality:(Not exposed in RDM)-> Single Pixel Control (Length 50)
App Control Settings:
Default App Control Settings: Dimmer Curve Linear, Dimmer Speed fast (snap)
当前示例
Selected DMX Address: 10
Selected DMX Personality: 2
Selected Dimmer Curve: Quadratic, Selected Dimmer Speed slow
Behavior:
- Vision Control Behavior = 0
- DMX Data[9] DMX Personality[2]
- Dimmer Curve Quadratic, Dimmer Speed slow
- Vision Control Behavior = 255 -> App Control with fixed App Control defaults
- DMX Data[0] DMX Personality[3]
- Dimmer Curve Linear, Dimmer Speed fast (snap)
DMX personality 要求
49_DMX_Personality_Requirement.htmlVision App Control 要求
为了让 Vision Control App 控制 fixture,需要一个 control footprint requirement。App 使用 reserved Vision Control Behavior 255,该行为称为 App Control。
请按 interface section 的说明,对 Vision DMX stream 中的 Vision Control Behavior 作出响应。Value 255 reserved for App Control。在该 mode 中,请使用固定 App Control defaults,使同一类型的所有 fixtures 无论 user setting 如何都表现一致。
Master Dimmer / Shutter 不是必需项。所有 pixels 应 individually controlled,优先使用 16 bit control。
默认行为:
LED 控制(Color)
推荐对所有 pixels 使用 RGBxx 16 bit linear control。对于 single pixel controlled fixtures,每个 pixel 都应可控制。RGBxx control 不应 faded / delayed,因为这些 channels 也用于 synchronized strobes。如需 smoothing dimming,请使用我们的 example code。
LED 控制(White)
推荐对所有 pixels 使用 White 16 bit linear control。对于 single pixel controlled fixtures,每个 pixel 都应可控制。Control 不应 faded / delayed。如需 smoothing dimming,请使用我们的 code template。
Pan & Tilt
| PanTilt | DMX Value | Slot Style | Note | |
| Tilt coarse | 0 | 65535 | fade | |
| Tilt fine | ||||
| Pan coarse | 0 | 65535 | fade | |
| Pan fine | ||||
Pan & Tilt rotation speed
| Pan & Tilt Rotation Speed | DMX Values From (8/16 bit) | DMX Values To (8/16 bit) | Description |
|---|---|---|---|
| No rotation | 0 / 0 | 0 / 255 | no rotation |
| Rotation Speed Clockwise (CW) Fast > Slow | 1 / 256 | 127 / 32767 | 1/256: fastest rotation speed CW 127/32767: slowest rotation speed CW |
| No rotation | 128 / 32768 | 128 / 33023 | no rotation |
| Rotation Speed Counter-Clockwise (CCW) Slow > Fast | 129 / 33024 | 255 / 65535 | 129/33024: slowest rotation speed CCW 255/65535: fastest rotation speed CCW |
Value 0 或 128:
Rotation disabled。Fixture 的 Pan 和 Tilt position 仅由 standard Pan and Tilt control channels 定义。
Values 1-127 和 129-255:
Rotation enabled。Fixture 会按 applied value 对应的 speed 执行 continuous rotation。
Transition behavior (Rotation -> Position):
当 value 从 rotation range(1-127 或 129-255)变为 0 或 128 时,fixture 应 smoothly transition 回到 Pan and Tilt control channels 定义的 standard Pan and Tilt position。Movement 应尽可能继续当前 rotation direction,不应在移动到 standard Pan and Tilt position 前突然停止。
Focus
| Focus | DMX Value | Slot Style | Note | |
| Focus coarse | 0 | 65535 | fade | near to far / please also disable or enable focus tracking feature |
| Focus fine | ||||
Zoom
| Zoom | DMX Value | Slot Style | Note | |
| Beam Angle | 0 | 255 | fade | narrow [000] ... wide [255] |
Fog
| Fog | DMX Value | Slot Style | Note | |
| Fog intensity | 0 | 255 | fade | no fog [000] ... 100% fog [255] |
Fan
| Fan | DMX Value | Slot Style | Note | |
| Fan intensity | 0 | 255 | fade | no fan [000] ... 100% fan [255] |
需要更多 components?请联系我们。我们会添加必要 components。
Test DMX
69_Test_DMX.html- Enable Test Mode 并连接 fixture 后,应显示如下。测试 DMX 时点击 "DMX":
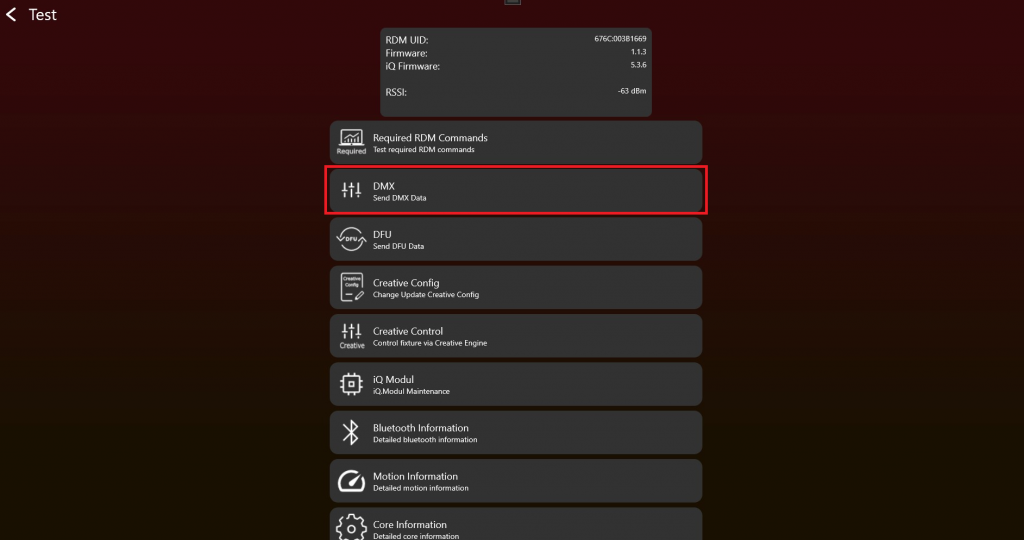
2. 选择 "Vision Control Behavior",并通过 sliders 设置 "DMX Values"。使用不同 "DMX start addresses" 和 "DMX Personalities"(有时也称为 "DMX Modes")测试 DMX Control,确保一切按预期工作。"Change Personality" function 会改变当前 Vision DMX stream 使用的 temporary DMX Personality。
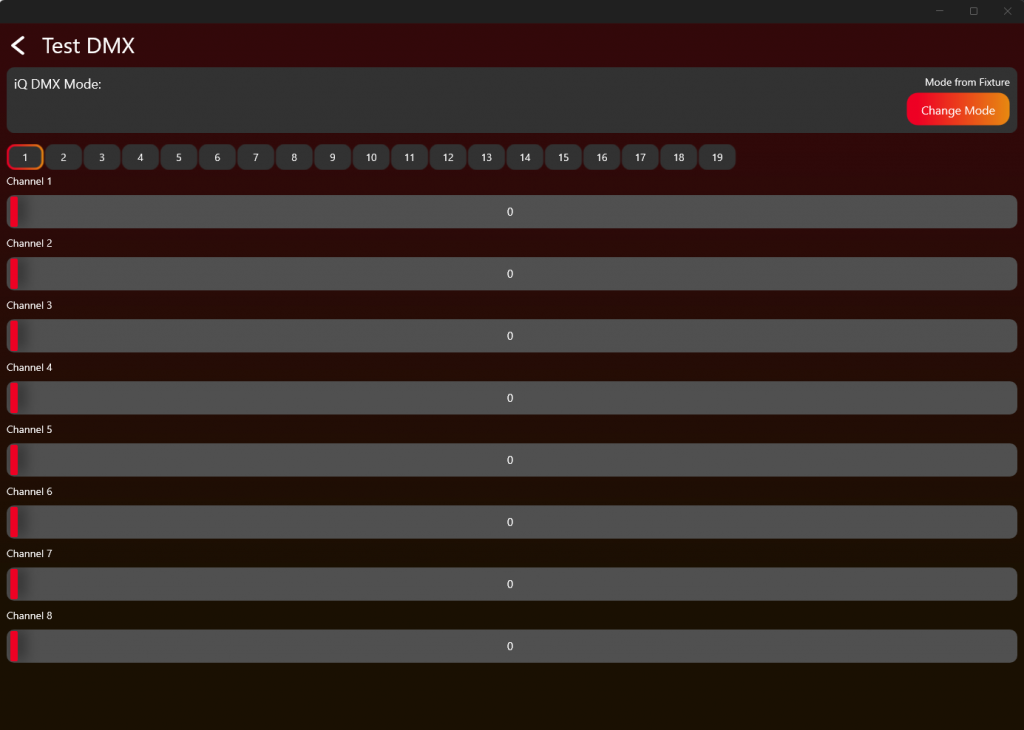
按照下表和 DMX chapter 中的说明,测试 Vision Control Behavior 0、1-x 和 255。
| Vision Control Behavior | Control behavior |
|---|---|
| 0 | DMX Control,使用 fixture 保存的 DMX settings |
| 1 | Legacy / Vision DMX Adapter only: 仅当前 frame 使用 DMX Personality 1 的 DMX Control |
| 2 | Legacy / Vision DMX Adapter only: 仅当前 frame 使用 DMX Personality 2 的 DMX Control |
| ... | ... |
| 255 | App Control,使用 fixed App Control settings。读取 DMX 时从 stream beginning 开始,与 DMX start address 无关。 |
6. App Control Configuration
目标: 定义 App 正确通过 App Control 控制产品所需的 fixture data。
需要实现的内容
- 在 DMX 和 App Control behavior 已正常工作后创建 App Control Configuration。
- 只定义 fixture 实际支持的 components。
- 按需要定义 pixel count、pixel positions、color components、white、zoom、focus、pan/tilt、smoke 或其他 supported components。
- 对于 color components,按要求提供 spectral data 以及 illuminance 或 luminous flux values。
- 将 App Control Configuration 保存为 file,并写入 fixture 进行测试。
- 在 fixture release preparation 时上传 App Control Configuration。
重要规则
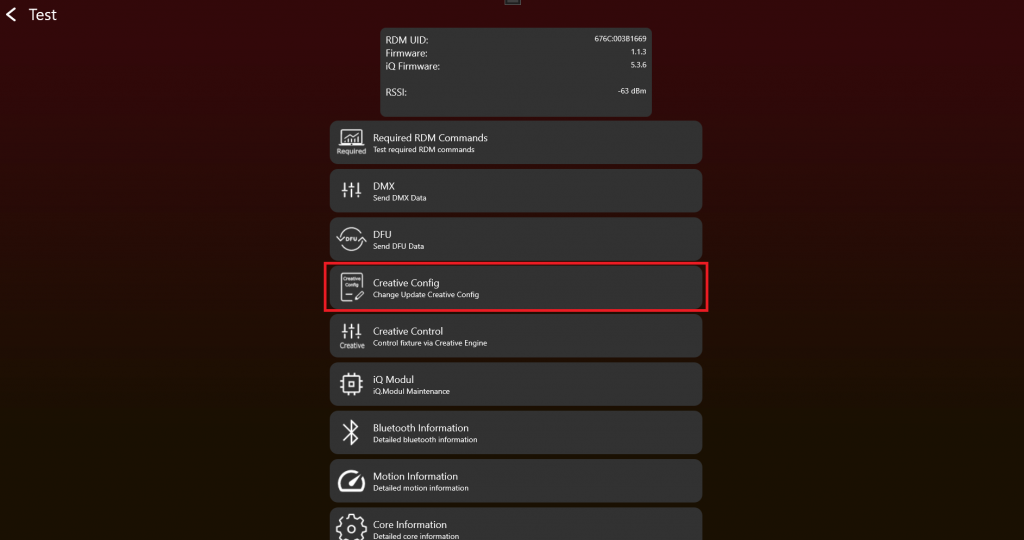
- App Control Configuration 以前叫 Creative Configuration 或 Creative Config。旧 screenshots、App versions、filenames 和 URLs 可能仍使用旧名称。
- 每种 fixture type 都需要一份 App Control Configuration,才能通过 App Control 控制。
- 可控 fixtures 的 App Control 使用 Vision Control Behavior 255。
- 如果 fixture 有多个 pixels 但不能单独控制,则按一个完整 fixture pixel 处理。
- 只上传产品真正支持的 components。
立即测试
- 将 App Control Configuration 写入 fixture。
- 打开 App Control test,确认只显示 supported components。
- 移动每个 configured component 的 sliders 或 controls,并确认 fixture 正确响应。
- 测试 shutter performance 和 color behavior。
- 如果 fixture 无法正确控制,返回 App Control Configuration 修正 component setup。
常见错误
- DMX 和 App Control behavior 还不稳定时就创建 App Control Configuration。
- 配置 fixture 实际不支持的 components。
- 把 App Control Configuration 与 normal saved DMX personality 混淆。
- App Control Configuration (已内联)
- App Control Test (已内联)
- Create App Library - 创建 Fixture (参考链接) - 之后上传 final App Control Configuration 用于 release 时参考。
- 生产 - Update Vision Module (参考链接) - 之后 production 中 update modules 时参考。
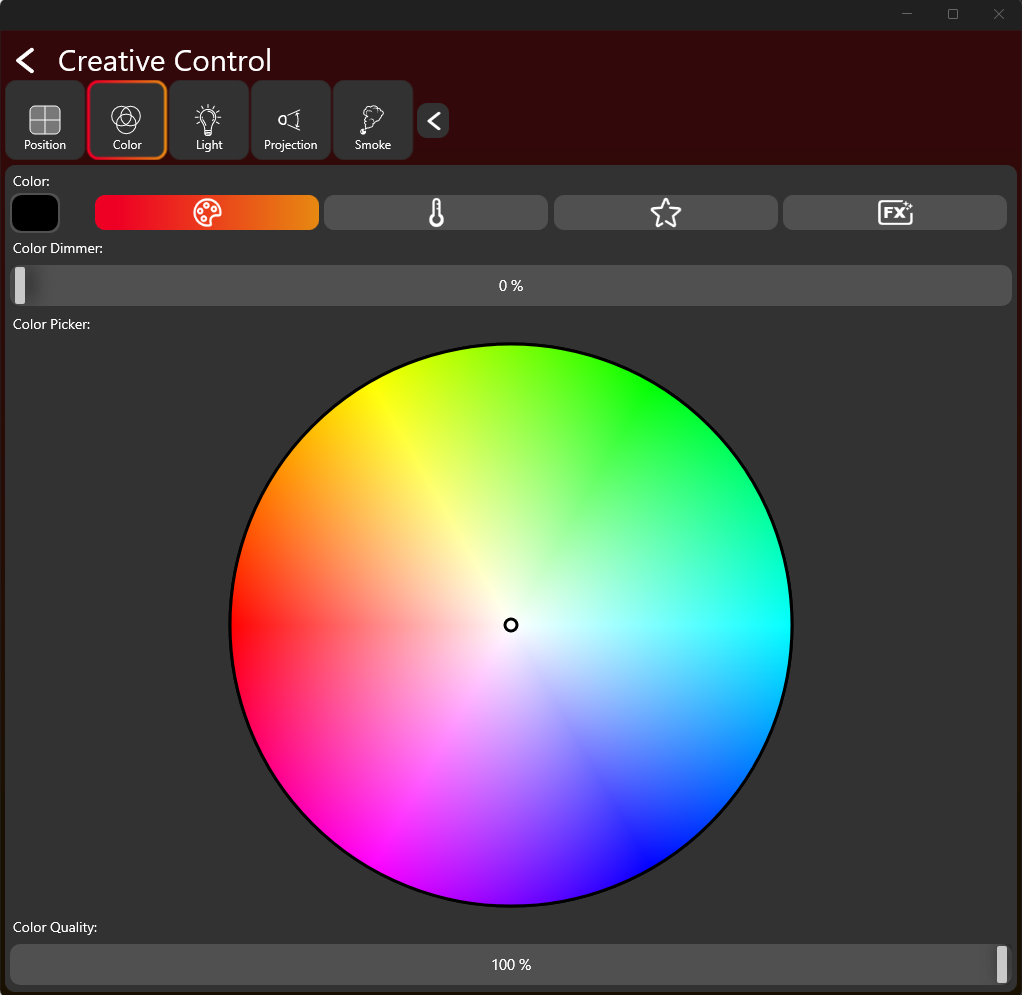
App Control Configuration
74_App_Control_Configuration.html启用 Test Mode 并连接灯具后,界面应类似下图。 要创建 App Control Configuration,请点击 "App Control Configuration":
旧名称说明:App Control Configuration 以前叫 Creative Configuration 或 Creative Config。旧截图、旧 App 版本、文件名或 URL 中可能仍然会看到这些旧名称。
如果前面的连接和基础测试都正常,就可以为灯具准备 App Control。这里可以创建、加载或写入 App Control Configuration。每一种灯具类型都需要一份 App Control Configuration,App 才能通过 App Control 正确控制该灯具。配置内容包括例如 pixel 数量、pixel 位置以及相关的灯具控制数据。

首先创建 App Control Configuration。点击 Create App Control Configuration。
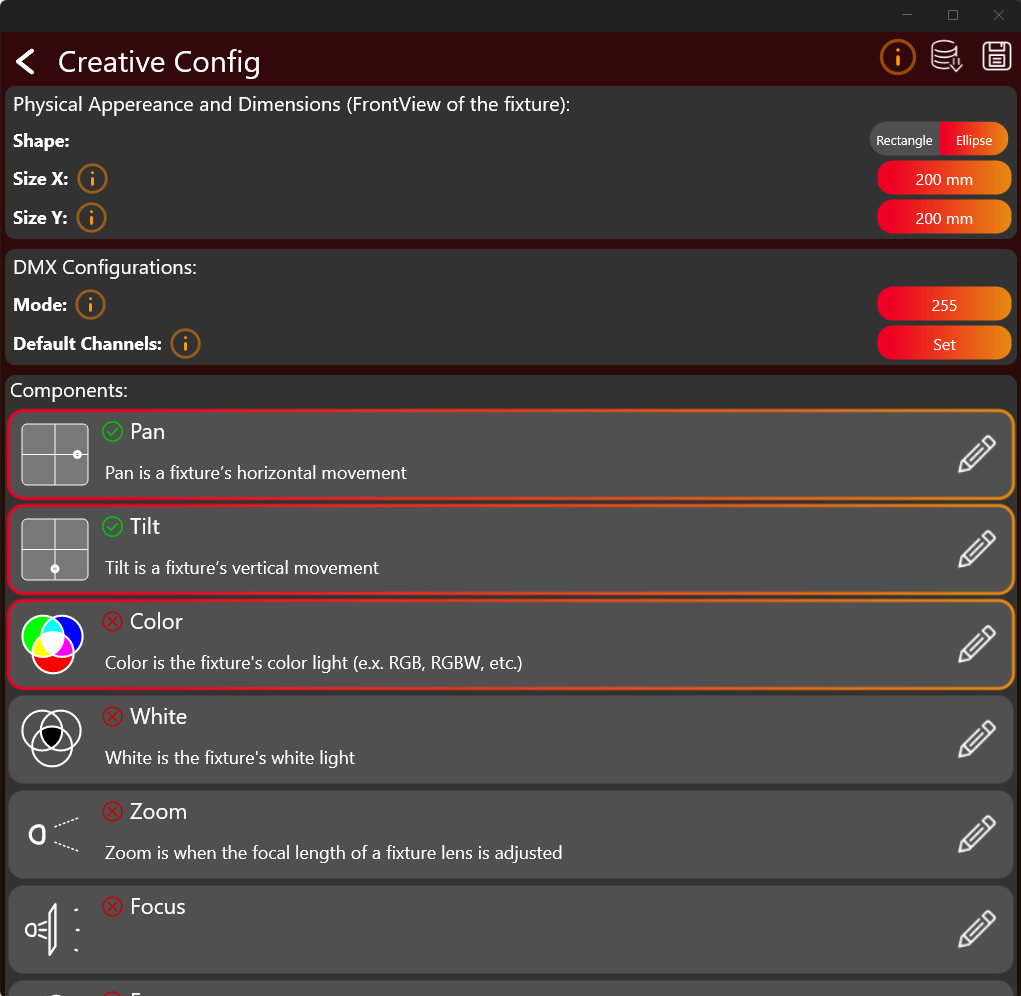
点击按钮设置需要的值。选择并配置灯具实际支持的组件,例如 Pan、Tilt、Color、White、Zoom、Focus、Smoke 等。点击整个组件框可以选中该组件。只选择灯具真正支持的组件。点击右侧的 pencil/edit 图标可以编辑配置。绿色勾号表示该组件已经完成配置。
橙色的 info i 按钮可以打开对应主题的更多说明。
完成配置后,应通过顶部按钮将其保存为 .json 文件,并写入灯具。
Color Component
Color Component 的配置通常是最复杂的部分,因此这里需要更详细说明。点击 Color Component 的 edit 按钮后,会打开类似下面的窗口:
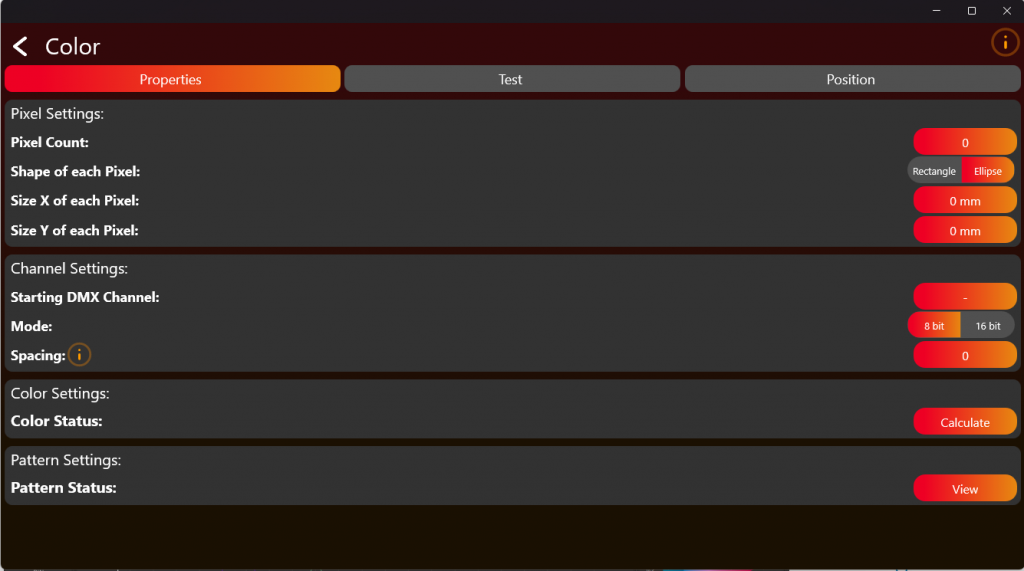
这里需要定义灯具的 pixel count,只填写可以通过 DMX 控制的 pixels。然后输入 LED 控制所需的 DMX 信息。配置后,使用顶部的 tabs 测试并定位 pixels。点击 Calculate 进入 Color Settings。
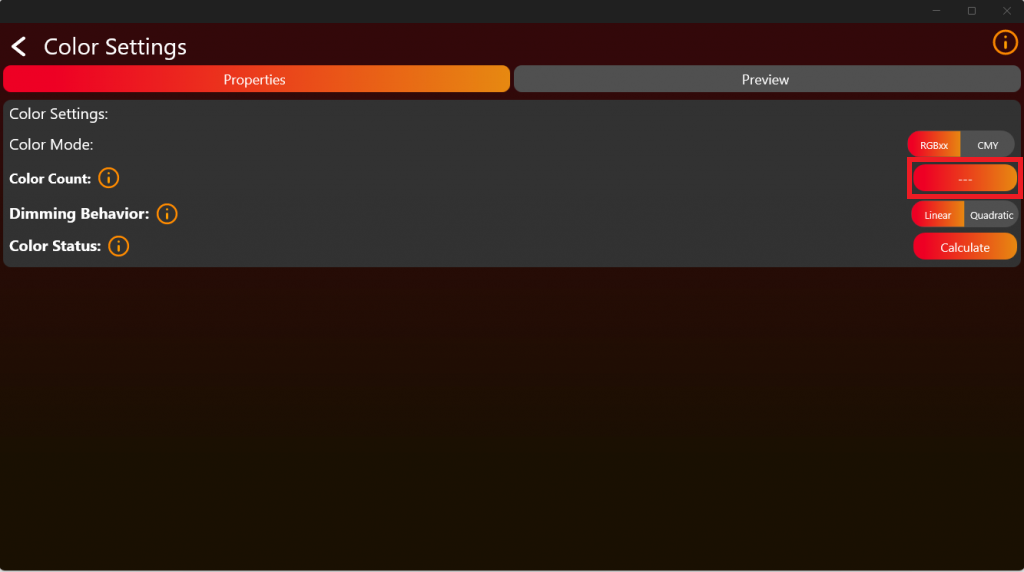
接下来是较难的部分:Color Settings。
选择灯具的 Color Count。例如 RGB 有 3 个颜色。后续步骤需要 Color Information:
因此,需要测量每个颜色在 full brightness 下相对于其他颜色的 spectral output。此类测量可以使用任何 spectrometer,只要它能在 380 nm 到 780 nm 范围内提供 1 nm 分辨率。例如可以使用 UPRTEK MK350N Premium。
将灯具放在离 spectrometer 合适的距离。确保灯具的颜色混合在 detector 上尽可能均匀。如果灯具侧没有温度补偿,还应在合适的较冷温度条件下测量颜色。每个颜色需要单独测量,如下图所示。示例中使用 RGBW LED Source。系统最多支持 6 个 Color LED Sources。
下面的示例使用 UPRTEK MK350N Premium:
测量后,应得到该颜色相对于其他颜色的 spectral response,类似下图:
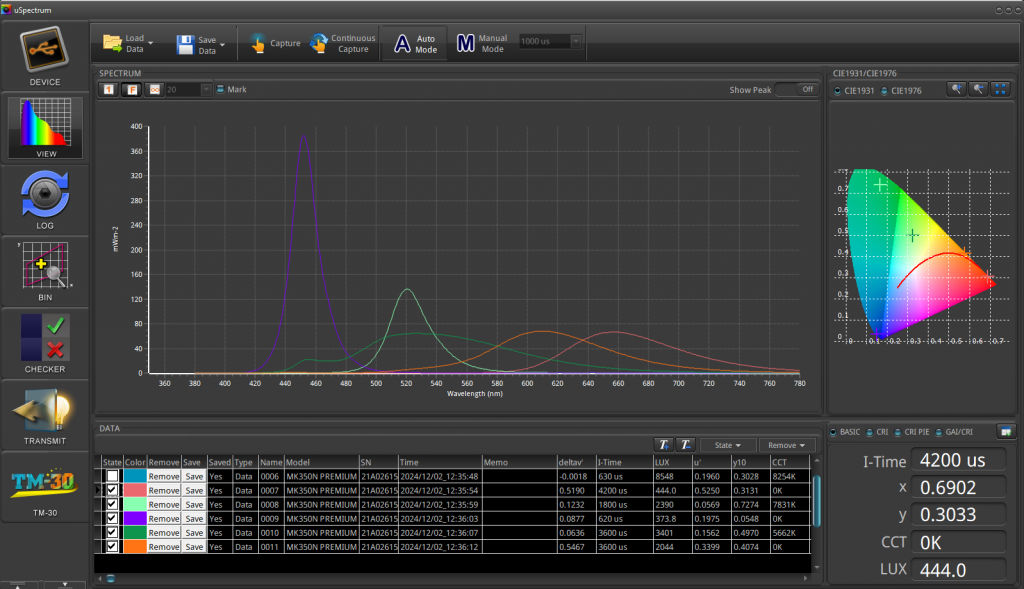
UPRTEK MK350N Premium 的结果会保存为 Excel 文件。下面的文件提供了示例格式:
需要的 illuminance value 是 LUX (lx)。在本示例中约为 1515.47 lx。

下一步,从 380 nm 到 780 nm 提取所需的 spectral data(mW/m^2)。示例如下:
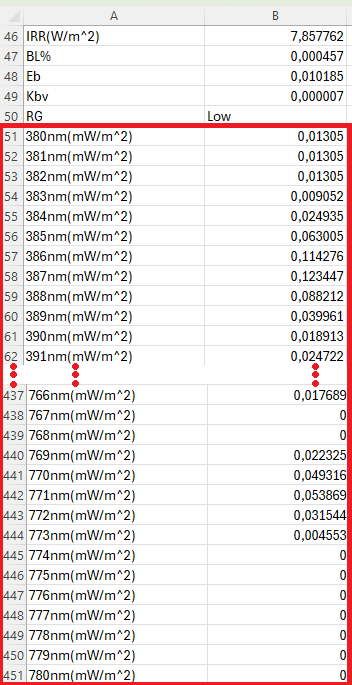
复制蓝色方框中的数值:
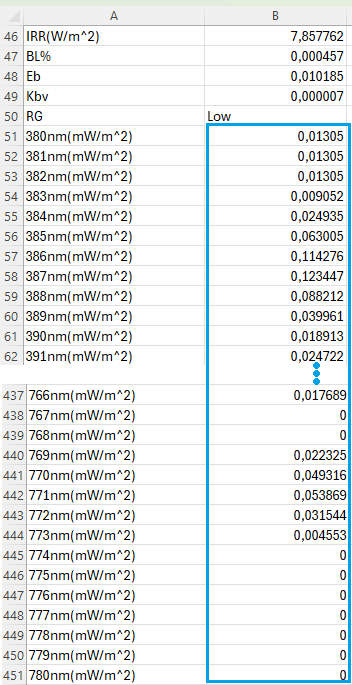
将这些数值放入新的 .txt file,并确保符合所需格式。可以参考下面的示例文件。
格式要求:
- 小数分隔符必须是 .(dot)。数值之间必须用 ,(comma)分隔。所有数值应放在同一行,不要换行。
例如可以在 Notepad++ 中使用 Find and Replace 实现:
- 将 , 替换为 .
- 将 \r\n 替换为 ,,并确保 Search Mode 设置为 Regular expressions。
下图示例是 3 个颜色的配置,例如 RGB。在可用选项中选择 Custom,然后上传包含 spectral data 的 .txt 文件:
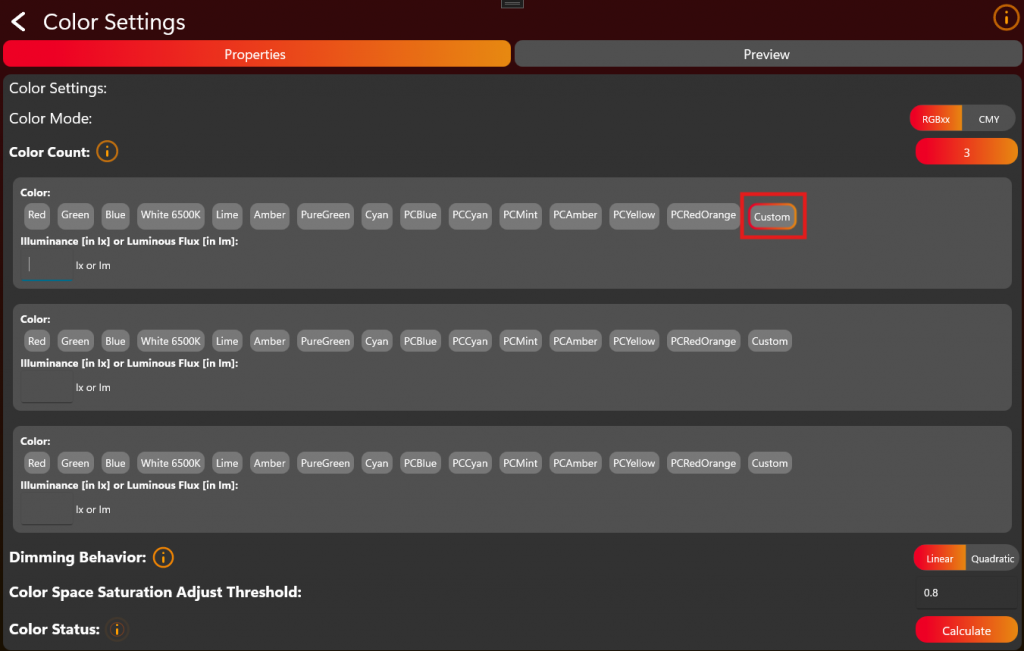
每个颜色可以输入 illuminance,单位为 lux (lx),也可以输入 luminous flux,单位为 lumens (lm):

对所有 LED colors 重复上传 spectral data,并填写对应的 illuminance value。
完成后点击 Calculate,等待计算完成。根据 Color Count 的不同,计算可能需要一些时间。
保存并写入 App Control Configuration
现在 App Control Configuration 已完成,并回到第一个编辑页面。在右上角可以将配置保存为文件,或直接发送到灯具用于测试:
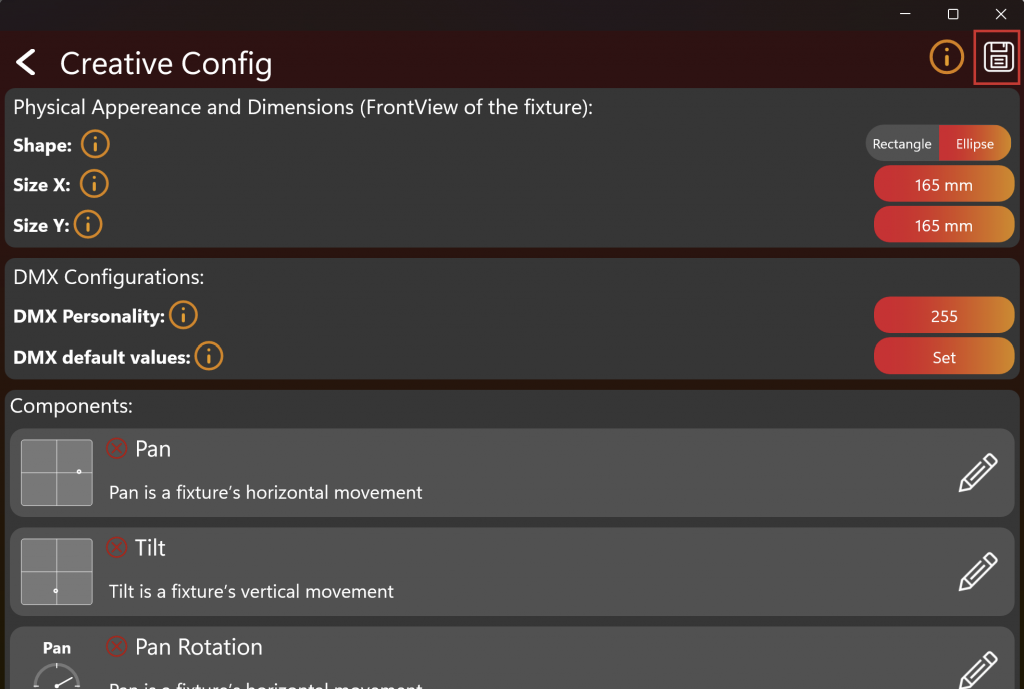
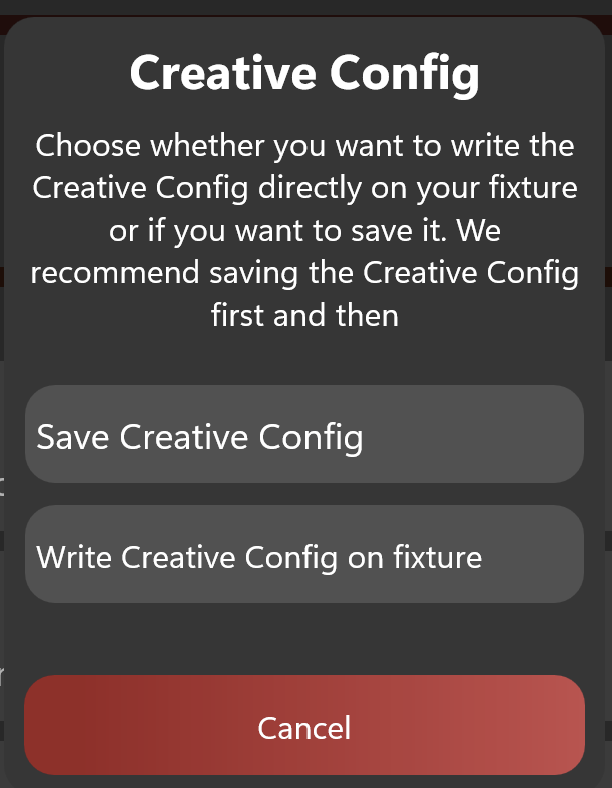
之后如果要上传到 web-service,需要保存该文件。下一章节的 App Control Test 要求该 App Control Configuration 已经写入灯具。
App Control Test
75_App_Control_Test.html启用 Test Mode 并连接灯具后,界面应类似下图。 要测试 App Control,请点击 "App Control Test":
灯具顶部应该只显示该灯具支持的组件。如果在这里可以正常控制灯具,说明 App Control Configuration 已正确设置。如果不能正常控制,请返回 App Control Configuration 修正问题。
7. Firmware update (DFU)
目标: 为 fixture application 以及需要的 Vision-related update flows 实现可靠 firmware updates。
需要实现的内容
- 决定 product 是否支持 application firmware update。
- 如果支持 DFU,在 Vision SPI library 中提供 DFU callbacks。
- bootloader 和 application 准备完成后,创建 fixture application DFU package。
- 根据 DFU process 处理 DFU start、packet、stop 和 response behavior。
- 保存生成的 DFU file,用于 production 和 release。
- 如果使用 RDM-based DFU commands,实现 required command flow 和 error/status responses。
重要规则
- 如果不支持 DFU,则不需要 DFU callback implementation。
- DFU packets 可变长度,必须按顺序处理。
- Fixture 在 update process 中必须提供清楚的 status/error behavior。
- 最终 verification 前,应分别测试 bootloader 和 application firmware behavior。
立即测试
- Flash bootloader 和 application firmware。
- 创建 DFU package,并通过 App/test workflow 执行 firmware update。
- 确认 fixture update 后正确 reboot,并报告预期 firmware version。
- 尽可能测试 missing packets 或 wrong package 等 error cases。
- 修改 application firmware 后重复测试,确认流程稳定。
常见错误
- 创建 package 后就认为 DFU 完成,但没有测试实际 update。
- 忘记保存 final DFU file 用于 release 和 production。
- 只在与 production firmware 不同的 debug setup 中测试 DFU。
- DFU 介绍 (已内联)
- DFU 流程 (已内联)
- App DFU package (已内联)
- 测试 DFU (已内联)
- RDM DFU Command (参考链接) - Optional RDM-based DFU command details。
Device firmware update 介绍
DFU 表示 "Device Firmware Update",是一种用于升级 embedded devices firmware 的技术,例如 lighting fixtures、sensors 或 controllers。该 process 对 deployed devices 后续修复 bugs、改善 functionality、添加 new features,以及修补 security vulnerabilities 非常重要。
Vision DFU(Device Firmware Update)process 本质上只是向 device 发送 variable sized datastream。该 raw datastream 没有固定 structure,因此可以兼容以往 fixture DFUs。这种 flexibility 允许使用任意类型的 DFU file,更容易更新 devices,而不需要修改 file format。为了将 update data 提供给 app,使用简单的 ".bin" file。建议在 data stream 中实现 error checks。
DFU file(".bin" file / datastream)包含更新 embedded device firmware 所需的数据。DFU file 的 structure 应确保 firmware 可以安全且有效地 update。该 structure 的一个重要部分是 header,它携带用于管理 update process 的 specific information。各 components 通常如下配合:
带 header 的 DFU binary file 组成:
- Header: Header 是 DFU file 的关键部分,包含 firmware update metadata。该 metadata 通常包括:
- Version number: 表示 firmware version,用于判断 update 是否比 device 当前 firmware 更新。
- Device identifier: 指定与 firmware compatible 的 device types,确保 update 只应用到合适 devices。
- Checksum or hash: Firmware data 的 cryptographic hash,用于在 file downloaded 或 transferred 后验证 integrity,确保没有被 tampered 或 corrupted。
- Firmware Data: 实际写入 device memory 的 binary data。它会替换现有 firmware,或修改其中部分内容以增强 functionality 或修复 issues。
DFU 流程
53_DFU_Process.htmlSoftware update handling 通过 READ_DFU 和 WRITE_DFU functions 完成。
必须使用以下 interrupt lines 推导 state:
- DFU_START_IRQ
- DFU_PACKET_IRQ
- DFU_STOP_IRQ
每当 software update triggered 时,DFU_START_IRQ 会变为 high。
然后 fixture 必须准备接收 firmware,并返回以下 response 之一:
- 0x0: DFU_ACCEPT
- 0x1 - 0xFF: DFU_ABORT
Fixture 使用 WRITE_DFU function response。Response timeout 为 20 seconds。写入 response 后会 disable DFU_START_IRQ flag。
接受 DFU 后,Vision Controller 开始发送 firmware packets。每个 packet 都有唯一 id,并向上计数。长度可变,最大 200 Byte。Default length 为 128 Byte。packetNr 使用 Big Endian,不是 Little Endian。
| data[0] | data[1] | data[2] | data[3] | ... | data[202] |
|---|---|---|---|---|---|
| packetNr | packetNr | data[0] | dmx[1] | ... | dmx[200] |
读取 packet 后,下一个 packet 会自动传输,不需要额外 response。
如果发生 error,可以通过写入大于 0 的 response(0x1 - 0xFF)提前 abort DFU。
如果 30 seconds 内没有读取 packet,DFU 会 abort。第一个 packet 到达前最多可能需要 30 seconds。请确保不要在该 timeout 之前 abort。
收到最后一个 packet 后,DFU_STOP_IRQ flag 会变为 high,用于表示所有 packets 已传输完成,DFU transmission 已结束。
此时 fixture 必须发送最后一个 response。Response 应为以下之一:
- 0x0: DFU_SUCCESS
- 0x1: DFU_ERROR_FLASH_ERASE
- 0x2: DFU_ERROR_NOT_IN_PROGRESS
- 0x3: DFU_ERROR_CORRUPTED_HEADER
- 0x4: DFU_ERROR_CORRUPTED_IMAGE
- 0x5: DFU_ERROR_INVALID_IMAGE_VERSION
- 0x6: DFU_ERROR_NO_PREAMBLE
- 0x7: DFU_ERROR_INVALID_FIXTURE_ID
- 0x8: DFU_ERROR_UNKNOWN
- 0x9: DFU_ERROR_SIGNATURE_NECESSARY_NOT_FOUND
- 0x0A: DFU_ERROR_PACKET_TIMEOUT
- 0x0B - 0xFF: Reserved
下面是一个 pseudo code example,用于在 application firmware 中接收 data,而不是像 example 那样使用 boot-loader 接收 data:
#define DFU_BOOT_DELAY_MS     1000
#define MAX_FIRMWARE_SIZE     (256 * 1024u) // example

typedef enum
{
    DFU_STATE_IDLE = 0,
    DFU_STATE_RECEIVING,
    DFU_STATE_ERROR,
    DFU_STATE_BOOT_PENDING
} dfu_state_t;

static dfu_state_t dfuState = DFU_STATE_IDLE;
static uint32_t dfuDataCounter = 0;
static uint16_t dfuPacketCounter = 0;

static uint8_t firmwareData[MAX_FIRMWARE_SIZE]; // Just dummy, use flash to write here

static void Dfu_Reset(void)
{
    dfuState = DFU_STATE_IDLE;
    dfuDataCounter = 0;
    dfuPacketCounter = 0;
}

static void Dfu_Abort(uint8_t errorCode)
{
    vision_writeDfu(errorCode);
    Dfu_Reset();
}

static bool Dfu_StoragePrepare(void)
{
    // Erase temporary DFU flash area here.
    // Return false if erase failed.
    return true;
}

static bool Dfu_StorageWrite(uint32_t offset, const uint8_t *data, uint16_t length)
{
    // Write data to temporary DFU flash area.
    // Handle flash alignment here.
    // Return false if flash write failed.
    (void)offset;
    (void)data;
    (void)length;

    return true;
}

static bool Dfu_CheckFirmwareDataValid(uint32_t imageSize)
{
    if (imageSize == 0)
    {
        return false;
    }

    if (imageSize > MAX_FIRMWARE_SIZE)
    {
        return false;
    }

    // Recommended checks:
    // - image header valid
    // - target device / hardware ID valid
    // - firmware size valid
    // - CRC/hash valid
    // - version valid
    //
    // Final signature/security validation should also be done by bootloader.

    return true;
}

static void Dfu_StartBootloaderTimer(void)
{
    // Start one-shot timer, for example 100 ms.
    // After timeout call Dfu_BootloaderTimerElapsed().
}

static void Dfu_SetBootloaderPendingFlag(void)
{
    // Store persistent bootloader request.
    // Options:
    // - backup register
    // - retained RAM magic value
    // - flash flag
    //
    // Bootloader must check this after reset.
}


static void Dfu_BootloaderTimerElapsed(void)
{
    if (dfuState != DFU_STATE_BOOT_PENDING)
    {
        return;
    }

    Dfu_SetBootloaderPendingFlag();

    __disable_irq();

    // Optional:
    // deinit peripherals
    // flush logs
    // stop radio/SPI/UART cleanly

    NVIC_SystemReset();
}


  // Callback Implementation SPI Library ---------------------------------------------------------------------

 static void DfuFlagReceivedCallback(vision_dfu_flag_t flag)
{

	if(flag == VISION_DFUFLAG_STOP)
	{
		if (dfuState != DFU_STATE_RECEIVING)
		{
			Dfu_Abort(DFU_ERROR_NOT_IN_PROGRESS);
			return;
		}

		if (!Dfu_CheckFirmwareDataValid(dfuDataCounter))
		{
			Dfu_Abort(DFU_ERROR_CORRUPTED_IMAGE);
			return;
		}

		dfuState = DFU_STATE_BOOT_PENDING;

		// Tell sender that application-side receive/validation was okay.
		vision_writeDfu(DFU_SUCCESS);

		// Do not reset state here.
		// Wait until the response had enough time to leave the device.
		Dfu_StartBootloaderTimer();
		return;
	}
	else if(flag == VISION_DFUFLAG_START)
	{
		Dfu_Reset();

		if (!Dfu_StoragePrepare())
		{
			Dfu_Abort(DFU_ERROR_FLASH);
			return;
		}

		dfuState = DFU_STATE_RECEIVING;

		// State is valid before response is sent.
		vision_writeDfu(DFU_SUCCESS);
		return;
	}
}
static void DfuDataReceivedCallback(uint16_t packetNr,const uint8_t* buf, uint16_t length)
{
	 if (dfuState != DFU_STATE_RECEIVING)
    {
        vision_writeDfu(DFU_ERROR_NOT_IN_PROGRESS);
        return;
    }

    if (buf == NULL || length == 0)
    {
        Dfu_Abort(DFU_ERROR_INVALID_PACKET);
        return;
    }

    if (packetNr != dfuPacketCounter)
    {
        Dfu_Abort(DFU_ERROR_WRONG_PACKETNR);
        return;
    }

    if ((uint32_t)length > (MAX_FIRMWARE_SIZE - dfuDataCounter))
    {
        Dfu_Abort(DFU_ERROR_IMAGE_TOO_LARGE);
        return;
    }

    if (!Dfu_StorageWrite(dfuDataCounter, buf, length))
    {
        Dfu_Abort(DFU_ERROR_FLASH);
        return;
    }

    dfuDataCounter += length;
    dfuPacketCounter++;

}
App DFU package
64_Custom_Firmware_App_DFU_Package.htmlCustom firmware - App DFU package
本章节说明如何生成一个可通过 Vision APP 更新 fixture 的 .bin file。如果已经按照 Custom Firmware instructions 操作,可以按以下步骤生成该 file。
首先在 Windows 上打开 Vision App。如果还不熟悉该步骤,请先查看:
#source-66_Test_Preparations
按照以下步骤将 application 切换到 Test Mode。这样可以使用和查看尚未 registered 的 development fixtures:
- 点击顶部 gear,进入 Settings:

- 点击 App Settings:

- 点击 App Software Version label(例如 0.0.5.0)两次。随后会出现 prompt。输入 PIN 7248,Test Mode 即会 activated。

现在 App 中会显示必要 functions。再次进入 settings tab。
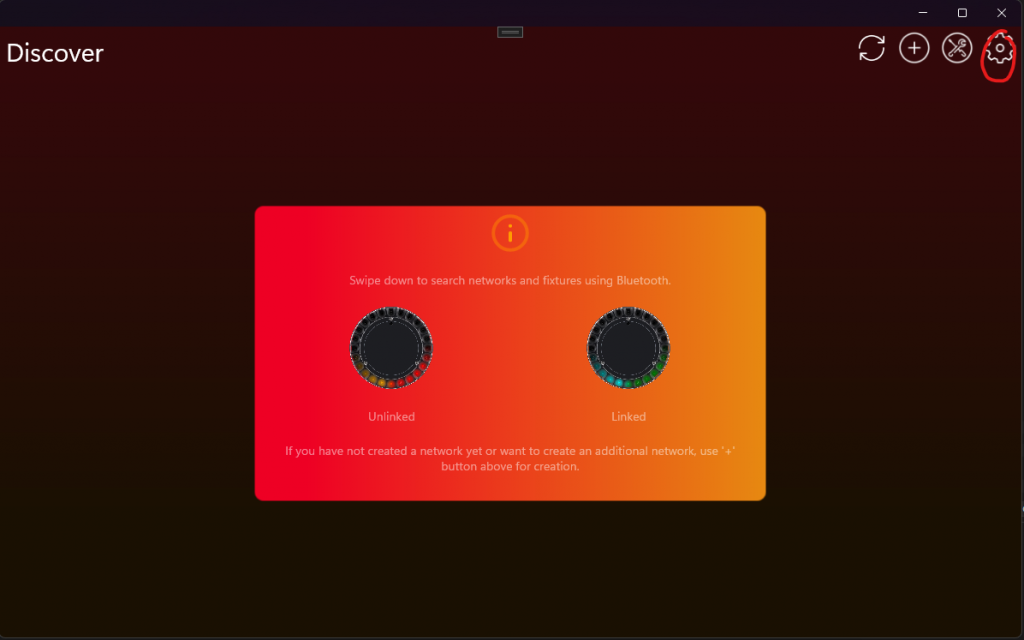
现在应能看到 Developer Tools。
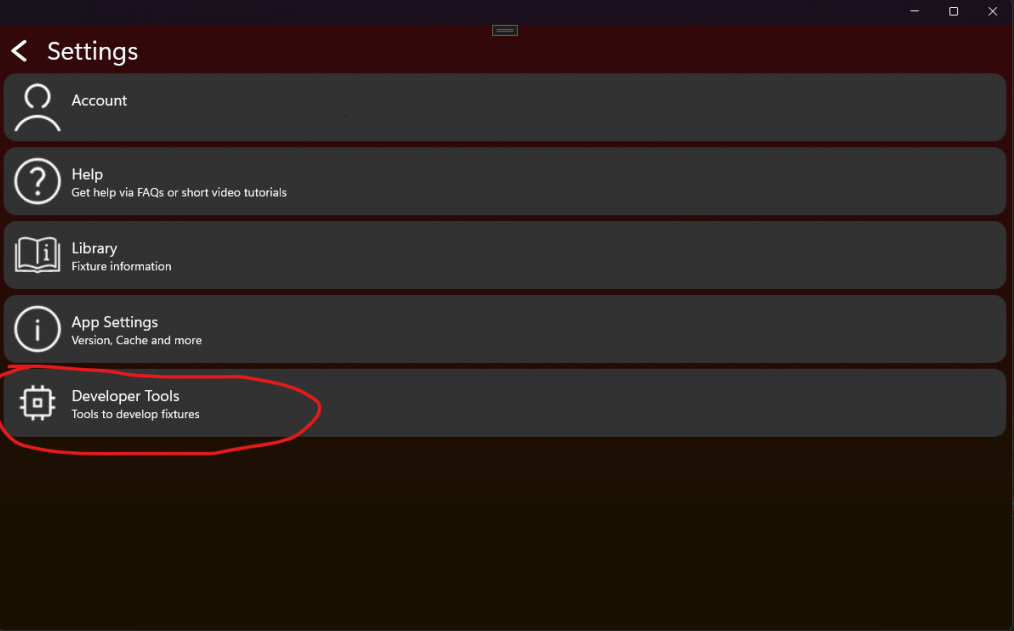
然后点击 DFU File Generator:
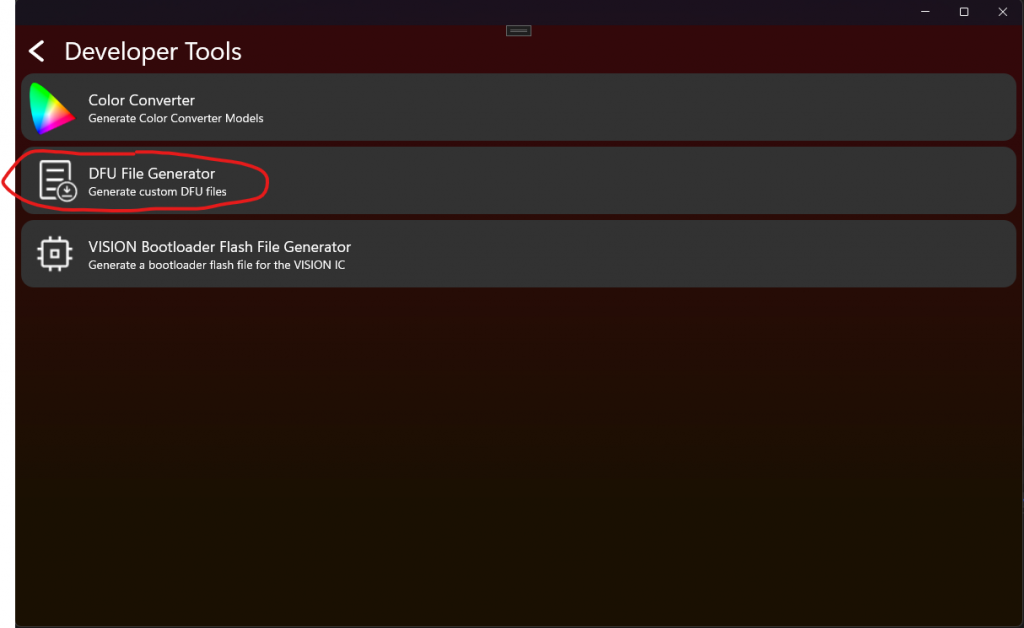
现在进入 DFU File Generator。在这里选择您的 Application .bin file,并输入 RDM Manufacturer Model 和 RDM Device Model ID。两者都使用 decimal,不是 hexadecimal。
Attention:
DFU 使用 RDM Manufacturer 和 Device Model ID 进行 protection。创建 product 时,请使用该 unique information secure firmware,确保 firmware 只能 uploaded 到对应 fixture type。这样可以防止 wrong firmware 导致 fixture bricked。请务必确保这些 values 始终正确。
还需要输入 Application Firmware Version。Vision app 要求 standardized versioning format:x.x.x.x。
第一个为 Major,表示与 previous firmware 不兼容的 function change。
第二个为 Minor,表示相对 previous firmware added feature。
第三个为 Patch,表示相对 previous firmware 的 bugfix。
第四个为 Release,标记 public firmware release。Public versions 请始终保持为 255。
这称为 Semantic Versioning:https://semver.org/
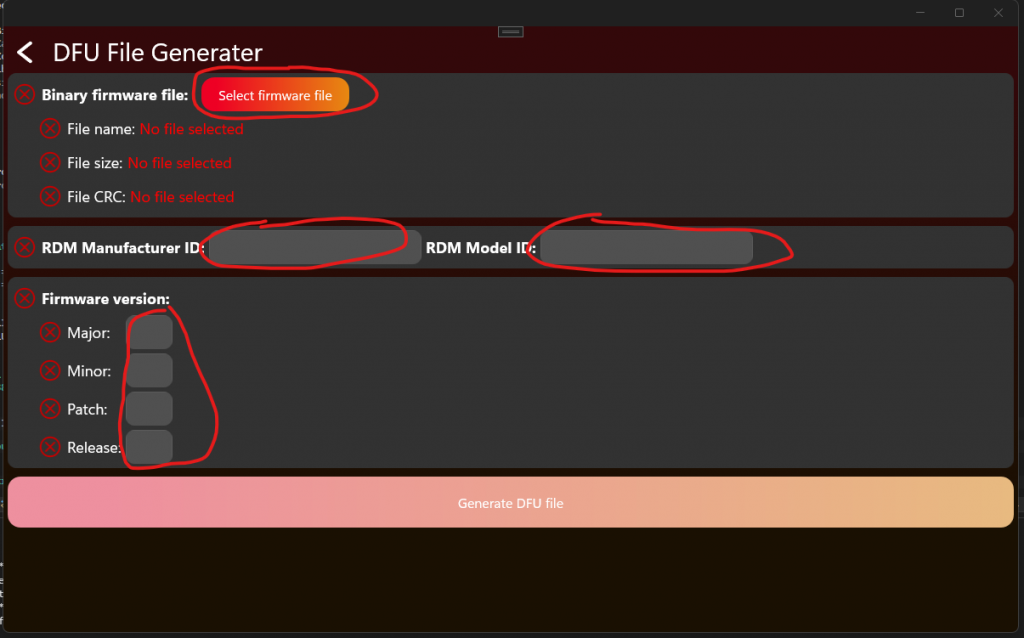
如果您按照 "Project Artery IC" 或 "Project STM32 IC" instructions 操作,可以打开 Keil,并在 ReleaseBL target configuration 下 build Application Project。
对于 Keil,需要在 Target User Settings 中添加以下内容:
在 "User" command column 中添加:fromelf.exe --bin --output .\Listings\@L.bin !L
Attention: 复制该 line 时可能会损坏 hyphen。请确保这里是 double hyphen。
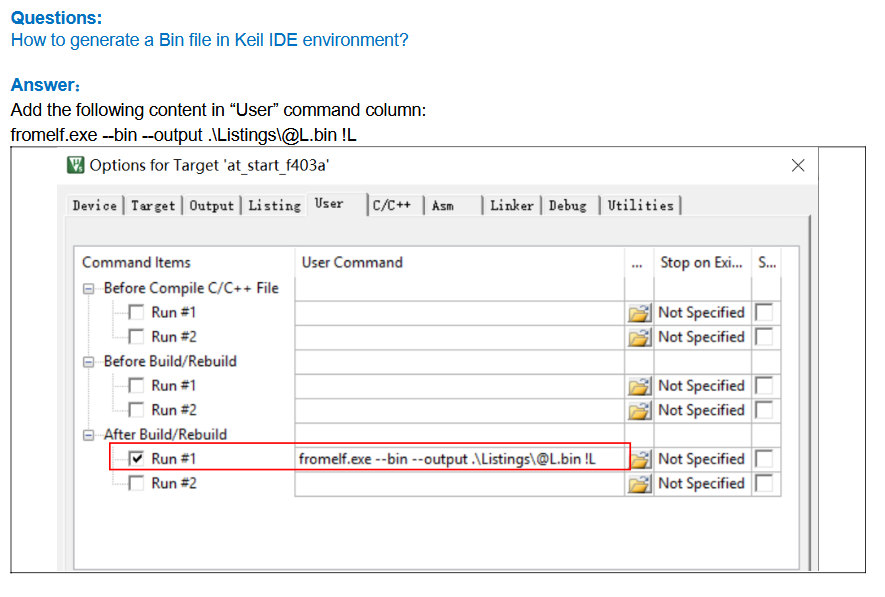
填写 data 后应类似如下。Manufacturer 61450 和 RDM Device Model ID 2 只是 example values,不应在您的 product 中使用。
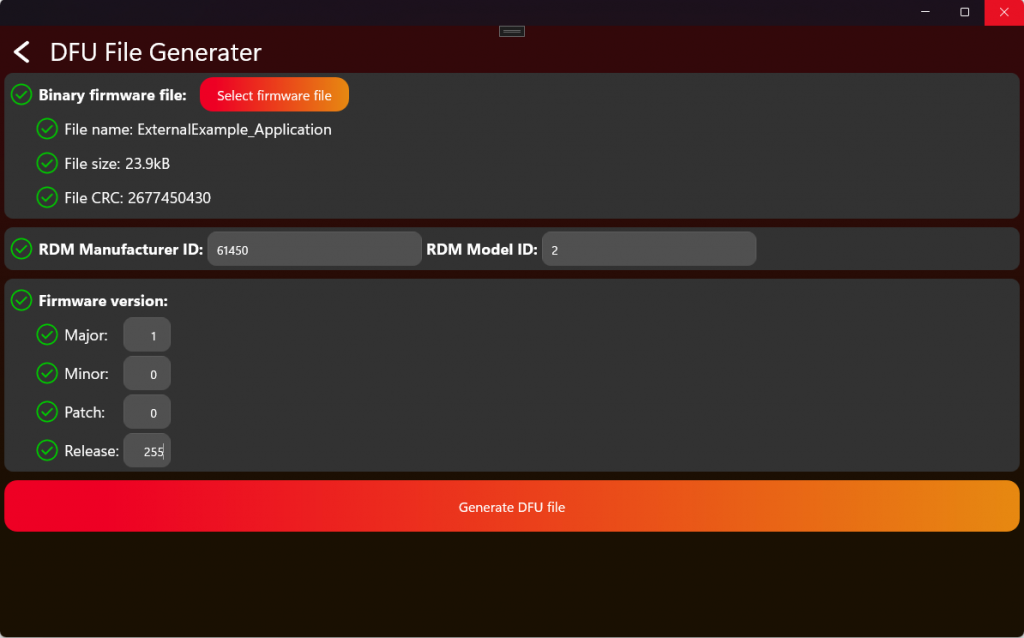
然后点击 Generate DFU File 获取 file。
该 file 现在可以上传到我们的 webservice,或在 APP 中手动选择用于 update process:
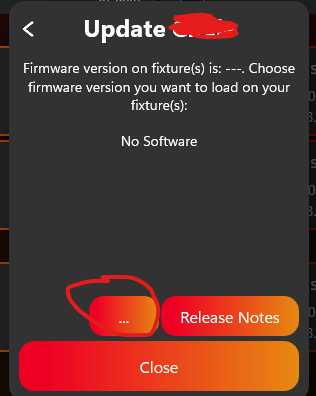
关于 upload process 的更多信息,请查看:
#source-82_Create_App_Library_Create_Fixture 中的 Software Upload。
测试 DFU
70_Test_DFU.html- Enable Test Mode 并连接 fixture 后,应显示如下。测试 DFU 时点击 "DFU":

2. 通过 "Load File" button 选择 .bin file,然后点击 "Run DFU" 开始 DFU。Progress bar 和 status label 会显示进度:
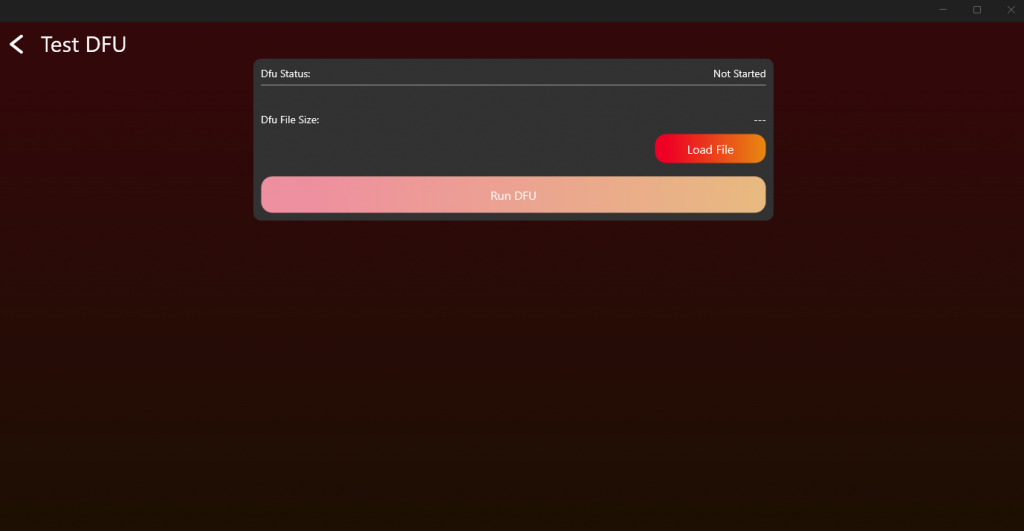
8. Optional features
目标: 只添加产品真正需要的 optional features,并逐项直接测试。
需要实现的内容
- 决定 product 包含哪些 optional features:NFC、IR、motion、sleep、antitheft、emergency mode、battery runtime 等。
- 在 firmware 依赖某功能前,先加入 required hardware。
- 按需要实现相关 RDM behavior 和 Vision custom command data。
- 如果 product 需要 runtime selection,使用 battery runtime library。
- 需要断电保持的 settings 必须保存。
重要规则
- Optional features 只在 product 支持时才需要。
- 如果实现了某功能,就必须测试该功能。
- Battery runtime 指 fully charged battery 下的 runtime,应让 user 容易理解。
- Low-power 和 wakeup features 必须与 hardware power design 一起检查。
- 不要在 App 中暴露 unsupported features。
立即测试
- 只有实现 NFC 时运行 NFC test。
- 只有实现 IR 时运行 IR test。
- 只有实现 motion sensor 时运行 motion test。
- 用真实 battery level 和 power consumption 测试 battery runtime selection。
- 确认 optional feature state 能通过 RDM 或 Vision data 正确报告。
常见错误
- hardware 和 firmware 都未准备好时就标记 feature supported。
- 忘记 enabled optional features 仍需要 production 和 final verification。
- 在 App 中暴露 fixture 无法可靠执行的 feature。
- 产品功能 (已内联)
- Battery runtime library (参考链接) - 只有实际使用 prepared runtime library 时才需要。
- 测试 NFC (参考链接) - 仅在实现 NFC 时使用。
- 测试 Motion (参考链接) - 仅在实现 motion sensor 时使用。
- 测试 IR (参考链接) - 仅在实现 IR 时使用。
Sleep Mode
用途: 允许 users 将 fixture power 降到最低,同时仍可从 app wake up。
How it works:
- Users 可以在 app 中 activate sleep mode。
- Fixture 随后 disable 尽可能多的 parts 以 minimize power,例如 drivers、display、motors 等。
- Users 可以再次通过 app wake up fixture。Fixture 在 device reset 时也应 wake up。
Sleep Mode 应至少持续 1 week。
Feature: Battery runtime selection
用途: 允许 users 在 brightness 和 battery duration 之间进行优化。
How it works:
- User 选择 fixture 应运行多久,例如 2、4 或 8 hours。Selected runtime 在 battery fully charged 时达到。如果 battery 只有 50%,fixture 将运行 selected time 的一半。这种方式简单且易于理解,不需要复杂 calculations。您也可以向 user 显示 remaining runtime,使其无需自行计算即可决定是否切换到更长 runtime。
- 为了达到 selected runtime,fixture 应根据 available battery capacity lower its output power(brightness)。最简单的方式是设置 fixed maximum brightness,确保 runtime 能达到。
- 这对 events 或 portable use 很有用,因为 light 需要持续一个已知时间。
Battery Runtime Selection 可以 turned on 和 off。该 setting 必须保存,因此 fixture 在 power loss 后仍会记住。
Runtime 始终基于 fully charged battery(100%)。
好的实现方式是限制 fixture 的 maximum power output。使用 battery capacity 和 current power consumption 计算并 dim light,刚好达到 selected runtime。
How to implement it:
- 知道 battery capacity,例如 Wh。如果 fixture 有 battery gauge,可以随着 battery aging 更新该 value,以保持 runtime accurate。
Example: BATTERY_CAPACITY = 100Wh - 知道每个 LED 的 power consumption。如果可以 live measure power,可以使用 real values 而不是 fixed ones。
Example:
POWER_RED = 5W
POWER_GREEN = 5W
POWER_BLUE = 5W - 计算 selected runtime 允许的 maximum power。
MAXPOWER = BATTERY_CAPACITY / RUNTIME
Example: MAXPOWER = 100Wh / 10h = 10W - 计算 LEDs 当前使用的 power。
Example: ACTPOWER = POWER_RED * DIMMER_RED + POWER_GREEN * DIMMER_GREEN + POWER_BLUE * DIMMER_BLUE - 检查是否需要 reduce power:
if (MAXPOWER < ACTPOWER)
{
DIMMERCUT = MAXPOWER / ACTPOWER
} - 将新的 dimmer values 应用到 LEDs。
NEW_DIMMER_RED = DIMMER_RED * DIMMERCUT - 为了向 user 显示 minimum remaining runtime,可以直接计算:
REMAINING_RUNTIME = RUNTIME * CURRENT_BATTERY_LEVEL
实现帮助可以参考我们的 runtime library,该 library 可免费实现:
./51_Battery_Runtime_Library.html
Feature: Emergency mode
用途: 在 power outages 或 system failures 时确保 lighting available。
How it works:
- 当 AC power lost 时,fixture automatically switches to battery power。
- Fixture 会 activate 一个 predefined emergency lighting profile,通常以 reduced brightness 运行以 extend runtime。
- 该 mode 通常需要符合 safety regulations(例如 EN 60598-2-22),并可能需要保证 minimum duration(例如 1 或 3 hours)。
Emergency Mode 可以 enabled 和 disabled。该 setting 应保存,因此 fixture 断电后仍能记住状态。
如果 gridpower(AC)available,则应按 normal operation 行为工作。
Feature: Anti-theft mode
用途: 防止 unauthorized use 或 device theft。
Anti-Theft-Mode 可以 enabled、disabled 和 triggered。启用 Anti-Theft-Mode 时,不应允许关闭 fixture,也不应允许使用 display 等 user interface。当 Anti-Theft-Mode triggered 时,fixture 应通过 visual effects 和/或 sound effects 发出 alarm。
该 feature 只有在 fixture 为 battery powered 时才能完整实现。如果该 feature active,所有 user interfaces 都应 locked(menu locked、button locked 等)。Vision IC 拥有 fixture 当前 acceleration information。如果 fixture 在 anti-theft-mode 下被移动,会触发 alarm。
- 使用 internal speaker 作为 siren(optional)
Feature: Shipping mode
Shipping Mode 只能 enabled。
如果 shipping mode enabled,fixture 应关闭并 cut off battery power。Fixture 只能通过 gridpower(AC)再次启动,以确保 transport experience 更可靠。
9. 最终验证、App Library 和生产
目标: 确认完整 product implementation,准备 Vision App Library release data,然后准备实际 fixtures 的 production。
需要实现的内容
- 每个 topic 已通过自身 test 后,再运行 implementation verification tool。
- 使用 test checklist 最终确认 RDM、DMX、App Control、DFU、optional features 和 display menu behavior。
- 创建 company account 和 Vision App Library 中的 fixture entry。
- 在 release 最终 RDM Manufacturer ID 和 RDM Device Model ID 前,确定 OEM 或 branded fixture workflow。
- 上传 required firmware、App Control Configuration、libraries、icons 和相关 resources。
- Verification data 和 product data 完成后,申请 fixture release。
- 购买 production licenses,flash 或 update Vision modules,license modules,并验证第一台 production sample。
重要规则
- Final verification 不是第一个 debug step,而是 direct topic testing 之后的最终确认。
- 如果某个 test point fail,先修正 implementation,并重新运行相关 topic test,再重复 final verification。
- App Library release data 必须使用 final firmware 和 final App Control Configuration。
- Fixture release 后,RDM Manufacturer ID 和 RDM Device Model ID 必须保持稳定。
- Release data 稳定且有足够 production licenses 后,才开始 production。
立即测试
- 从头到尾运行完整 implementation verification tool。
- 确认 RDM、DMX、App Control、DFU 以及所有已实现 optional features 通过。
- 对照 final firmware version 检查 App Library data 和 uploaded resources。
- 准备一个接近 production 的 sample,并验证 flashing 或 update behavior。
- License production sample,并确认 App 可以无 warning 地控制它。
- 保留 final checklist result 作为 release evidence。
常见错误
- 把 final verification 当作第一次测试 RDM、DMX 或 DFU 的地方。
- 混淆 App Library release preparation 和 production licensing。
- 上传与 final firmware 不匹配的 App Control Configuration。
- Release 后修改 RDM Manufacturer ID 或 RDM Device Model ID。
- Release data 和 product configuration 尚未稳定时就 license modules。
- 实现验证工具 (已内联)
- 测试清单 (已内联)
- Create App Library 概览 (已内联)
- Create App Library - 创建 company (已内联)
- Create App Library - OEM/品牌 (已内联)
- Create App Library - 创建 fixture (已内联)
- 生产概览 (已内联)
- 购买生产 licenses (已内联)
- 生产 - Flash Vision Module (已内联)
- 生产 - Update Vision Module (已内联)
- 生产 - License Vision Modules (已内联)
- Logo 和贴纸 (参考链接) - Branding 和 sticker requirements。
- Custom Production Flash File (参考链接) - Custom helper。
实现验证工具
Implementation Verification Tool 用于对所有 VISION 产品进行质量验证。灯具软件完成后,每台设备都应执行一次完整 test run。该 test run 会检查产品的关键功能和关键方面,以帮助保持质量标准。
但该工具不会测试产品的所有方面,制造商仍然对自己产品的整体质量负责。此模式是辅助工具,不提供任何保证。
下面的视频展示了 Implementation Verification Tool 的详细流程。视频是有帮助的补充资料,但不是必须观看;下面的文档已经足够完成操作。
Fixture Implementation Verification Video
Test Areas:
- VISION RDM (Remote Device Management)
- VISION DMX (Digital Multiplex)
- VISION FEATURES (Product Features)
- VISION DFU (Device Firmware Update)
灯具必须从开始到结束通过完整 test run。如果任何一个 test point 失败,App 会显示错误信息,并自动结束本次 test run。负责的 developer 必须修改软件,然后使用新版本重新开始测试。如果所有测试全部通过,则该灯具通过验证。
Step-by-Step Guide
- 确认被测灯具满足以下前提条件:
- Bootloader for fixture firmware flashed
- Fixture Firmware installed
- Bootloader for Vision firmware flashed
- Newest Vision firmware installed
- Activate Test Mode:
- 点击顶部齿轮进入 Settings:

- 点击 App Settings:

- 连续点击 App Software Version label(例如 0.0.5.0)两次。之后会出现 PIN 输入框。输入 PIN 7248,Test Mode 将被激活。

- 返回 Discover 页面。
- 点击顶部齿轮进入 Settings:
- Scan for devices:
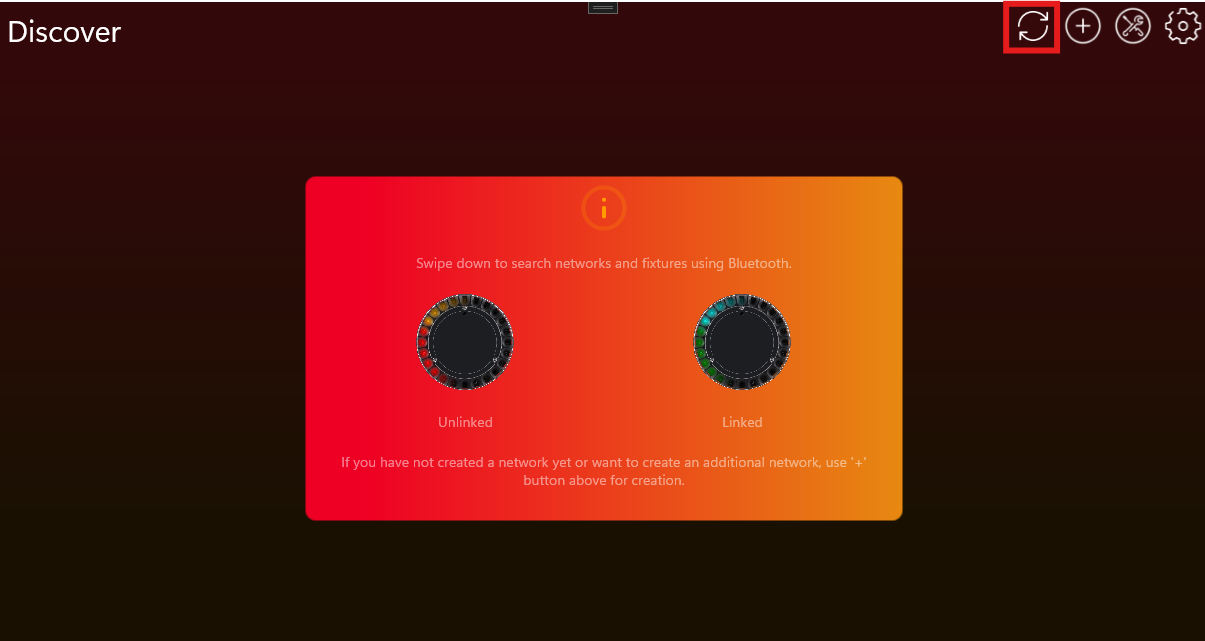
- 点击目标灯具并连接:

- 向下滚动并点击 Verify Implementation:
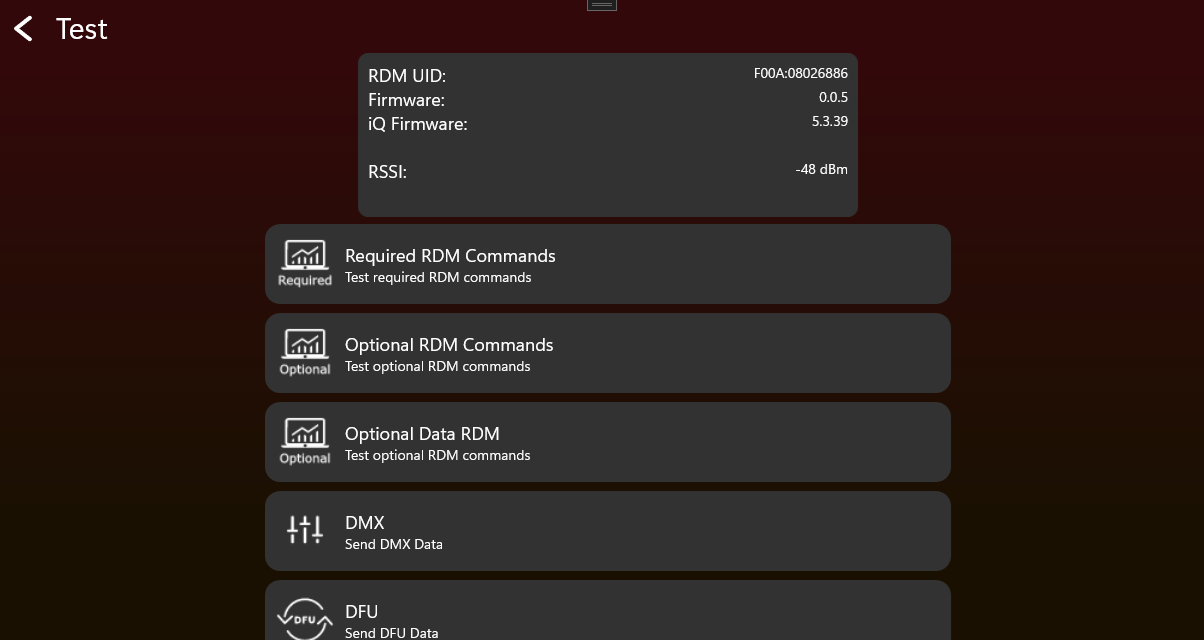
- 随后会出现 popup,并引导你完成整个流程。
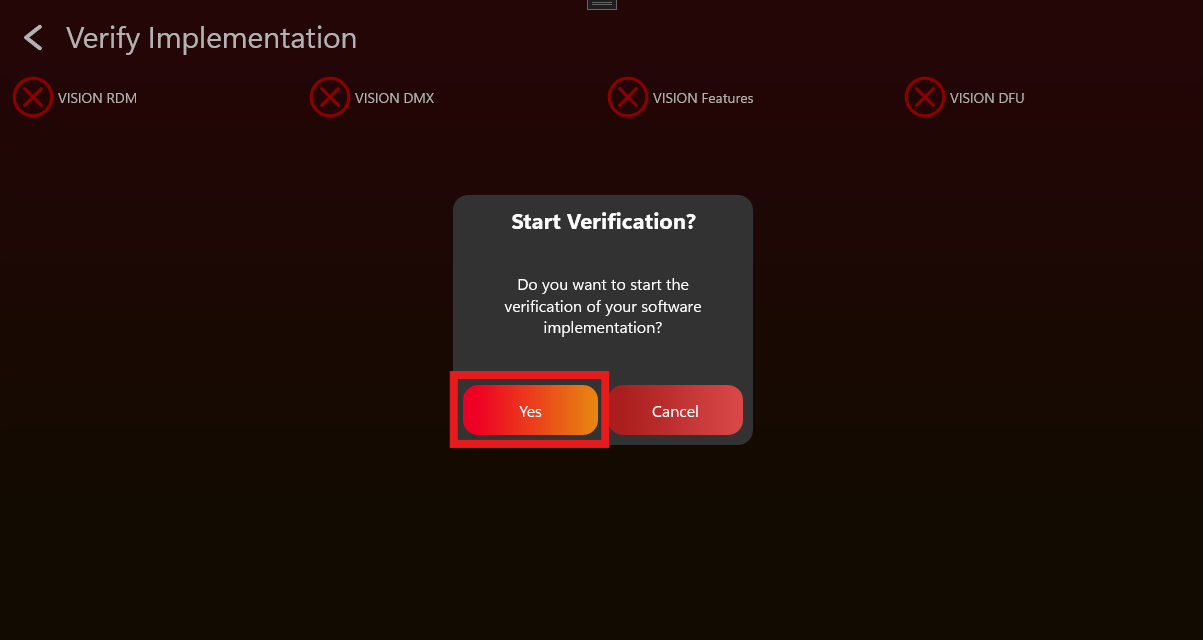
- 所有步骤成功完成后,device 将被 verified。
- 下载 verification certificate。
- 按以下步骤将 certificate 上传到 Vision Webservice。
- 登录:https://server.kk-t.eu/
- 进入 My Fixtures,然后点击已经完成验证的 fixture。
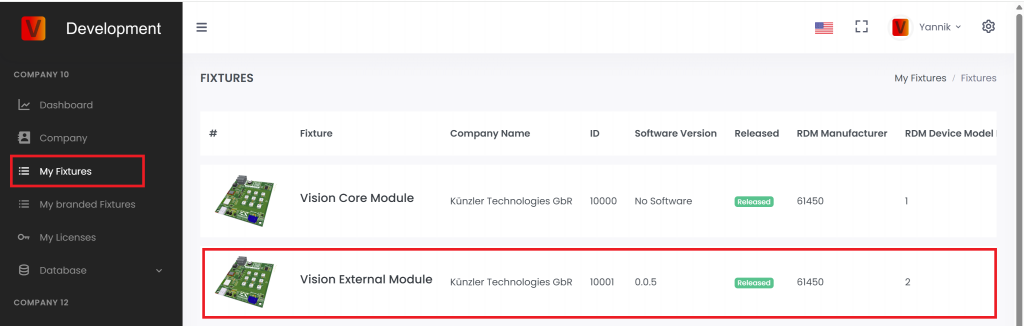
- 向下滚动到 Certificates。
- 向上滚动,点击右上角的 plus icon。
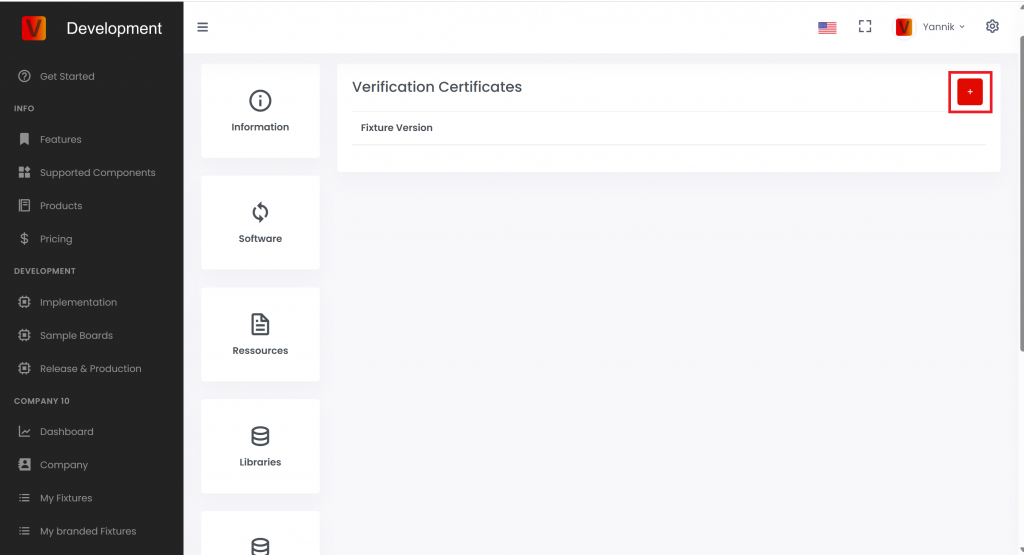
- 上传 certificate,然后点击 Add Certificate。
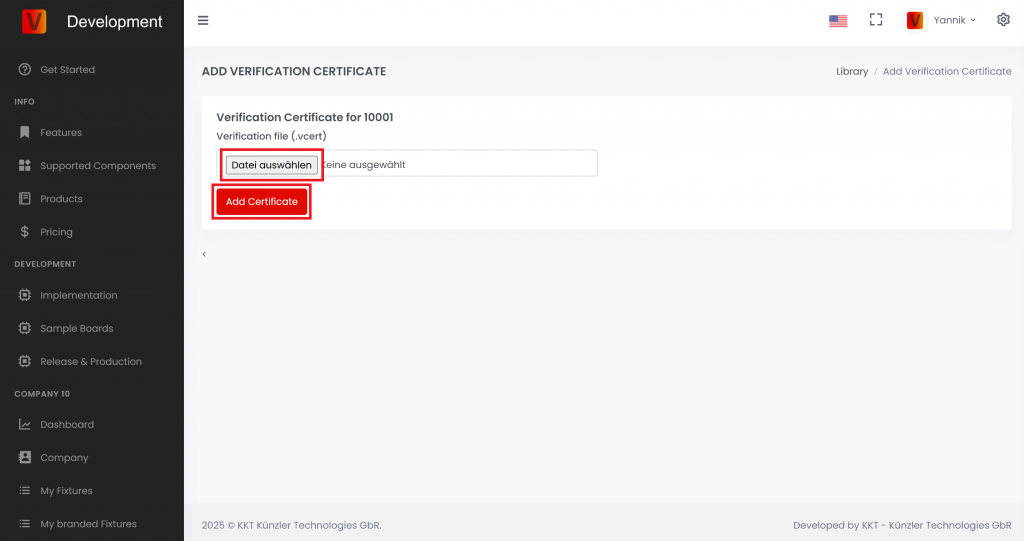
Fixture Name:
Firmware Version:
DMX/RDM Test
- 执行 Factory Default,确保灯具处于默认设置。
- 打开 Vision Control App,并进入 Test Mode。
- 使用 RDM test tool 或我们的 Vision DMX Adapter 进行测试。
RDM
| Function | Sub Function | Passed | Comment |
|---|---|---|---|
| Test Get Device Info | Overall Look | ||
| Test Device Label | Set Get | ||
| Test Factory Defaults | Set Get | ||
| Test DMX Personality | Set Get | ||
| Test DMX start address | Set Get | ||
| Test Sensor Definition | Get | ||
| Test Sensor Value | Get | ||
| Test Lamp Hours | Get | ||
| Test PowerCycles | Get | ||
| Test Identify | Set Get | ||
| Test Reset | Set | ||
| Power State | Set Get | ||
| Perform Selftest | Set Get | ||
| Selftest Description | Get |
Custom RDM
| Function | Sub Function | Passed | Comment |
|---|---|---|---|
| Test GET CPID VISION | Overall Look | ||
| Test Powerstate | |||
| Change DMX Address using Display, RDM | |||
| Change DMX Personality using Display, RDM | |||
| Change Input Source to Vision via Display | |||
| Test Set CPID VISION | Set Input Source | ||
| Set Input State. Link the fixture in the app and unlink via Set CPID VISION Unlink. | |||
| Set Emergency Mode (if it is a battery fixture) | |||
| Set Battery Runtime (if it is a battery fixture) | |||
| Set Antitheft Mode (if supported) | |||
| Test CPID Error Codes | Get | ||
| Test CPID Warning Codes | Get |
VISION Test
- 执行 Factory Default,确保灯具处于默认设置。
- 打开 Vision Control App,并进入 Test Mode。
- 将 fixture 设置为 Vision。
RDM
| Function | Sub Function | Passed | Comment |
|---|---|---|---|
| Test Get Device Info | Overall Look | ||
| Test Device Label | Set Get | ||
| Test Factory Defaults | Set Get | ||
| Test DMX Personality | Set Get | ||
| Test DMX start address | Set Get | ||
| Test Sensor Definition | Get | ||
| Test Sensor Value | Get | ||
| Test Lamp Hours | Get | ||
| Test PowerCycles | Get | ||
| Test Identify | Set Get | ||
| Test Reset | Set | ||
| Power State | Set Get | ||
| Perform Selftest | Set Get | ||
| Selftest Description | Get |
Custom RDM
| Function | Sub Function | Passed | Comment |
|---|---|---|---|
| Test GET CPID VISION | Overall Look | ||
| Change DMX Address using Display, RDM, Vision | |||
| Change DMX Personality using Display, RDM | |||
| Change Input Source to Vision via Display | |||
| Test Set CPID VISION | Set Input Source | ||
| Set Input State. Link the fixture in the app and unlink via Set CPID VISION Unlink. | |||
| Set Emergency Mode (if it is a battery fixture) | |||
| Set Battery Runtime (if it is a battery fixture) | |||
| Set Antitheft Mode (if supported) | |||
| Test CPID Error Codes | Get | ||
| Test CPID Warning Codes | Get |
Firmware Update
| Function | Passed | Comment |
|---|---|---|
| Test Firmware Update |
DMX Control
| Function | Subfunction | Passed | Comment |
|---|---|---|---|
| Test DMX Control: Vision Control Behavior == 0 | DMX start address == 1 | ||
| DMX start address == 10 | |||
| Test legacy Vision DMX Adapter behavior: Vision Control Behavior == 1 | DMX start address == 1 | ||
| DMX start address == 10 | |||
| Test App Control: Vision Control Behavior == 255 | DMX start address == 1 | ||
| DMX start address == 10 |
Display Menu Test
| Function | Passed | Comment |
|---|---|---|
| Test Input Source Vision | ||
| Test Unlink Vision | ||
| Test Vision Service Connect |
NFC Test
| Function | Passed | Comment |
|---|---|---|
| Test NFC Antenna behavior | ||
| Test WakeUp through NFC | ||
| Test RDM commands through NFC |
App Control Configuration Test
| Function | Passed | Comment |
|---|---|---|
| Test App Control Configuration | ||
| Test Shutter performance | ||
| Test Color Behavior |
Optional Tests
Button 测试
| Function | Passed | Comment |
|---|---|---|
| Test Button (On/Off/Unlink) |
Battery 测试
| Function | Passed | Comment |
|---|---|---|
| Test Battery |
Motion 测试
| Function | Passed | Comment |
|---|---|---|
| Test Motion |
IR 测试
| Function | Passed | Comment |
|---|---|---|
| Test IR |
Create App Library 概览
79_Create_App_Library_Overview.html本章说明如何为 Vision Control App 创建 fixture data。这里包括 company account、OEM 或品牌方案、fixture entry、firmware、App Control Configuration、图片和资源文件。
这一步应在 production 之前完成。Production 是后续步骤,用于对实际模块进行 flashing、update 和 licensing。
本章内容
- 在 Vision Web Service 上创建或申请 company account。
- 确定 fixture 是自己的产品、OEM sample,还是客户品牌产品。
- 使用正确的 RDM Manufacturer ID 和 RDM Device Model ID 创建 fixture entry。
- 上传 firmware、App Control Configuration、产品图片、icon 和文档。
- 当 implementation 和上传的数据都确定后,申请 fixture release。
重要
RDM Manufacturer ID 和 RDM Device Model ID 用来识别 fixture type。Release 后不要再修改这些值。如果之后修改,现场已经交付的 fixtures 可能无法再被识别为同一个产品。
上传的 App Control Configuration 必须与最终 firmware 匹配。如果 firmware behavior 改变,在 release 或 production 前必须重新检查 App Control Configuration。
Create App Library - 创建 company
80_Create_App_Library_Create_Company.html在 Vision App Library 中创建 fixtures 之前,需要先创建或申请 company account。Vision Control App 和 Vision Web Service 使用同一个登录账号。
打开 Vision Web Service
打开 https://server.kk-t.eu/,并使用 Vision account 登录。
如果还没有账号,请先安装 Vision Control App,并在 App 中创建账号:
打开 Windows Store
打开 Google Play Store
打开 Apple App Store
先查看 demo company
登录后,打开 MY COMPANY (DEMO)。Demo company 会显示之后自己公司会用到的页面,例如 Dashboard、Company、My Fixtures 和 My Licenses。
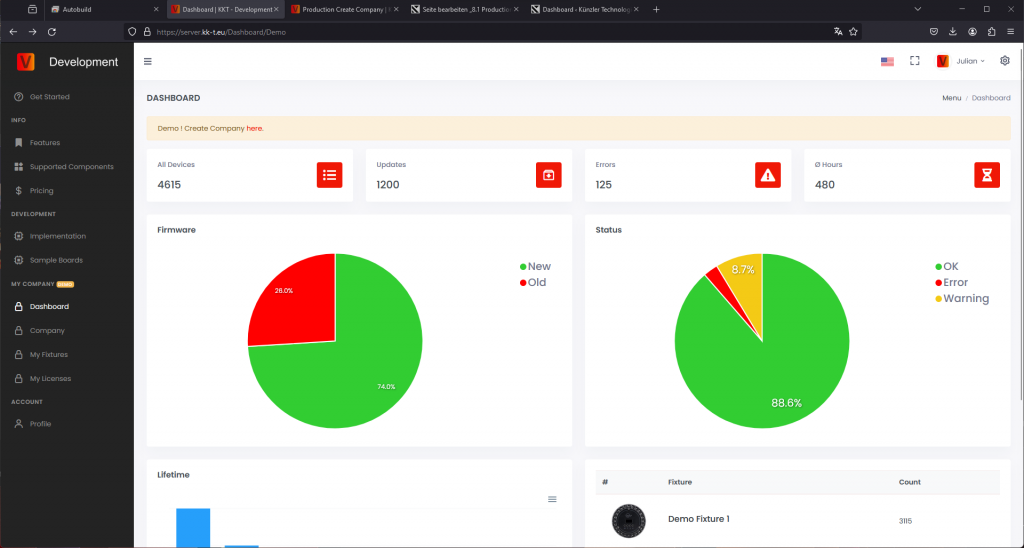
申请自己的 company
在 demo 页面中点击 Demo! Create Company here。请认真填写 company request,并使用有效的公司邮箱。
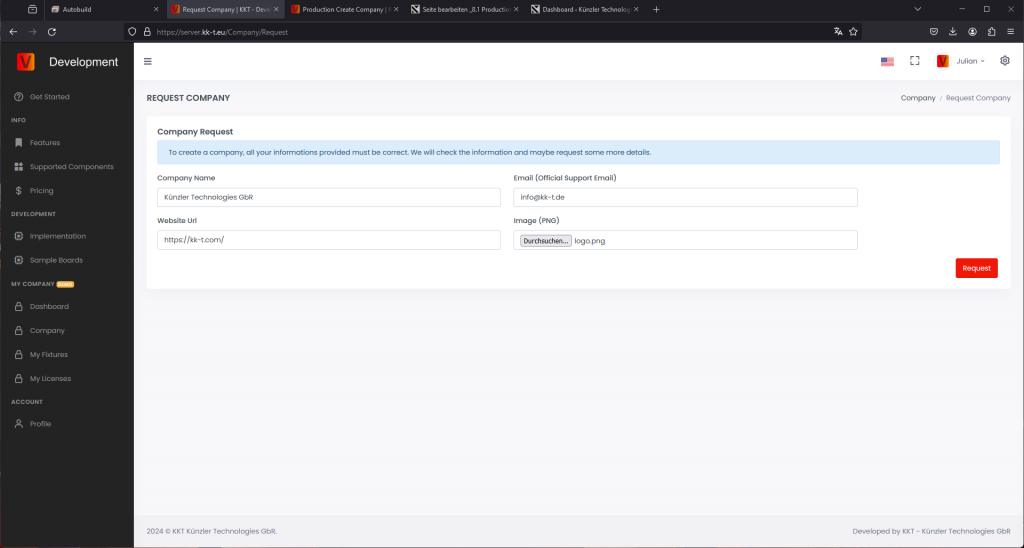
Vision Control 会在 company 激活前检查申请。如果信息不完整,或者 company 无法验证,我们会通过 email 联系你。验证通常可能需要 2-3 个工作日。
验证完成后,你会收到 email。之后可以为 company 创建 fixtures、管理 release data,并购买 production licenses。
如果一个账号需要管理多个 companies,请联系 Vision Control,或发送邮件至 info@vision-cs.de。
Create App Library - OEM/品牌
81_Create_App_Library_Oem_Branding.html本页说明推荐的 OEM 和品牌 fixture workflow。在 Vision Web Service 上创建最终 fixture entry 前,请先确认这个 workflow。
RDM Manufacturer ID 和 RDM Device Model ID 一起用于识别准确的 fixture type。Fixture release 后,这两个值不能再修改。如果修改,现场已经交付的 fixtures 可能无法再被识别。Description、images、website URLs、resources 和 names 后续仍可更新。
推荐 workflow
1. Development sample
在自己的 company 中创建一个 fixture,使用自己的命名、自己的 RDM Manufacturer ID 和自己的 RDM Device Model ID。这个 fixture 用于内部开发、演示和 customer samples。它不需要在 App 中公开显示。
RDM Manufacturer: 你公司的 Manufacturer ID
RDM Device Model ID: 该 fixture 专用的 Device Model ID
以 Vision Core Module 为例:

Sample 完成并通过验证后,在 fixture page 上申请 release。在 release 之前,该 fixture 保持 internal 状态,只有授权账号可以访问。
2. Customer sample
Sample release 后,将其发给 customer 测试。如果 customer 需要 branded fixture,则继续创建 branded production fixture。如果不需要 branding,可以直接进入 production。
3. Branded production fixture
对于 branded product,需要根据 customer 要求调整 firmware 和 product data。如果品牌方需要拥有 fixture identity,released product 应使用品牌方最终的 RDM information。
RDM Manufacturer: 品牌方的 Manufacturer ID
RDM Device Model ID: 品牌方该 fixture 专用的 Device Model ID
然后在 server 上使用品牌方的最终 product information 创建一个独立 fixture。
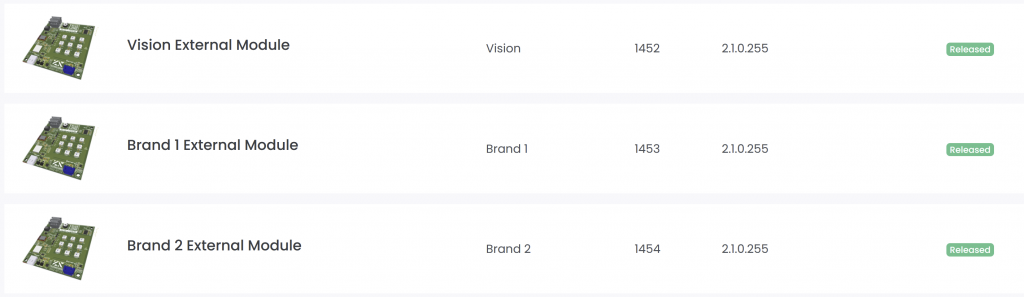
Branded fixture entry 准备好后,可以将 fixture access 分享给品牌方。品牌方可根据约定维护 product data、resources 或 release information。
Create App Library - 创建 fixture
82_Create_App_Library_Create_Fixture.htmlCompany account 已存在,并且最终 fixture identity 已确定后,再创建 fixture entry。Fixture entry 是 App Library 中的记录,Vision Control App 通过它识别产品并加载正确的 App data。
开始前需要准备
- 最终 RDM Manufacturer ID。
- 最终 RDM Device Model ID。
- Fixture name、brand name、product description、website 和 support information。
- Fixture 使用的 serial number format。
- 最终或 release-candidate firmware file。
- 与 firmware 匹配的最终 App Control Configuration。
- Fixture image、App icon,以及可选文档,例如 manual、DMX chart 或 technical data sheet。
重要:RDM Manufacturer ID 和 RDM Device Model ID 在 release 后必须保持稳定。Vision 通过这两个值识别 fixture type。
打开 My Fixtures
登录 Vision Web Service,打开你的 company,然后进入 My Fixtures。
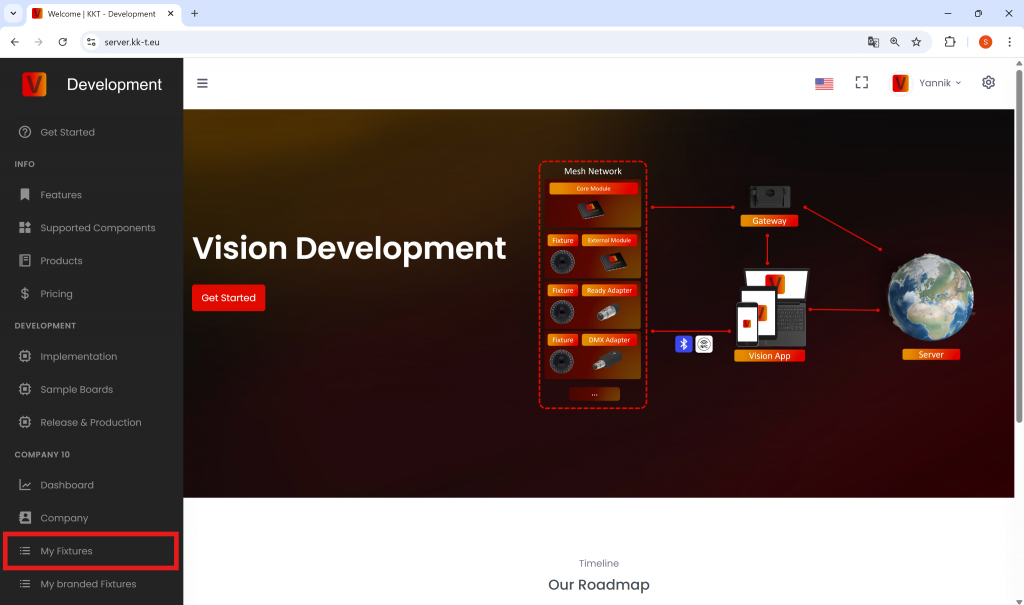
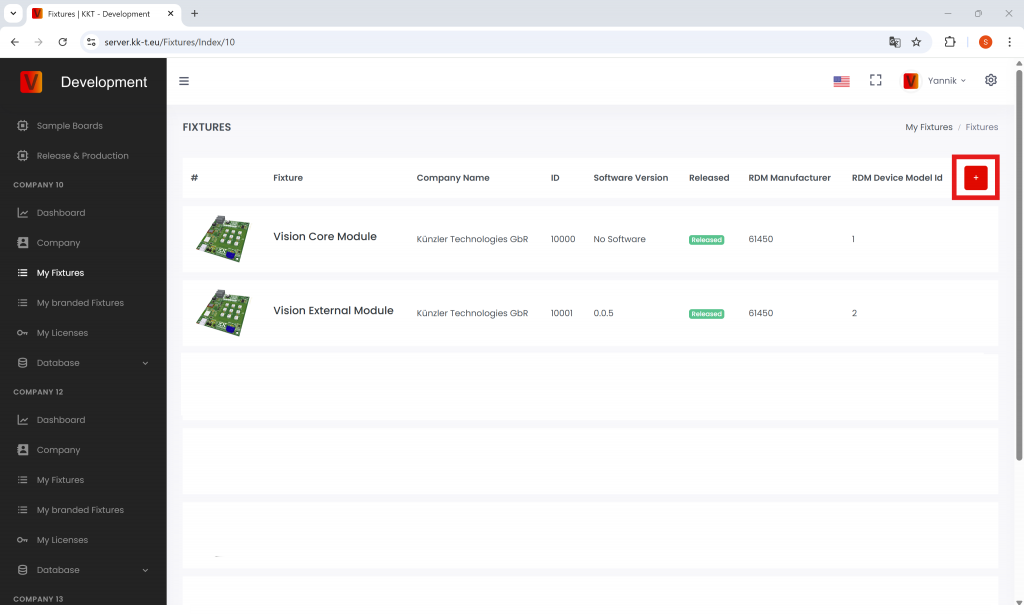
创建 fixture
点击 plus button 创建新的 fixture。请仔细填写 product identity。
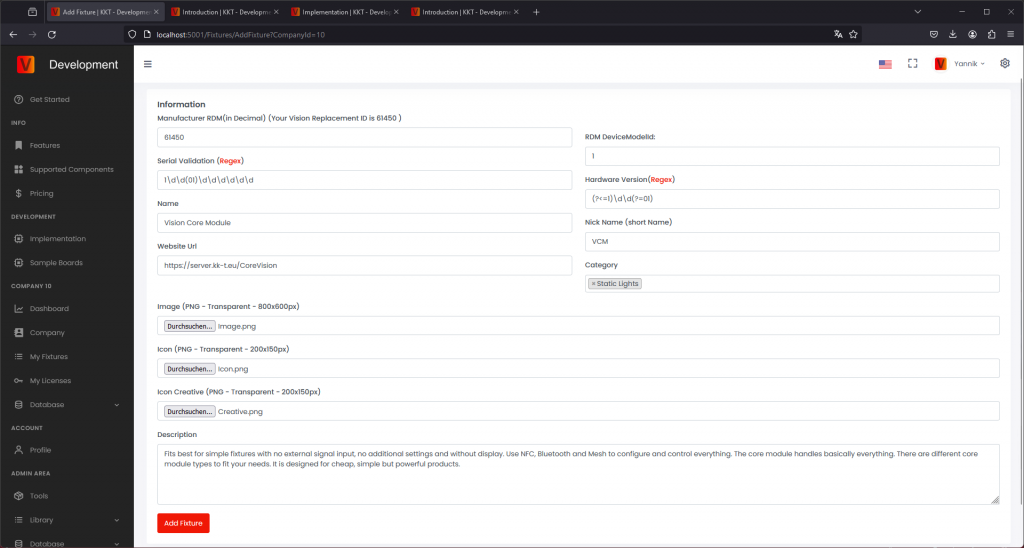
- RDM ESTA Manufacturer ID: 输入十进制值。如果你的值是 hexadecimal,请先转换为 decimal。如果你不是 RDM manufacturer,请使用分配给你的 Vision replacement ID。
- RDM Device Model ID: 输入 fixture model ID 的十进制值。
- Serial number validation: 输入用于验证 fixture serial number 的 regular expression。如果没有特殊要求,使用 Vision Control 推荐的简单 numeric format。
- Product information: 添加用户可见的 name、brand、description、website 和 support information。
保存后,fixture 会显示在 My Fixtures 页面。新创建的 fixtures 初始为 draft,普通用户还看不到。
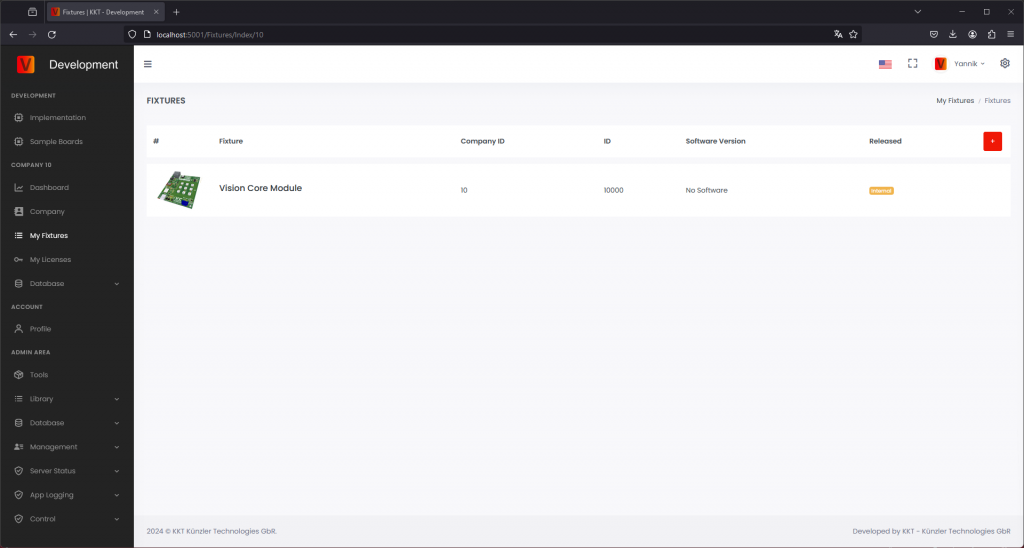
添加 image 和 icon
Fixture image 和 icon 会在 App 中显示,应让用户容易识别产品。
- Image: 上传清晰的产品图片。
- Icon: 使用透明背景的 200 x 150 px icon,不应显示主动 light output。
- App Control icon: 标记可控制的发光区域。旧页面或截图中可能仍称为 Icon Creative。
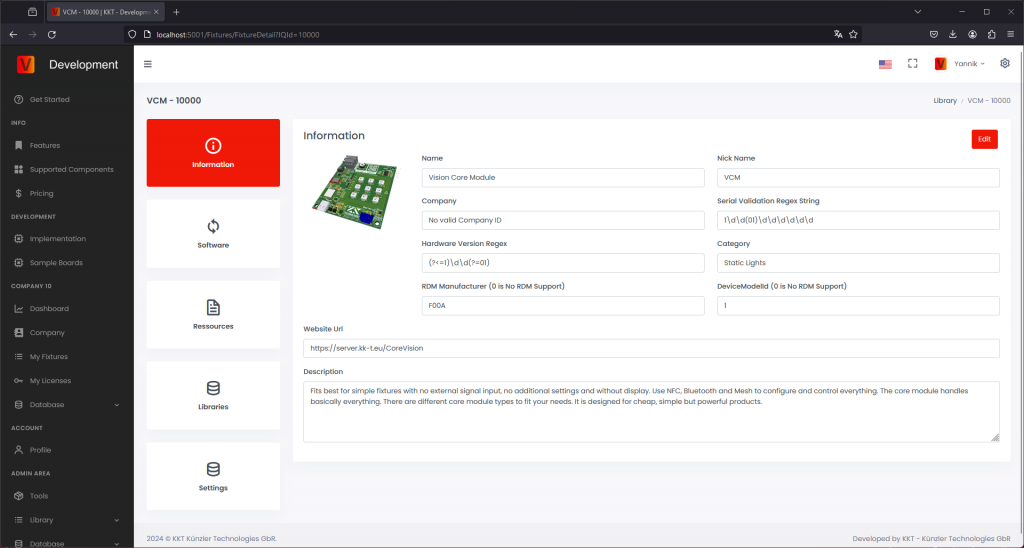
上传 firmware
打开 Software section,上传 fixture firmware file。添加清楚的 release notes,让 customer 能理解本次变化。
- 使用 Vision Web Service 要求的 versioning format。
- 只 release 已在真实 fixture 上测试过的 firmware。
- Firmware 未准备好 release 前,保持 draft 状态。
Firmware 准备好给用户使用时,将它从 draft 改为 release。
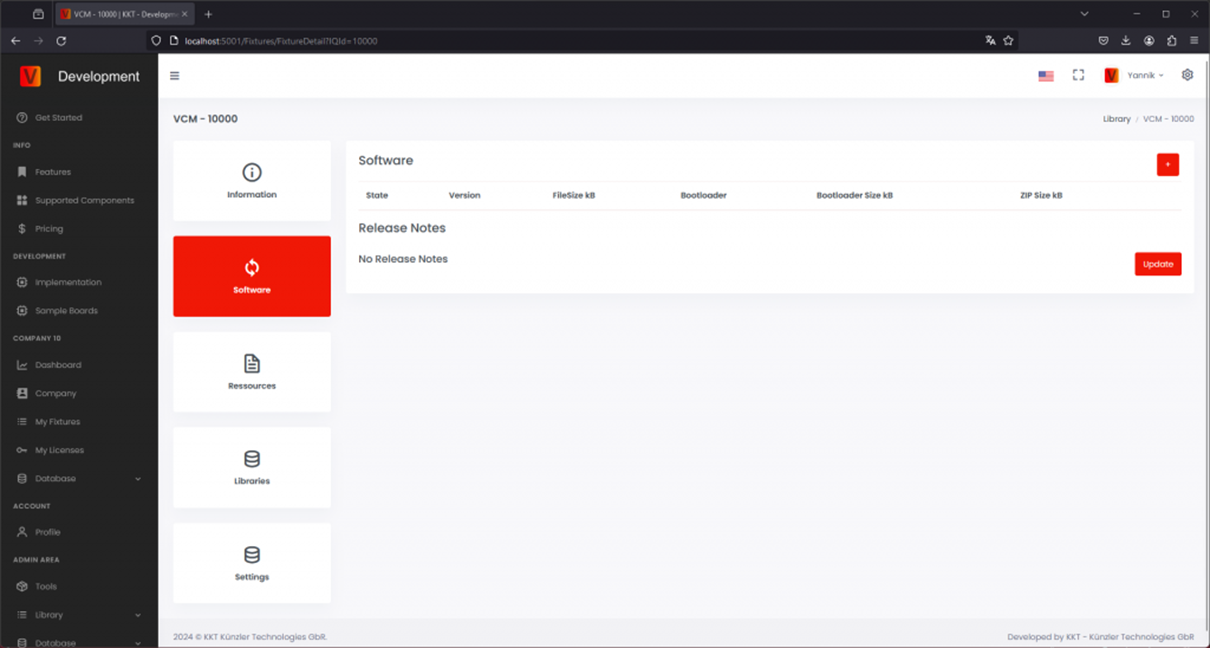
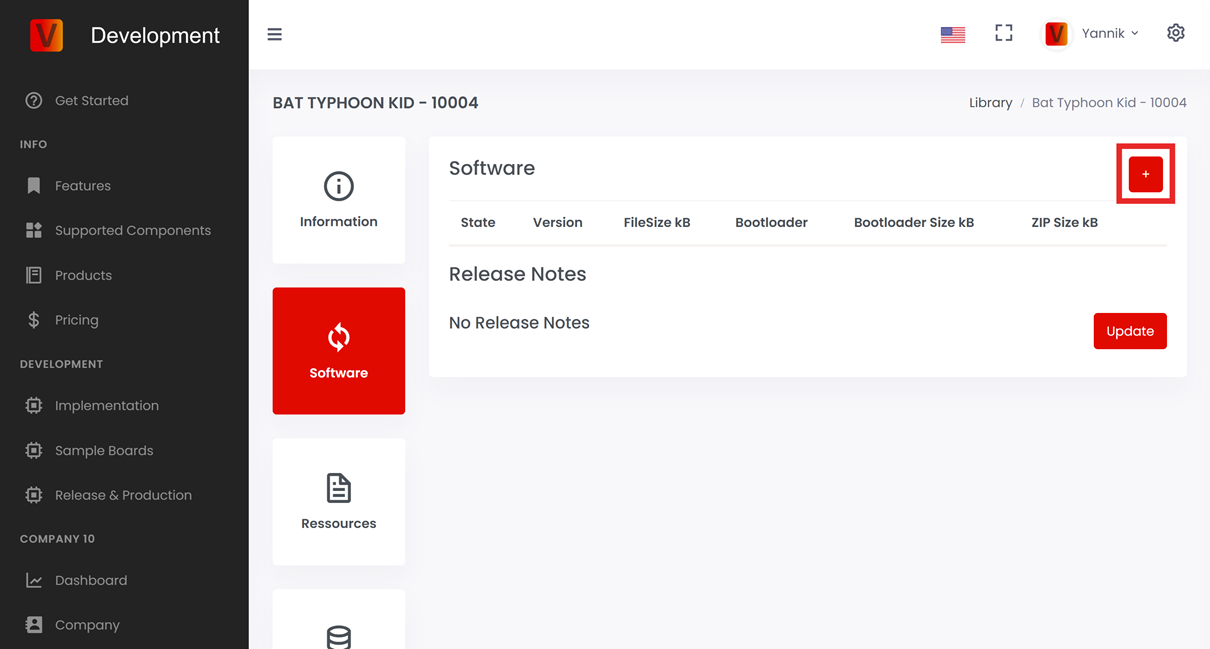
上传 resources
在 resources area 上传面向 customer 的文档。常见 resources 包括 user manual、DMX sheet、safety information、technical specification 或 service documents。
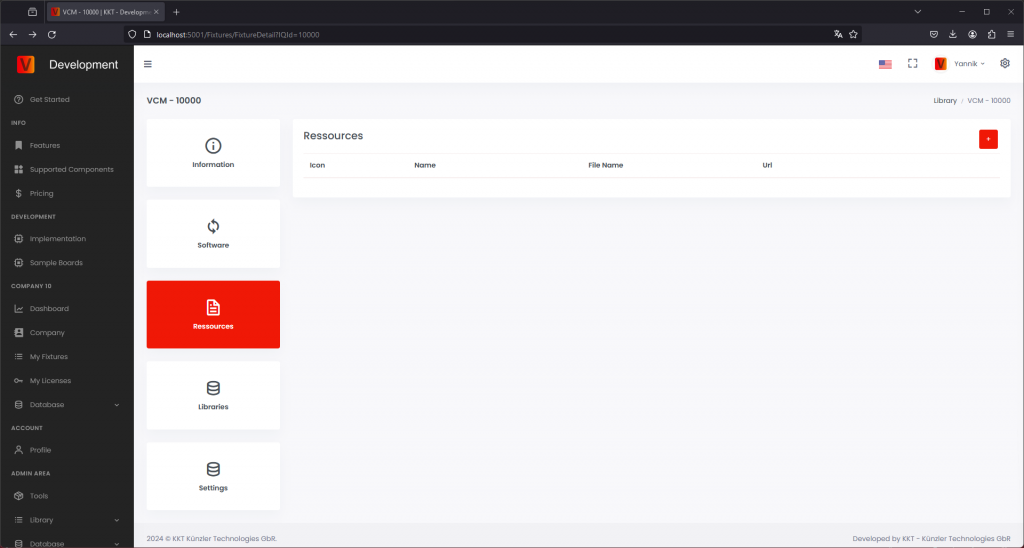
上传 App Control Configuration
上传在 implementation 中创建并测试过的最终 App Control Configuration。该 configuration 必须与最终 firmware behavior 匹配。如果 firmware behavior 改变,需要检查 App Control Configuration 是否也必须更新。
旧名称说明:App Control Configuration 以前叫 Creative Configuration 或 Creative Config。旧 App 版本、截图、URL 和文件名中可能仍会看到这些旧名称。
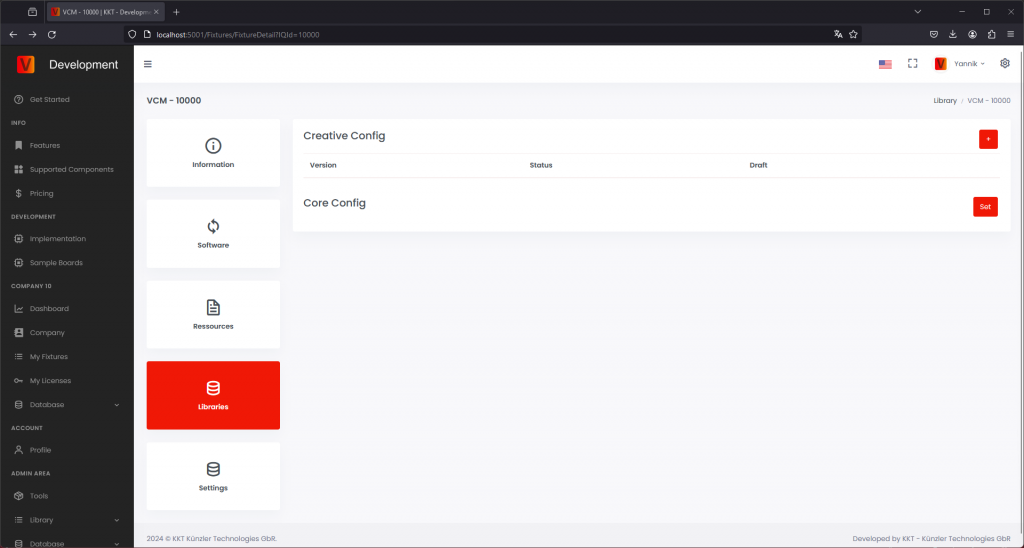
如果多个 firmware versions 使用同一个 configuration,可以指向同一份 App Control Configuration。如果新的 firmware 改变了 DMX layout 或 App Control behavior,则需要上传新的 configuration,并分配给对应的 firmware version。
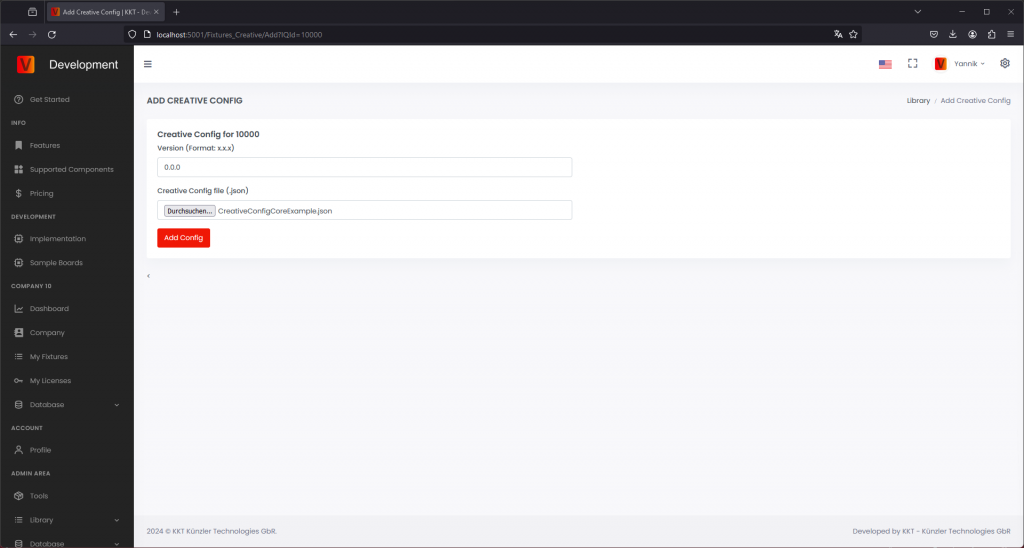
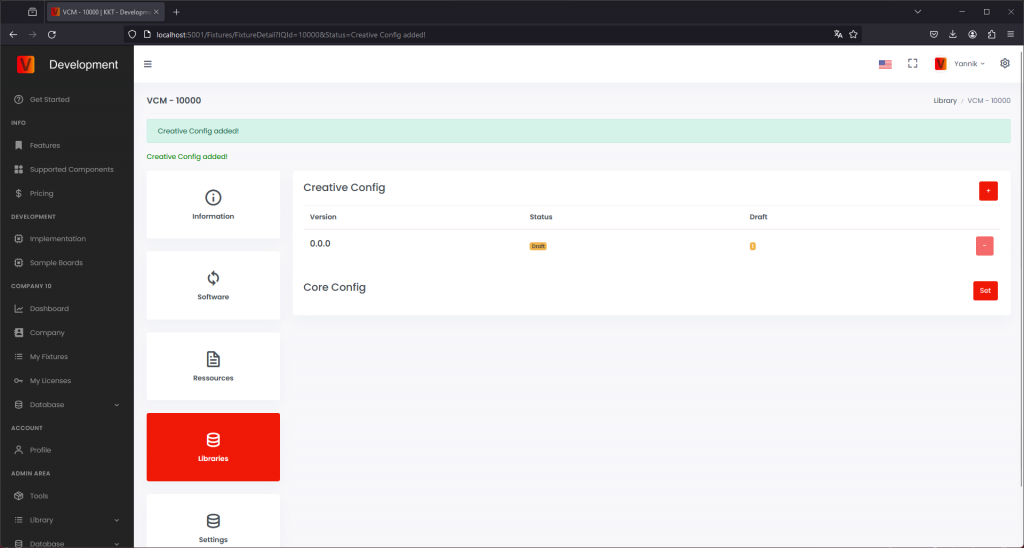
检查 release information
申请 release 前,请检查所有会在 Vision Control App 中显示或被 App 使用的信息。
- Fixture name、brand、description、website 和 support contact。
- RDM Manufacturer ID 和 RDM Device Model ID。
- Firmware version 和 release notes。
- 分配给正确 firmware version 的 App Control Configuration。
- Fixture image、icon 和 App Control icon。
- Manual、DMX chart、technical data sheet 或 safety information 等 resources。
RDM Manufacturer ID 和 RDM Device Model ID 在 release 后不能修改。其他 product information 后续可以更新,但 release 前仍应仔细检查。
申请 release
只有在真实 fixture 已使用最终 firmware、最终 App Control Configuration 和最终 product data 测试后,才申请 fixture release。上传所需的 verification information;如有要求,也需要上传展示 fixture 功能的视频。

Release approval 后,继续 production chapter:购买 production licenses、flash 或 update Vision modules、license modules,并验证第一台 production sample。
分享 fixture access
如果你作为 OEM 生产 fixture,而另一家公司拥有品牌,在 fixture entry 准备好后可以把 fixture access 分享给该公司。品牌方之后可根据约定维护 product data 或 release information。
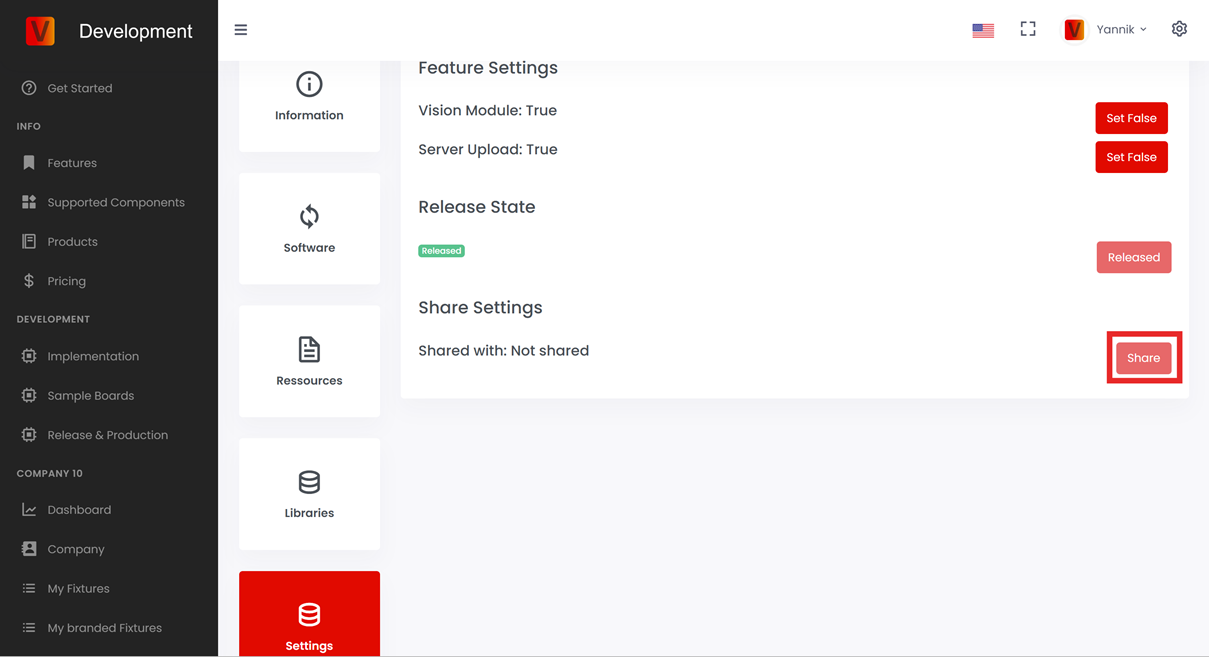
Production 在 fixture implementation 已验证、App Library data 已准备好之后开始。在 production 中,每个实际 fixture 都必须具有正确的 Vision firmware/data、正确的 App Control Configuration,以及有效的 production license。
生产前
- Fixture firmware 已最终确定,或已被批准用于 production。
- App Control Configuration 与最终 firmware 匹配。
- Fixture entry 已存在于 Vision App Library 中。
- Fixture 已通过 implementation verification tool 验证。
- Company 中已有可用的 production licenses。
- Production station 可以 flash、update 并测试 Vision module。
生产流程
- 购买 production licenses: 在生产 batch 前确认有足够 licenses。
- Flash Vision module: 根据所选 hardware module,将正确的 bootloader 或 production flash file 写入 Vision module。
- Update Vision module: 如果 production flash file 未包含最终 App data,则在 Vision Control App 中用最终 App Control Configuration 更新 module。
- License Vision module: 通过 License Manager 为每台 fixture 激活 production license。
- 验证第一批 production samples: 检查 discovery、connection、App Control、DMX Control、RDM data、firmware version 和 optional features。
- 完成市场准备: 按要求处理 Vision logo 或 sticker information,并完成 certification 相关任务。
Flash file 或 App update
对于小批量或 development samples,通过 App 更新 App Control Configuration 通常已经足够。对于较大的 production batch,production flash file 可以减少手动步骤,因为所需 Vision data 已在 flashing 时包含。
如果产品使用 custom hardware 或 custom firmware workflow,还需要参考 custom production flash file 文档。
生产样品检查
每个 production batch 至少应测试第一批 units,并使用最终 App release data。只用 development data 测试过的 sample,不足以作为 production approval。
购买生产 licenses
85_Purchase_Production_Licenses.htmlFixture 能够被 licensed 并正常交付给 customer 前,company account 中必须有可用的 production licenses。请从负责该 fixture production 的 company account 中购买 licenses。
打开 My Licenses
登录 Vision Web Service:https://server.kk-t.eu/,打开你的 company,然后进入 My Licenses。该页面会显示 free licenses 和已使用 licenses。点击 shopping cart 购买更多 licenses。
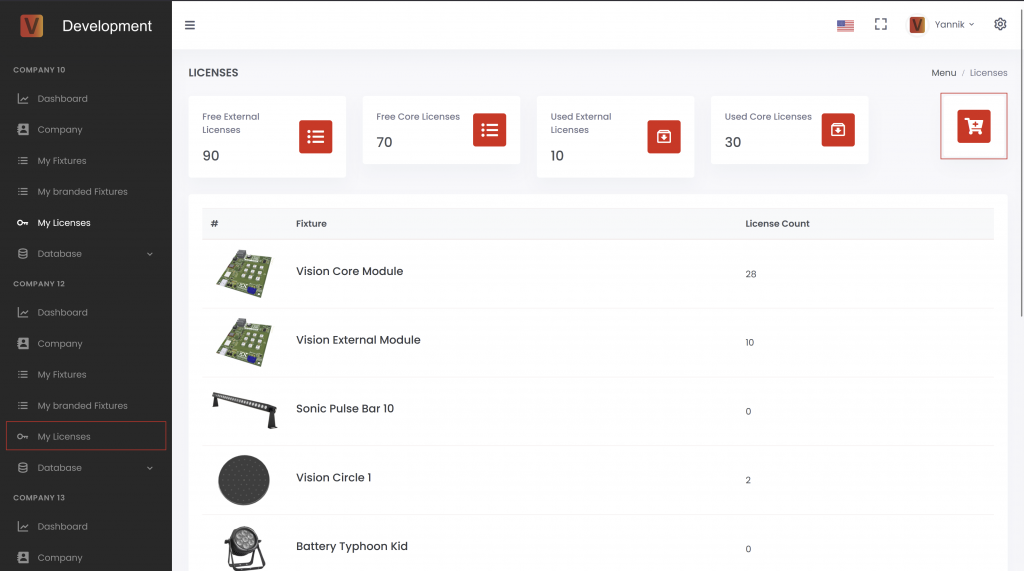
选择 license type 和数量
选择所需 license type,并输入数量。价格会根据当前 pricing scheme 自动计算。对于 contract pricing 或较大数量,请在下单前联系 Vision Control team。
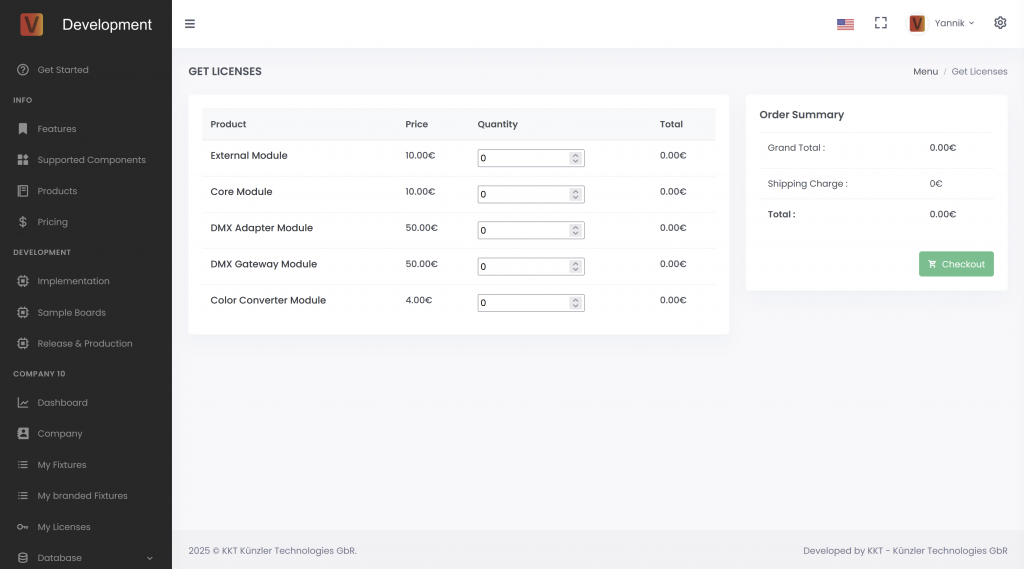
Checkout
输入 company 和 payment information。请使用清晰的 address format,例如:
Example Company Inc
Street and house number
ZIP code and city
Country
如果有任何不清楚的地方,请在提交订单前联系 Vision Control。
下单后
订单成功后,company page 会显示 order overview。你也可以在那里查看并下载 invoices。购买的 licenses 之后可用于 production licensing step。
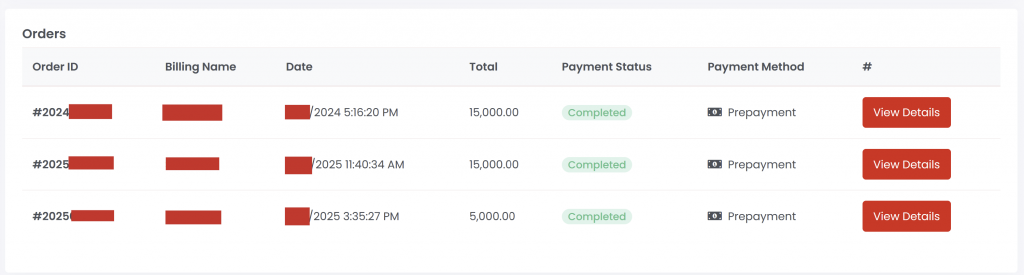
生产 - Flash Vision Module
82_Production_Flash_Vision_Module.html本页说明 Vision module 的 production flashing 步骤。在标准 production flow 中,flashing 会将所需的 Vision bootloader 写入 Vision IC。
Fixture application firmware 通常不在这个步骤中 flash。Fixture firmware 应通过 firmware update procedure 安装或更新,这样可以同时验证 bootloader 和 update process 是否正确工作。
为了提高 production 效率,可以选择生成 fixture-specific bootloader flash file。该文件包含 Vision bootloader 和最终 App Control Configuration,从而减少后续 production 中的手动 App 操作。
如果 Vision module 已经包含正确的 bootloader 和最终 App Control Configuration,可以直接继续 licensing step。
Flash bootloader
从 Vision firmware 页面下载正确的 Vision bootloader。请选择与 fixture 中 Vision hardware module 匹配的文件。
- 为 Vision module 选择正确的 bootloader file。
- Flashing 前先 erase Vision IC,确保 MBR 被正确擦除。
- 使用该 module 对应的 flash tool 写入 bootloader。
- 给 fixture 上电,并确认 Vision Control App 可以发现 Vision module。
可选 bootloader + App Control Configuration
Production flash file 可以包含 Vision bootloader data 和最终 App Control Configuration。这样可以减少 production 中的手动 App 步骤。具体文件取决于 Vision hardware module 和最终 fixture configuration。
Vision Control App 提供 developer tool,用于生成 Vision bootloader flash file。该工具是 optional,主要用于 production 中需要将 App Control Configuration 预先写入 Vision module 的情况。
- 在 App settings 中启用 developer tools。
- 打开 Developer Tools。
- 打开 VISION Bootloader Flash File Generator。
- 选择 fixture 使用的 Vision IC 或 module type。
- 从 App Library 中选择 fixture。
- 只有产品确实需要时,才启用 optional settings。
- 生成 Vision bootloader flash file。
- 使用 approved production programmer 将生成的文件 flash 到 Vision IC,例如 J-Link。
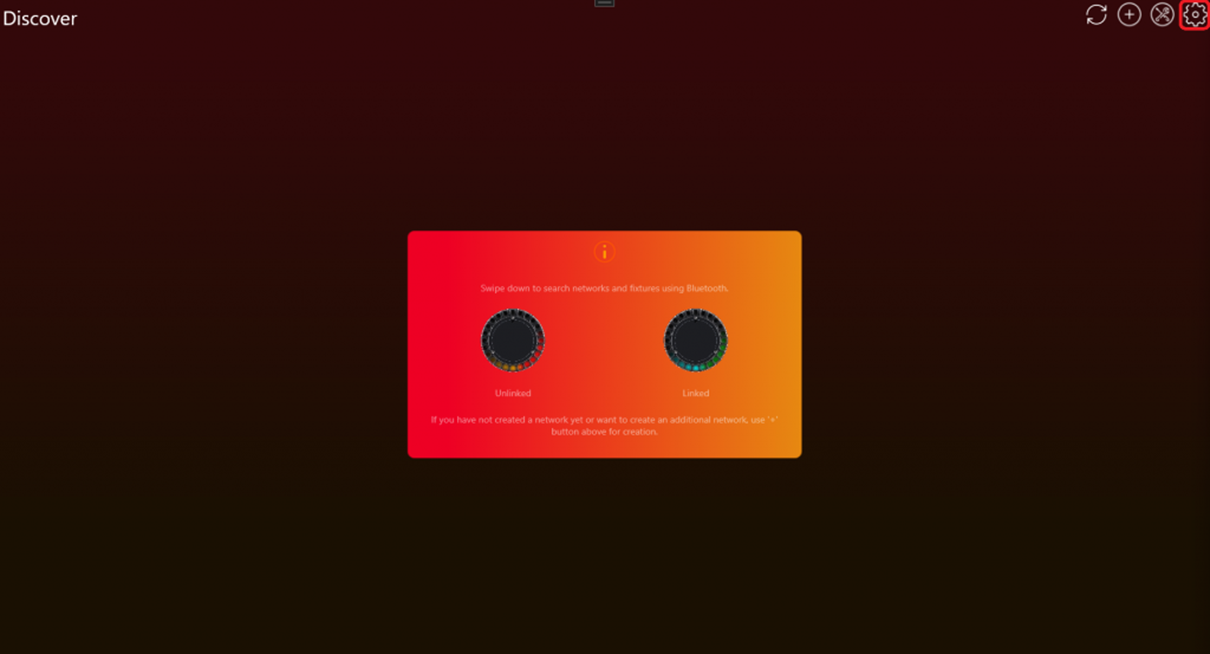
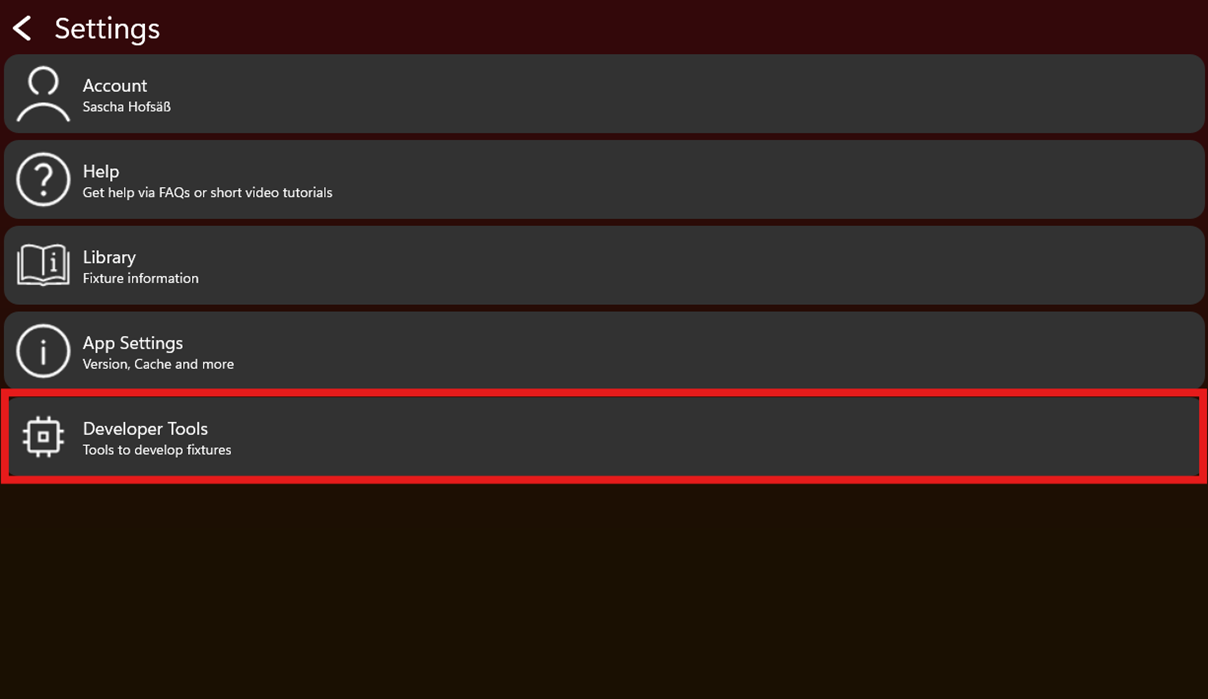
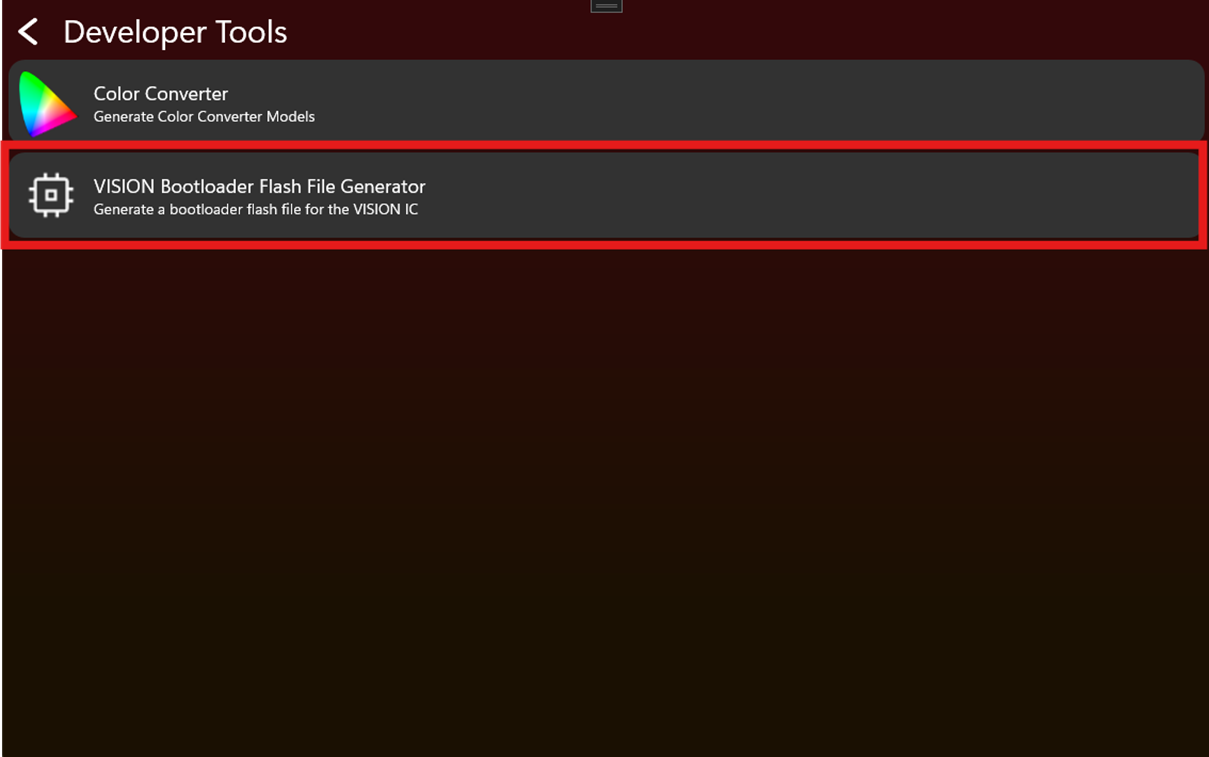

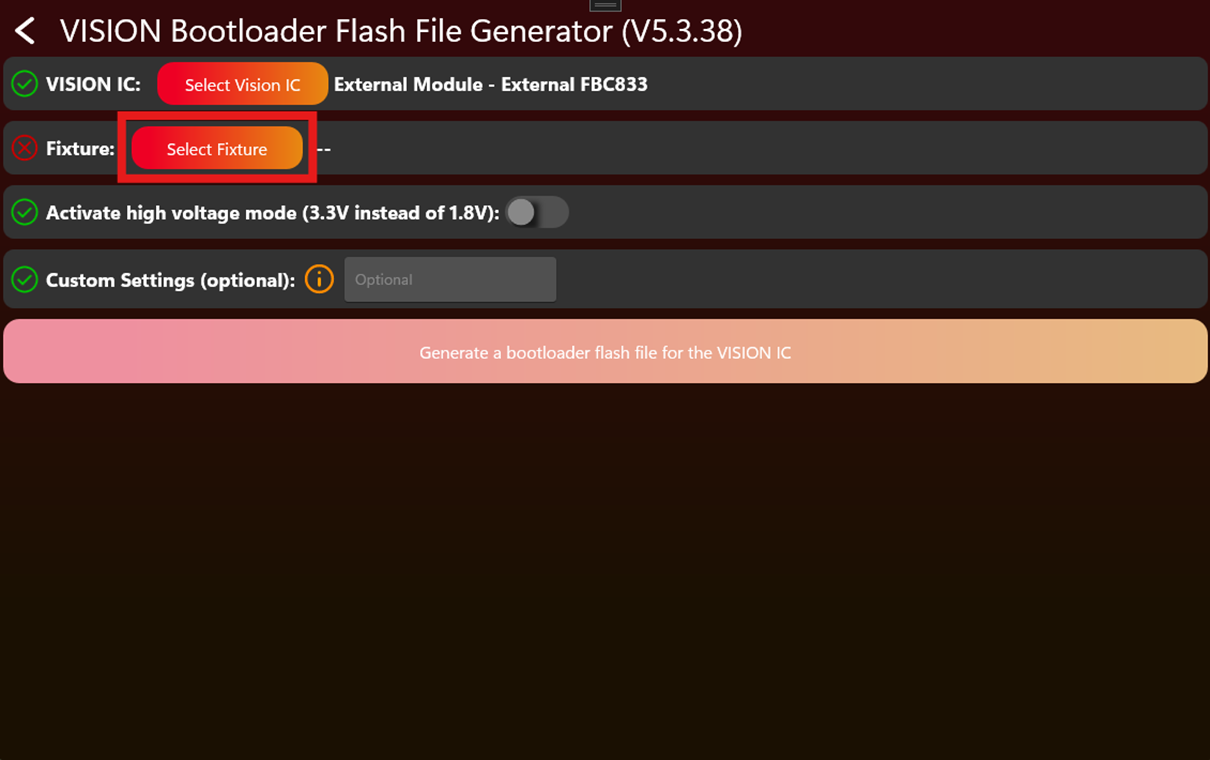
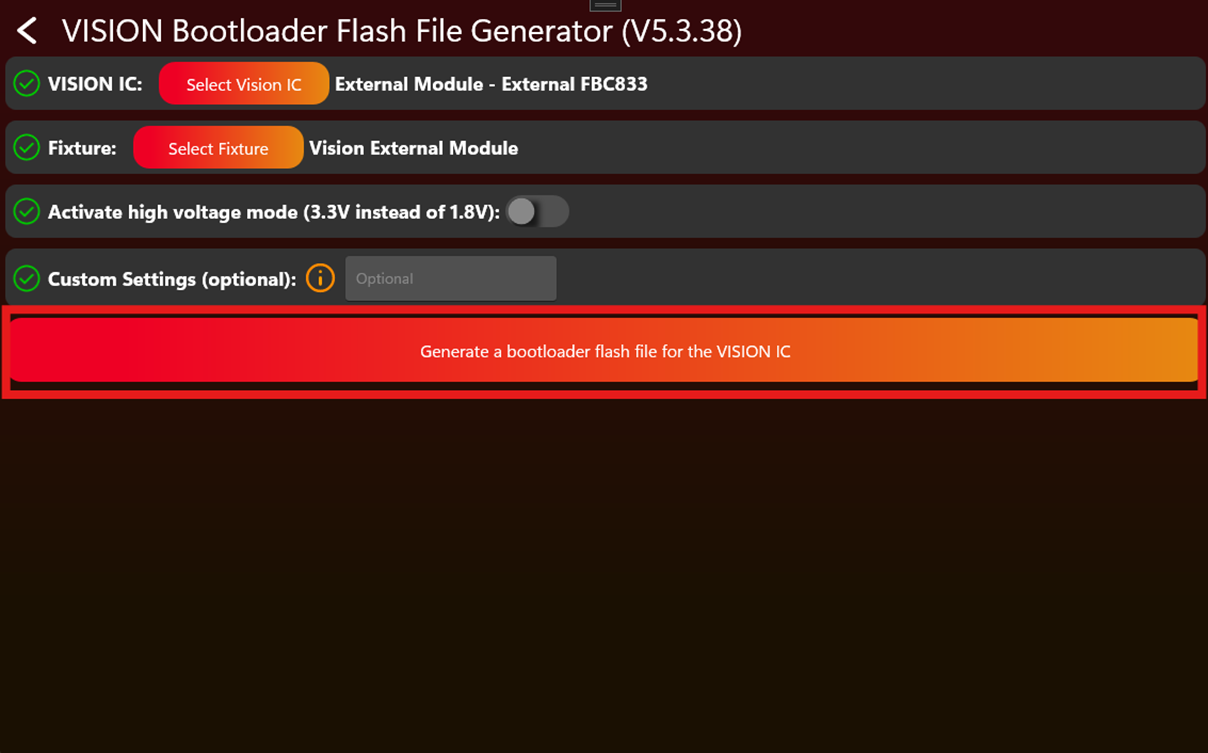
Flashing 后
给 fixture 上电,并使用 Vision Control App 扫描。Fixture 应显示为 Vision Bootloader,并准备好接收 firmware。
生产 - Update Vision Module
82_Production_Update_Vision_Module.html本页说明如何使用最终 App Control Configuration 更新 Vision module。当 fixture 在 flashing 时未包含最终 App data,或 module programmed 后 App Control Configuration 又发生变化时,需要执行此步骤。
什么时候需要此步骤
- Production flash file 未包含最终 App Control Configuration。
- Flashing 后 App Control Configuration 又被更新。
- Development module 需要转换为最终 released fixture data。
- App 显示该 fixture 需要 App Control Configuration update。
App Control Configuration 必须与最终 firmware 匹配。如果 firmware 和 App Control Configuration 不属于同一版本,App Control 可能会出现错误 behavior。
使用 Vision Control App 更新
- 给 fixture 上电,并打开 Vision Control App。
- Scan fixtures。
- 打开带有 red badge 的 tools icon。
- 打开 App Control Configuration Manager。
- 选择 fixture,或对所有需要 update 的 detected fixtures 使用 Update all。
- 等待 update 完成。
- 如果 App 或 fixture behavior 要求,restart fixture。
- 再次 scan,确认没有 pending App Control Configuration update。
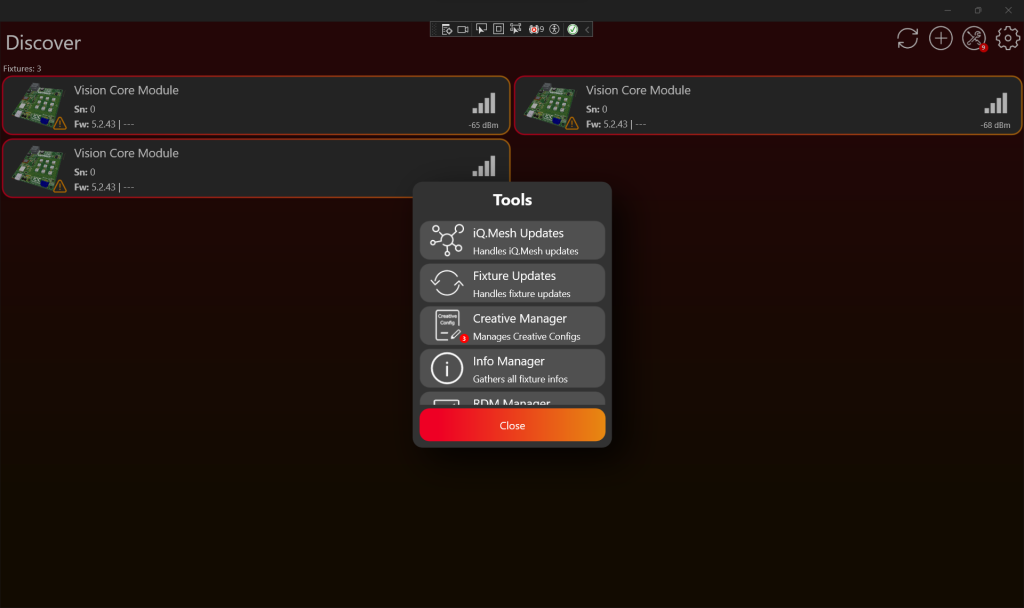
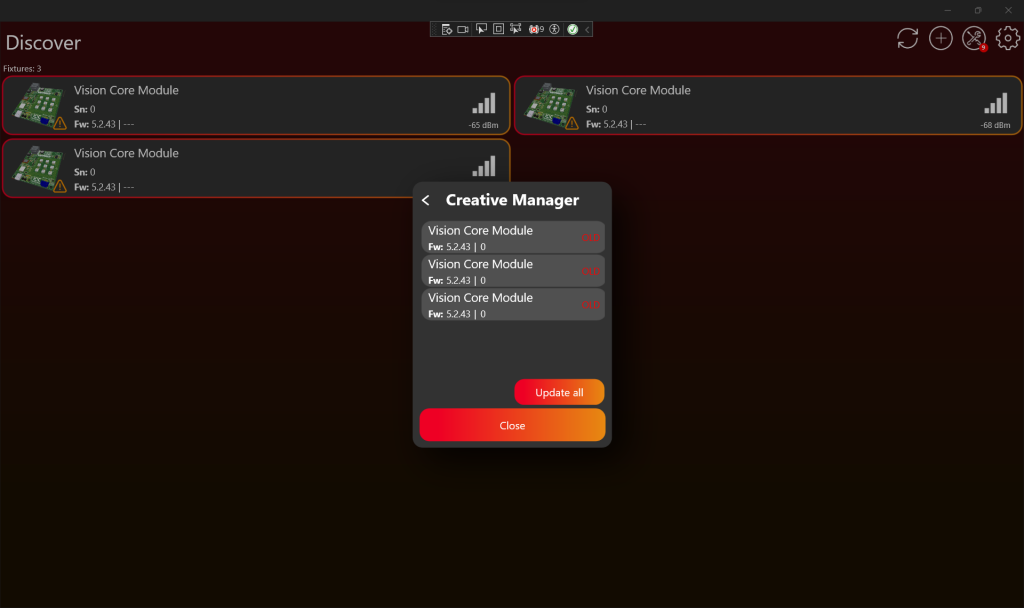
Update 后
直接在 App Control 中测试 fixture。确认显示的 controls 与产品匹配,并且每个 configured function 都正确响应。完成检查后,继续 production licensing。
生产 - License Vision Modules
83_Production_License_Vision_Modules.html本页说明 production licensing 步骤。Licensing 会为每个实际 fixture 激活一个 production license。请在 fixture 已完成 implementation、verification、Vision App Library 注册,并已写入正确 Vision data 后执行。
检查 license availability
打开 https://server.kk-t.eu/,登录后打开你的 company,并进入 My Licenses。
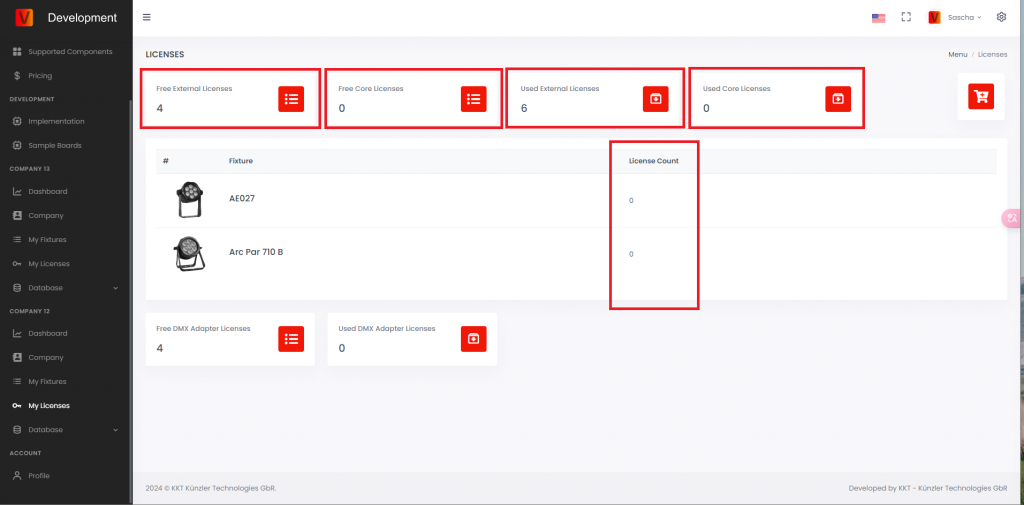
- Free External Licenses: 已购买但尚未使用的 External Vision licenses。License 新的 External Vision fixture 前,该值必须大于 0。
- Free Core Licenses: 已购买但尚未使用的 Core licenses。
- Used External Licenses: 已经被 fixtures 激活使用的 External Vision licenses。
- Used Core Licenses: 已经被 fixtures 激活使用的 Core licenses。
- License Count: 某个 fixture type 已使用的 license 数量。
在 App 中找到未 licensed fixtures
打开 Vision Control App 并 scan fixtures。未 licensed 的 production fixture 可能会显示 warning。该 warning 表示 fixture 已被发现,但在 license 激活前不能正常使用。
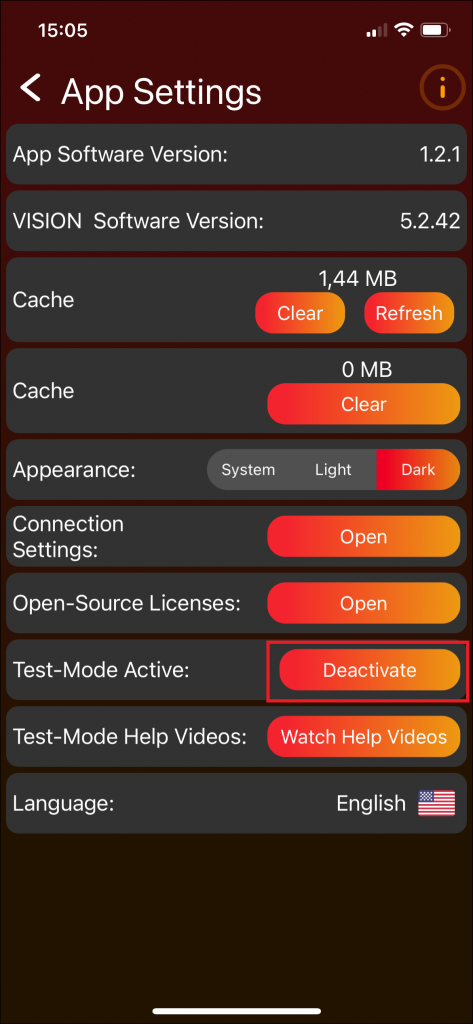
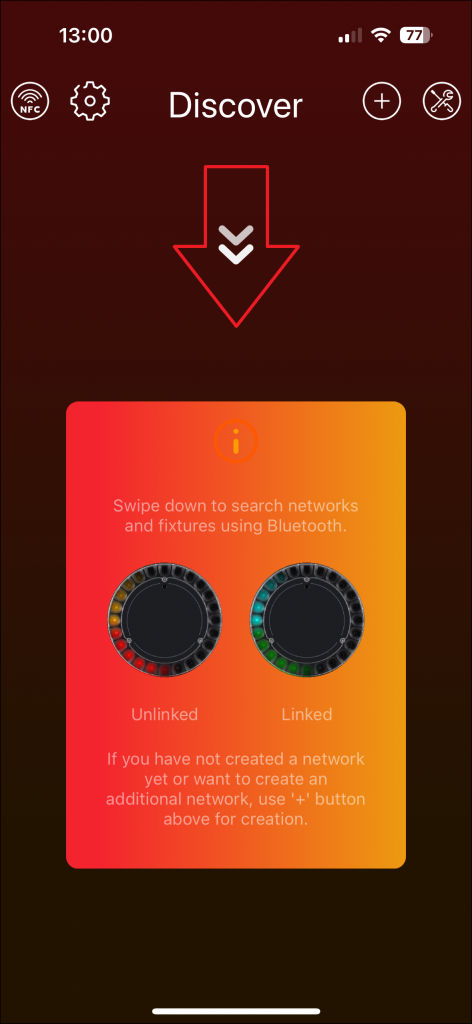
为 fixtures 授权
- 打开 Vision Control App 中的 tools area。
- 打开 License Manager。Red badge 可能表示有 fixtures 等待 licensing。
- 确认 fixture 显示为 licensable。
- 如果列表中的 fixtures 都应被 licensed,使用 License all。
- 等待 App 确认 licensing result。
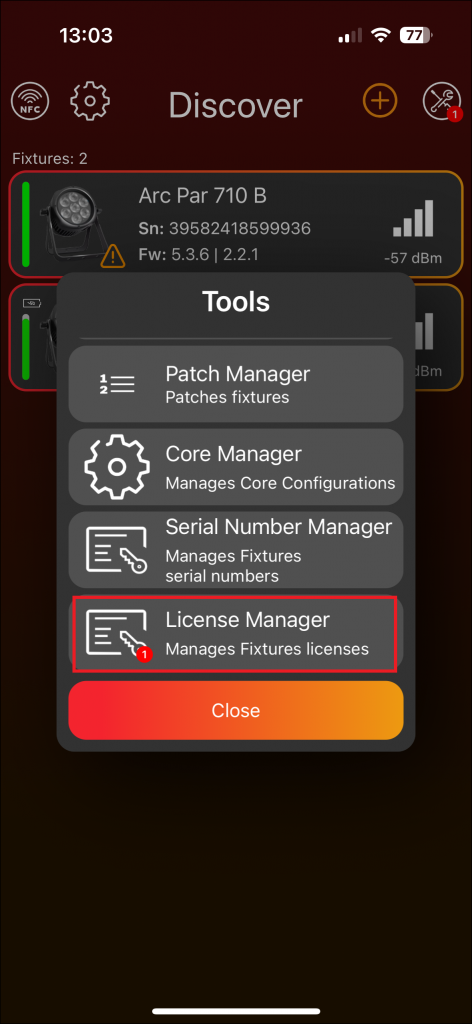
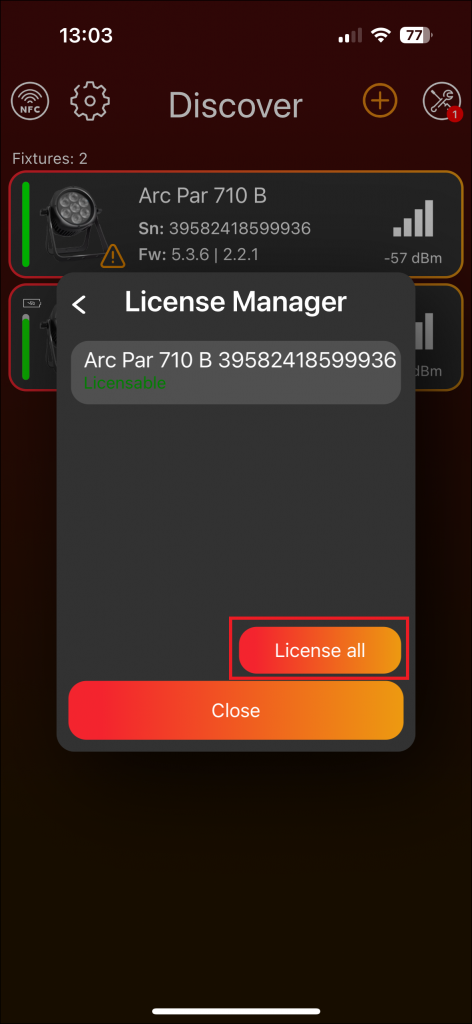
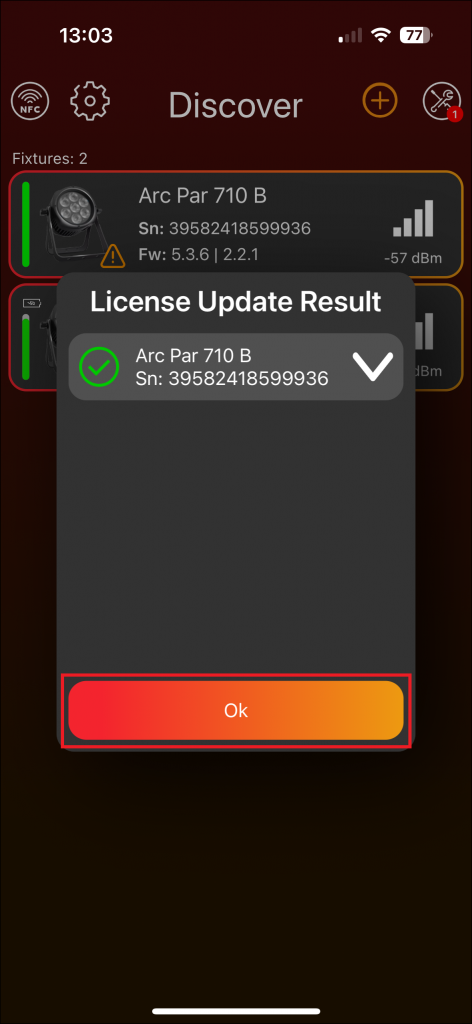
验证 license
Licensing 后,fixture 不应再显示 unlicensed warning,并且可以被 Vision Control App 控制。在 Vision Web Service 上,free license count 会减少,used license count 会增加。
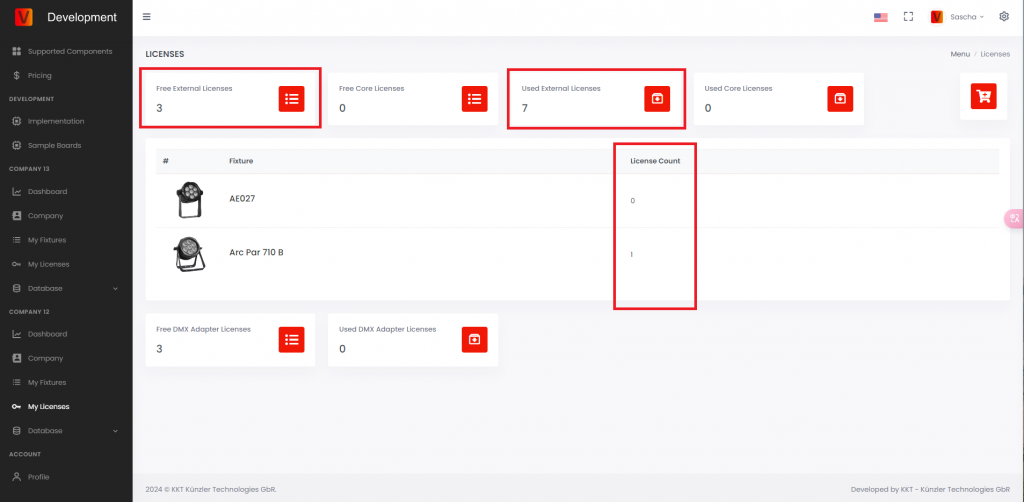
打开 fixture license details,可以查看已 licensed fixtures 的 serial number、RDM ID 和相关信息。